Servings: 12–16 | Prep Time: 25 minutes | Bake Time: 35–40 minutes | Total Time: ~1 hour 10 minutes
Carrot Cake Just Got a Tropical Upgrade — And It’s Unreal
You think you love carrot cake? Wait until you try this Hawaiian Carrot Pineapple Cake. It takes everything you already love about a classic carrot cake and adds juicy pineapple, sweet coconut, and warm spice. The result is something that genuinely stops people mid-bite.
I brought this to a summer cookout last year and went home with an empty dish and four people demanding the recipe. That’s all the endorsement it needs.
What Makes This Hawaiian Carrot Pineapple Cake Different?
Regular carrot cake is great. But this version adds crushed pineapple and shredded coconut to the batter, which completely transforms the texture and flavor profile. The pineapple keeps every slice unbelievably moist — even the day after baking.
The coconut adds a subtle chew and tropical sweetness that makes each bite feel like a little vacation. Paired with tangy cream cheese frosting, this cake hits every flavor note perfectly. You won’t miss plain carrot cake at all.
Ingredients You’ll Need
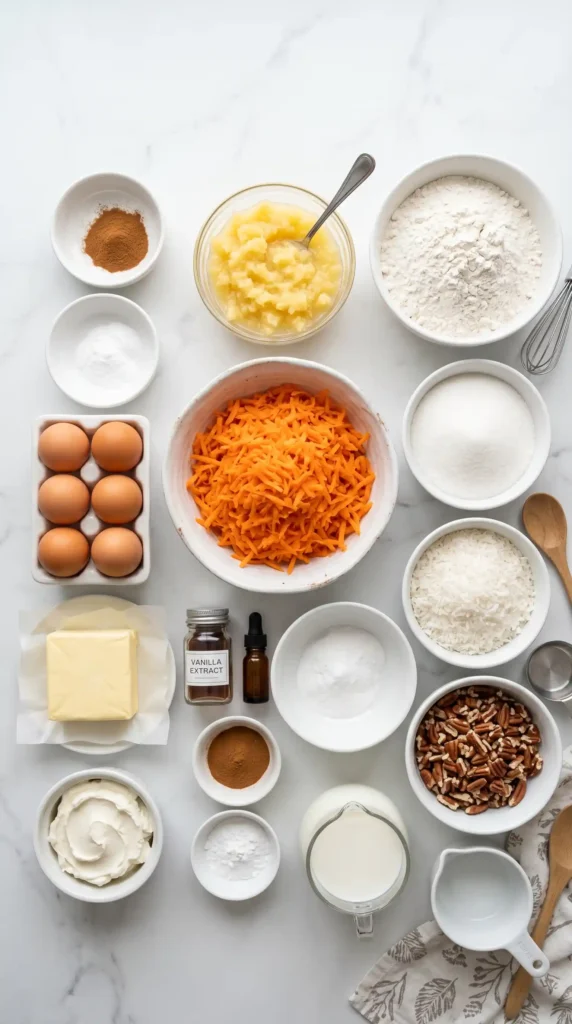
For the Cake
- 2 cups all-purpose flour
- 2 tsp baking soda
- ½ tsp salt
- 2 tsp cinnamon
- 1 cup vegetable oil
- 1½ cups granulated sugar
- 4 large eggs
- 2 tsp vanilla extract
- 2 cups grated carrots
- 1 cup crushed pineapple, drained slightly
- 1 cup sweetened shredded coconut
- 1 cup chopped pecans or walnuts
For the Cream Cheese Frosting
- 8 oz cream cheese, softened
- ½ cup unsalted butter, softened
- 4 cups powdered sugar
- 1 tsp vanilla extract
Optional Garnish
- Toasted coconut
- Chopped pecans
- Pineapple tidbits
One important note: Don’t fully drain the pineapple. Leaving a little juice in there is what makes this cake stay moist for days. Drain it, but not aggressively.
Step-by-Step: How to Make Hawaiian Carrot Pineapple Cake
Step 1: Preheat and Prepare Your Pans
Start by preheating your oven to 350°F (175°C). Grease two 9-inch round cake pans with butter or cooking spray, then line the bottoms with parchment paper circles. This makes removing the layers clean and stress-free.
If you prefer a single-layer cake, a greased 9×13-inch baking pan works just as well. The baking time stays roughly the same, so no adjustments needed. Either way, a well-prepared pan is the difference between a cake that releases cleanly and one that comes out in chunks.
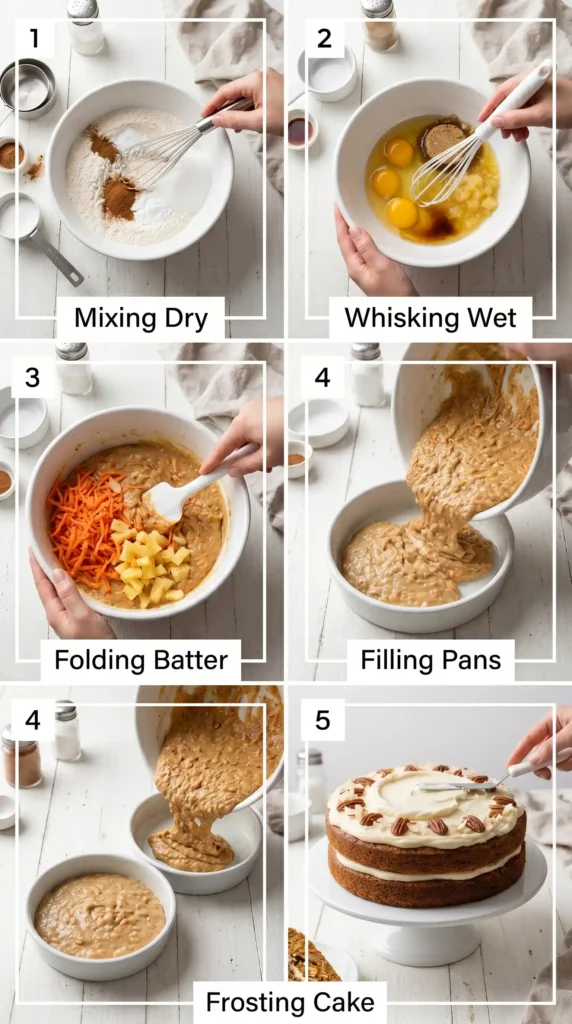
Step 2: Mix the Dry Ingredients
Grab a large mixing bowl and add the flour, baking soda, salt, and cinnamon. Whisk them together thoroughly for about 30 seconds until everything looks evenly combined.
This step matters more than most people realize. Whisking distributes the baking soda and cinnamon evenly through the flour, so you don’t end up with pockets of spice or uneven rise in the finished cake. It takes half a minute — don’t skip it.
Step 3: Whisk the Wet Ingredients
In a separate large bowl, whisk together the vegetable oil, granulated sugar, eggs, and vanilla extract. Beat everything together for about 1 to 2 minutes until the mixture looks smooth, slightly thick, and pale yellow.
The oil is doing important work here. Unlike butter, vegetable oil stays liquid at room temperature, which keeps your cake moist long after it cools. IMO, oil-based cakes simply stay fresher longer than butter-based ones — and this recipe is proof.
Step 4: Fold in the Carrots, Pineapple, and Coconut
Add the grated carrots, crushed pineapple, and shredded coconut directly into the wet ingredient bowl. Stir everything together gently with a rubber spatula or wooden spoon until evenly distributed.
Take a moment to appreciate this part. The batter already smells incredible — sweet, slightly spiced, and tropical all at once. Add the chopped pecans or walnuts at this stage too. Give it one more gentle stir to mix the nuts in without overworking the batter.
Step 5: Combine Wet and Dry Ingredients
Pour the wet mixture into the bowl of dry ingredients. Using a spatula or wooden spoon, fold the two together with slow, deliberate strokes. Scrape the bottom of the bowl as you go to make sure no dry flour hides underneath.
Mix only until you no longer see streaks of dry flour. The moment everything comes together, stop mixing. Overmixing activates gluten and makes your cake dense and chewy instead of tender and soft. A few small lumps in the batter are completely fine — they’ll bake out.
Step 6: Fill the Pans and Bake
Divide the batter evenly between your two prepared cake pans. Use a spatula to spread it into an even layer and smooth the tops. Tap each pan gently on the counter twice to release any trapped air bubbles.
Place both pans on the center rack of your preheated oven. Bake for 35 to 40 minutes. At the 35-minute mark, insert a toothpick into the center of one cake. If it comes out clean or with just 1–2 moist crumbs, the cakes are done. If batter clings to the toothpick, give it another 3–5 minutes and test again.
Once done, remove the pans from the oven and let them cool on a wire rack for 15 minutes before attempting to remove the cakes. Then run a knife around the edge of each pan, flip them out carefully, peel off the parchment paper, and let them cool completely on the rack before frosting. Completely means completely — not slightly warm, not “close enough.”
Step 7: Make the Cream Cheese Frosting
While the cakes cool, make the frosting. Add the softened cream cheese and softened butter to a large mixing bowl. Beat them together with a hand or stand mixer on medium speed for 2 full minutes until smooth and creamy with no lumps.
Reduce the mixer speed to low and gradually add the powdered sugar, about ½ cup at a time. Adding it all at once creates a cloud of sugar dust and can cause the frosting to clump. After each addition, mix until incorporated before adding the next.
Once all 4 cups of powdered sugar are in, add the vanilla extract and increase the speed to medium-high. Beat for another full minute. The frosting should be thick, creamy, and hold its shape. If it feels too soft, refrigerate it for 15 minutes before using.
Step 8: Assemble and Frost the Cake
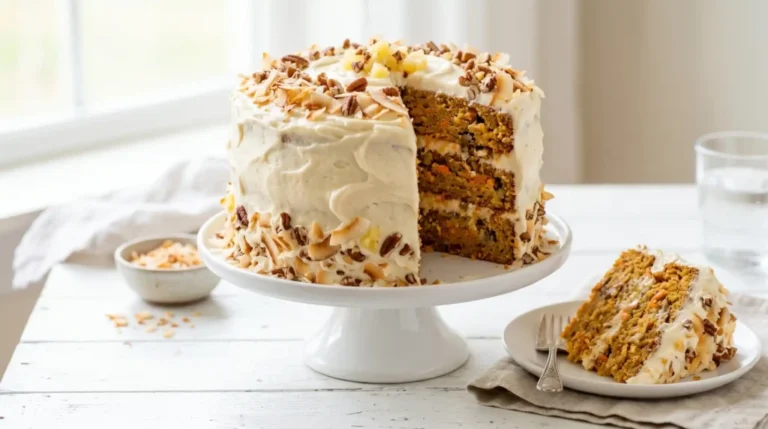
Place one cooled cake layer on your serving plate or cake stand. Spread a generous layer of cream cheese frosting over the top — about ¾ to 1 cup — using an offset spatula or the back of a spoon. Spread it evenly all the way to the edges.
Set the second cake layer on top, pressing it down gently so it sits level. Apply the remaining frosting to the top and sides of the cake. You don’t need to be perfectly smooth — a more rustic, textured finish actually looks beautiful on this cake.
Garnish with toasted coconut, chopped pecans, or a few pineapple tidbits if you want to make it look extra impressive. It takes two minutes and makes the whole thing look bakery-quality.
Tips for the Best Hawaiian Carrot Pineapple Cake
- Grate carrots fresh. Pre-shredded carrots from a bag are too dry and coarse. Fresh-grated carrots release moisture into the batter and add the right texture.
- Drain pineapple — but not completely. Too much juice makes the batter too wet and the cake won’t set properly. Too little makes it dry. Aim for “mostly drained.”
- Room-temperature cream cheese and butter are non-negotiable for frosting. Cold cream cheese leaves lumps that no amount of mixing can fix.
- Toast the coconut garnish. Spread shredded coconut on a baking sheet at 325°F for 5–7 minutes until golden. It adds crunch and nutty flavor that fresh coconut just doesn’t have.
- Cool the cake fully before frosting. A warm cake melts the frosting and causes it to slide right off. Patience pays off here.
Can You Make This Cake Ahead of Time?
Absolutely — and honestly, you should. FYI, this cake tastes even better the next day once the flavors have had time to settle and meld together. The pineapple and coconut keep the crumb incredibly moist overnight.
Store the frosted cake covered at room temperature for up to 2 days, or refrigerate it for up to 5 days. Bring refrigerated slices back to room temperature before serving — cold cream cheese frosting loses that silky, creamy texture.
You can also bake the cake layers up to 2 days ahead and store them wrapped tightly in plastic wrap at room temperature, then frost the day you serve.
Common Variations Worth Trying

This recipe is already outstanding, but here are a few tweaks worth experimenting with:
- Swap walnuts for macadamia nuts for an even more Hawaiian-inspired flavor.
- Add ½ tsp ground ginger to the dry ingredients for extra warmth and spice.
- Stir in ½ cup golden raisins to the batter for pops of sweetness throughout.
- Make it a sheet cake in a 9×13 pan instead of two rounds — perfect for large gatherings.
- Add pineapple jam between layers for an even more intense tropical flavor.
FAQs About Hawaiian Carrot Pineapple Cake
Can I use fresh pineapple instead of canned?
Yes, but you’ll need to chop it very finely and drain off as much juice as possible. Fresh pineapple has more moisture than canned, so err on the side of over-draining to prevent the batter from getting too wet.
Do I have to use nuts in this cake?
Not at all. If you have guests with nut allergies or you just prefer a smoother texture, simply leave the pecans or walnuts out. The cake bakes perfectly fine without them.
Why did my cream cheese frosting turn out runny?
This almost always comes down to ingredient temperature. If your cream cheese or butter was too warm or slightly melted, the frosting won’t hold its structure. Refrigerate the frosting for 20–30 minutes, then beat it again — it should firm up nicely.
Can I make this cake gluten-free?
Yes. Substitute a 1:1 gluten-free all-purpose flour blend for the regular flour. The texture will be slightly different but still delicious. Make sure your baking soda is also certified gluten-free if that’s a concern.
How do I store leftover cake?
Store leftover slices in an airtight container in the refrigerator for up to 5 days. For longer storage, freeze unfrosted cake layers wrapped tightly in plastic wrap and aluminum foil for up to 2 months. Thaw overnight in the fridge before frosting and serving.
Final Thoughts
This Hawaiian Carrot Pineapple Cake earns a permanent spot in your recipe collection — no question. It’s moist, warmly spiced, and loaded with tropical flavor from real pineapple and coconut. The cream cheese frosting pulls everything together perfectly.
Whether you’re making it for a holiday table, a summer cookout, or just a random Tuesday when you feel like baking something spectacular, this cake delivers every single time. Go make it. Your kitchen is about to smell incredible.
Hawaiian Carrot Pineapple Cake
Ingredients
Method
- Preheat your oven to 350°F (175°C). Grease two 9-inch round cake pans with butter or cooking spray and line with parchment paper.
- If using a single-layer cake, a greased 9×13-inch baking pan can be substituted without changing the baking time.
- In a large bowl, whisk together flour, baking soda, salt, and cinnamon for about 30 seconds.
- In another bowl, whisk vegetable oil, granulated sugar, eggs, and vanilla extract until smooth and slightly thick.
- Fold in grated carrots, crushed pineapple, shredded coconut, and chopped nuts to the wet ingredients.
- Pour the wet mixture into the dry ingredients and mix just until combined.
- Divide the batter evenly between prepared pans. Bake for 35 to 40 minutes, checking with a toothpick.
- Let the cakes cool in the pans for 15 minutes before transferring to a wire rack to cool completely.
- Beat cream cheese and butter together until smooth. Gradually add powdered sugar and vanilla extract.
- Place one cake layer on a serving plate, spread frosting on top, layer the second cake, and frost the entire cake.
- Garnish with toasted coconut, chopped pecans, or pineapple tidbits if desired.