Servings: 12 cupcakes | Prep Time: 30 minutes | Cook Time: 20 minutes | Total Time: 50 minutes
Some desserts look like they took a professional pastry chef and a full afternoon to pull off. These cupcakes are not that, even though they’ll absolutely trick your guests into thinking otherwise.
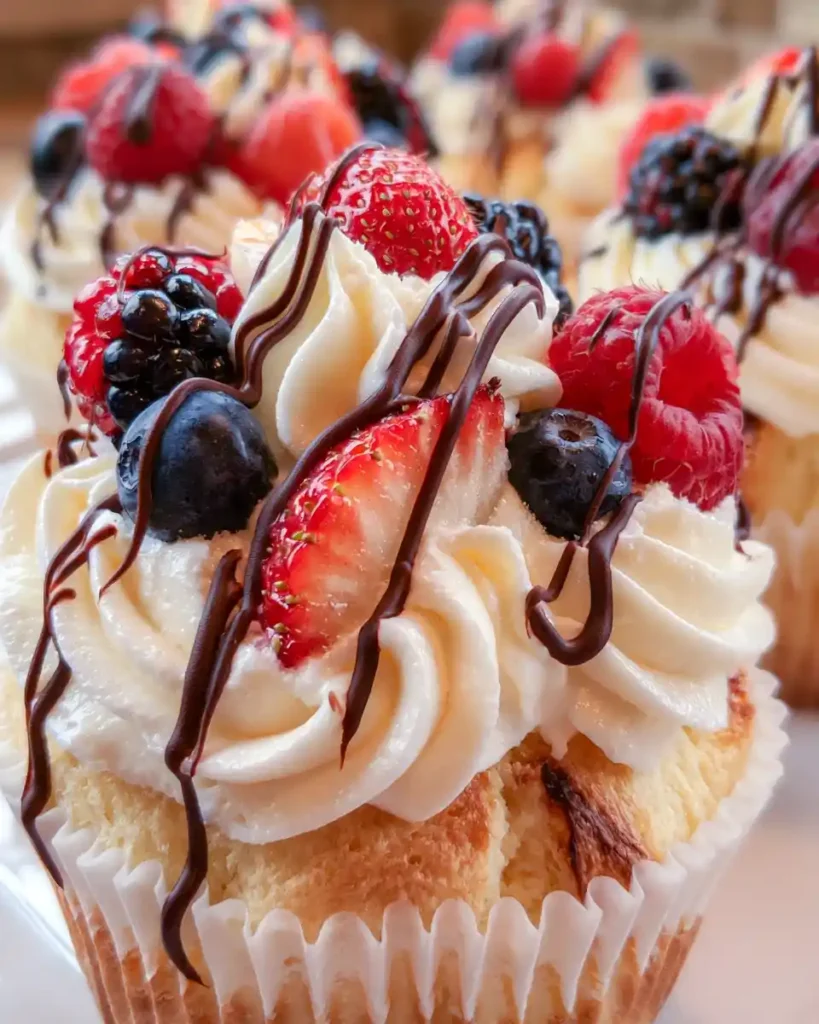
Berries & Cream Cupcakes stack a fluffy vanilla base, a cloud of whipped cream, and a pile of fresh berries into one seriously impressive bite. Have you ever wanted dessert that looks harder than it actually is? Same.
I started making these for a summer birthday party when I had zero time and even less patience for fondant. They stole the whole dessert table, and honestly, they still do every single time.
Why You’ll Love These Berries & Cream Cupcakes
A good cupcake recipe earns repeat status for a reason. This one checks every box without demanding a culinary degree to pull off.
- Fast turnaround — ready in about 50 minutes total
- Light, airy crumb — thanks to whipped egg whites folded in just right
- Fresh berry flavor — no artificial anything, just real fruit on top
- Crowd-pleasing presentation — these look like bakery-level work
Isn’t it satisfying when a recipe looks way more complicated than it actually is? IMO, that’s the best kind of dessert to have in your back pocket.
Ingredients You’ll Need
Nothing here requires a special trip to a baking specialty shop. Just standard pantry staples plus fresh berries doing the real work.
For the cupcakes:
- ½ cup unsalted butter, softened
- 1 cup granulated sugar
- 1 ½ cups all-purpose flour
- 2 tablespoons cornstarch
- ¼ teaspoon salt
- 1 ½ teaspoons baking powder
- ½ cup milk
- 1 teaspoon vanilla extract
- 3 large egg whites
For the whipped cream topping:
- 1 cup heavy whipping cream
- 2 tablespoons granulated sugar
- ¼ teaspoon almond extract
Now For topping:
- 1 ½ cups fresh mixed berries
- ¼ cup semi-sweet chocolate, melted, for drizzling
Frozen berries work in a pinch too. Just thaw and drain them well first, or you’ll end up with a soggy mess instead of a pretty topping.
How to Make Berries & Cream Cupcakes, Step by Step
Ready to bake something that punches way above its effort level? Let’s break this down into manageable, no-stress steps.
Step 1: Preheat and Prep Your Pan
Set your oven to 375°F and let it fully heat before you start mixing anything. Line a standard 12-cup cupcake pan with paper liners, or lightly grease it if you’re skipping liners entirely.
Getting this part done early means you’re not scrambling once your batter is ready to go. Nobody wants melted batter sitting around while the oven catches up.
Step 2: Whip the Egg Whites
In a clean, dry mixing bowl, beat the egg whites with an electric mixer until stiff peaks form. You’ll know they’re ready when the peaks hold their shape and don’t flop over when you lift the beaters.
This step matters more than it seems. Properly whipped egg whites are what give these cupcakes their light, airy texture instead of a dense, heavy crumb.
Step 3: Cream the Butter and Mix the Wet Ingredients
In a large bowl, beat the softened butter until it turns pale and fluffy, roughly two minutes with an electric mixer. Add the sugar, vanilla extract, and milk, then beat again until fully combined and smooth.
Room temperature butter matters here. Cold butter refuses to blend smoothly, leaving you with lumpy batter and uneven cupcakes.
Step 4: Combine the Dry Ingredients
In a separate bowl, whisk together the flour, cornstarch, salt, and baking powder until evenly distributed. This step prevents pockets of baking powder from creating weird bitter spots in your finished cupcakes.
Gradually add the dry mixture into the wet ingredients, mixing on low speed just until combined. Stop as soon as the flour disappears — overmixing here toughens the crumb instead of keeping it tender.
Step 5: Fold in the Egg Whites
This is the step that makes or breaks your cupcake texture, so slow down here. Add about a third of your whipped egg whites into the batter first, stirring normally to loosen the mixture slightly.
Add the remaining egg whites and fold gently using a spatula, scooping from the bottom of the bowl up and over. Stop folding as soon as no white streaks remain visible, since overworking the batter deflates all that airy structure you just built.
Step 6: Fill and Bake
Divide the batter evenly among your lined cupcake cups, filling each about two-thirds full. Overfilling causes overflow and misshapen tops, so resist the urge to pile it high.
Bake for about 20 minutes, checking doneness with a toothpick inserted into the center. It should come out clean or with just a few dry crumbs clinging to it, and the tops should look lightly golden.
Step 7: Cool Completely
Remove the cupcakes from the oven and let them sit in the pan for five minutes before transferring to a wire rack. Cool them completely before adding any toppings — warm cupcakes melt whipped cream instantly, and that’s a mess nobody enjoys.
Step 8: Whip the Cream
While the cupcakes cool, chill your mixing bowl and beaters in the freezer for about ten minutes. Cold equipment makes a real difference when whipping cream properly.
Add the heavy whipping cream, sugar, and almond extract to the chilled bowl. Beat on medium-high speed until stiff peaks form, watching closely so you don’t accidentally churn it into butter.
Step 9: Assemble the Cupcakes
Once everything’s fully cooled, top each cupcake with a generous dollop or piped swirl of whipped cream. Add a handful of fresh mixed berries on top, arranging them however looks prettiest to you.
Finish with a light drizzle of melted semi-sweet chocolate over each cupcake. That final touch turns a simple cupcake into something that looks straight out of a bakery display case.
Tips for Success
Small details make a noticeable difference in how these turn out:
- Use room temperature butter, milk, and eggs for the smoothest batter
- Chill your bowl and beaters before whipping cream for better results
- Don’t overmix once the flour and egg whites go in
- Frost only after cupcakes are fully cooled
- Store finished cupcakes in the fridge and eat within a few days
Variations Worth Trying
Once you’ve nailed the base recipe, there’s plenty of room to make it your own.
- Gluten-free version: swap in a 1:1 gluten-free flour blend
- Lower sugar option: use a sugar substitute like erythritol or stevia
- Berry swap: try blackberries, raspberries, or even chopped mango
- Dairy-free adaptation: use coconut oil, dairy-free milk, and coconut whipped cream
- Chocolate lovers’ twist: add cocoa powder to the batter for a chocolate base
Serving Suggestions
These cupcakes shine on their own, but a few pairings make them feel extra special.
- A glass of iced tea or fresh lemonade alongside
- A scoop of vanilla ice cream for an over-the-top treat
- Displayed on a cake stand for parties and gatherings
- Extra berries scattered around the serving plate for color
Frequently Asked Questions
Can I use frozen berries for these cupcakes? Yes, frozen berries work fine as a topping. Thaw them completely and drain off excess liquid first, or the moisture will make your whipped cream slide right off.
How should I store leftover Berries & Cream Cupcakes? Keep them in the refrigerator in an airtight container, since the whipped cream topping needs to stay cool. They taste best within two to three days of baking.
What can I substitute for almond extract? Plain vanilla extract works as an easy swap. You’ll lose the subtle nutty note, but the whipped cream still tastes great.
How do I keep my cupcakes light and fluffy? Whip the egg whites to true stiff peaks and fold them in gently rather than stirring aggressively. Overmixing at any stage is the fastest way to end up with dense cupcakes.
Can I bake these cupcakes ahead of time? Absolutely. Bake the cupcakes a day or two ahead and store them unfrosted in an airtight container. Add the whipped cream, berries, and chocolate drizzle right before serving for the freshest presentation.
Final Thoughts
Berries & Cream Cupcakes prove that impressive desserts don’t require complicated techniques or hours of standing at the counter. A light vanilla base, real whipped cream, and fresh fruit do all the heavy lifting here.
Next time you need a dessert that looks like way more effort than it took, reach for this recipe. Your kitchen will smell incredible, and honestly, nobody needs to know how easy it actually was.



