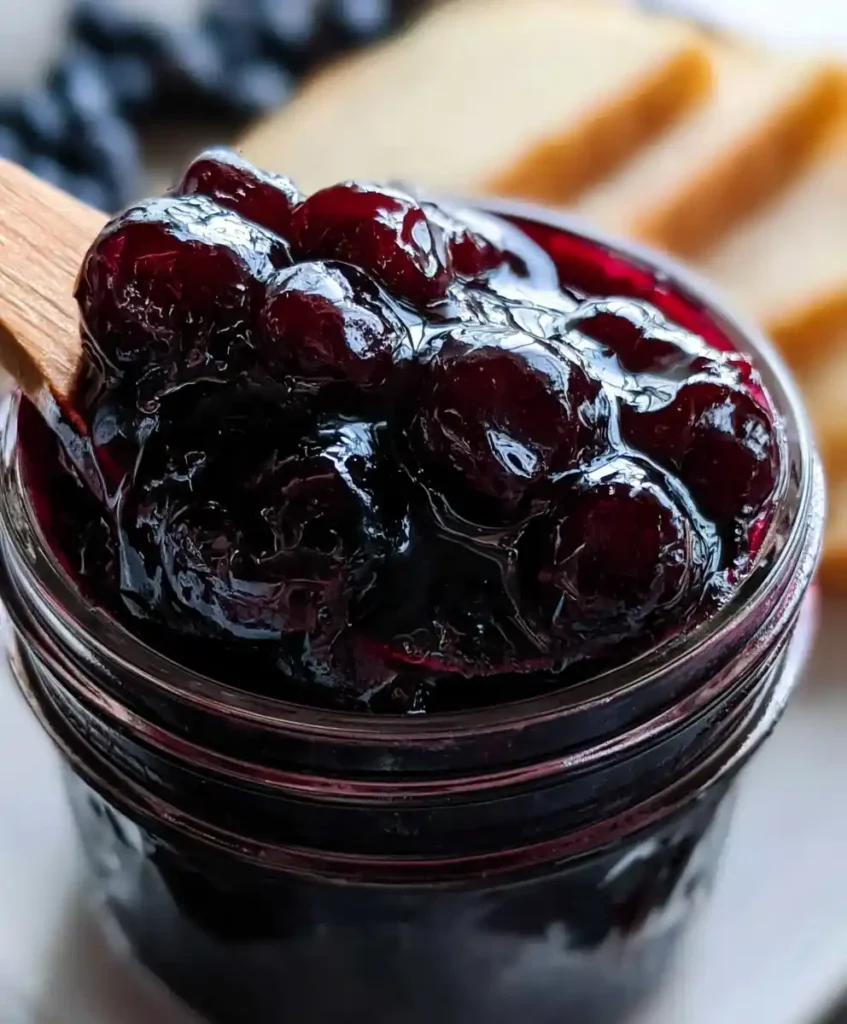
Grab a spoon and get ready, because once you taste homemade Blueberry Jam, the grocery store jar starts looking pretty sad by comparison.
Servings: Makes about 3 cups (24 tablespoons) Prep Time: 10 minutes Cook Time: 20 minutes Total Time: 30 minutes
I started making this jam after getting tired of paying premium prices for jars half full of corn syrup. Turns out, real Blueberry Jam takes barely any effort at all.
Why This Blueberry Jam Recipe Works
Have you ever wondered why homemade jam tastes so much brighter than the stuff on grocery shelves? It comes down to fresh fruit and honest ingredients, no preservatives required.
Here’s what makes this recipe worth your time:
- Ready in 30 minutes — no all-day canning marathon needed
- Just five ingredients — nothing you can’t pronounce or find nearby
- No pectin required — blueberries and lemon juice do the thickening work
- Freezer and fridge friendly — keep it around for weeks, not days
Ingredients You’ll Need
Here’s your shopping list for this Blueberry Jam. Simple stuff, big flavor payoff.
- 4 cups fresh or frozen blueberries
- 1½ cups granulated sugar
- 1 tablespoon lemon zest
- 3 tablespoons lemon juice
- ¼ teaspoon salt
That’s the whole lineup. Five ingredients between you and a jar of pure blueberry magic.
How to Make Blueberry Jam
Let’s slow down and walk through each stage, because rushing homemade jam is how you end up with a burnt pot.
Step 1: Combine the Blueberries and Sugar
Start by grabbing a medium saucepan, something heavy-bottomed if you’ve got one. Pour in your blueberries first, followed by the granulated sugar. Add the lemon zest, lemon juice, and that small pinch of salt right on top.
Stir everything together gently with a wooden spoon. You’re not trying to mash the berries yet, just combining them evenly. The sugar will start pulling moisture out of the berries almost immediately, and that’s exactly what you want.
Let the mixture sit for a minute or two before turning on the stove. This gives the sugar a head start on dissolving. IMO, this tiny pause makes a noticeable difference in the final texture.
Step 2: Bring the Mixture to a Boil
Place your saucepan over medium-high heat. Stir the mixture frequently so nothing scorches on the bottom. Within a few minutes, you’ll see it start bubbling vigorously across the whole surface.
This rolling boil matters because it dissolves the remaining sugar and starts breaking down the fruit’s natural pectin. Keep stirring throughout this stage, since blueberry mixtures can stick fast once they heat up. Your kitchen should start smelling incredible right about now.
Watch for foam building up on the surface as it boils. Skim it off with a spoon if it gets thick. This foam is just air bubbles and impurities, and removing it keeps your jam looking clear and glossy.
Step 3: Simmer Until Thickened
Once you’ve got a strong boil going, drop the heat down to low. Let the mixture simmer gently for 15 to 18 minutes, stirring every couple of minutes so it doesn’t stick. As it cooks, gently press the back of your spoon against some of the berries to release their juices.
You’re looking for a syrupy consistency, similar to warm honey but flecked with soft fruit. If you own a candy thermometer, aim for around 220 degrees Fahrenheit, which signals the jam has hit its setting point. No thermometer? No problem, just do the classic plate test.
For the plate test, chill a small plate in the freezer beforehand. Drop a spoonful of the hot jam onto it, wait thirty seconds, then push it with your finger. If it wrinkles and holds its shape, your jam is ready to come off the heat.
Step 4: Cool and Store the Jam
Pull the saucepan off the heat and let it rest for about 10 minutes. This short cooling period lets the jam thicken further before you transfer it anywhere. Skipping this step usually means runnier jam once it’s in the jar.
Once it’s cooled slightly, spoon the jam into clean glass jars, leaving a little space at the top. Screw the lids on while the jam is still warm, then let the jars sit at room temperature until fully cooled. After that, move them straight into the fridge.
Give the jam at least 24 hours in the fridge before digging in, since it continues thickening as it chills. Is waiting a full day going to test your patience? Absolutely. Is it worth it? Every single time.
Tips for the Best Blueberry Jam
A few lessons I’ve picked up after more batches than I care to admit.
- Choose plump, deeply colored berries for the most concentrated flavor
- Don’t skip the lemon juice, since it helps the jam set properly
- Stir constantly once the mixture starts boiling to avoid scorching
- Let the jam cool fully before judging its final thickness
- Label jars with the date so you know when to use them by
Equipment You’ll Need
Nothing fancy required here, just a few kitchen basics.
- Medium saucepan — heavy-bottomed works best to prevent scorching
- Wooden spoon or silicone spatula — for stirring without scratching your pot
- Glass jars with lids — clean and dry before filling
- Candy thermometer — optional, but handy for precision
Fun Variations to Try
Once you’ve nailed the classic version, these twists keep things interesting.
- Mixed berry jam: swap one cup of blueberries for raspberries or blackberries
- Spiced blueberry jam: stir in a pinch of cinnamon or ground cloves
- Vanilla blueberry jam: add a splash of vanilla extract during the last few minutes
- Low-sugar version: replace half the sugar with a granulated sweetener alternative
- Chia seed jam: stir in a tablespoon of chia seeds for natural thickening
Ways to Serve Blueberry Jam
This jam earns its keep well beyond the breakfast table.
- Spread thick on warm buttermilk biscuits or toast
- Swirl into plain yogurt with a handful of granola
- Spoon over vanilla ice cream for an easy dessert
- Layer between cake layers instead of frosting
- Pair with sharp cheddar on a cheese board
Frequently Asked Questions
Can I use frozen blueberries for this jam recipe? Yes, frozen blueberries work great and often cost less than fresh ones. Just add them straight to the pot without thawing first, and expect the cooking time to run a few minutes longer.
How long does homemade blueberry jam last in the fridge? Properly sealed jam keeps well in the fridge for about three weeks. Always use a clean spoon each time you scoop some out, since that keeps bacteria from sneaking into the jar.
Why is my blueberry jam too runny? Runny jam usually means it needs a few more minutes on the stove. Simmer it longer next time, and remember that jam thickens quite a bit more as it cools in the fridge.
Can I make blueberry jam without added sugar? You can substitute honey or a granulated sugar alternative, though the texture and sweetness will shift slightly. Taste as you go and adjust, since natural sweeteners behave a little differently than plain sugar.
Is lemon juice really necessary in this recipe? Lemon juice isn’t optional if you want proper texture. It balances the sweetness and activates the natural pectin in the berries, which is what helps your jam set instead of staying syrupy.
Can this jam be frozen for longer storage? Absolutely. Pour cooled jam into freezer-safe containers, leaving room at the top for expansion. It keeps well for up to six months, so thaw it in the fridge whenever you’re ready to use it.
Final Thoughts on Blueberry Jam
Blueberry Jam turns a handful of simple pantry staples into something you’ll want to spread on everything in sight. It takes half an hour, dirties one pot, and delivers way more flavor than anything from a store shelf.
Give this recipe a try the next time blueberries go on sale, and stash a few jars in your fridge. Once you taste the difference, going back to store-bought jam just won’t feel right anymore.