Servings: 4 wraps | Prep Time: 15 minutes | Cook Time: 15 minutes | Total Time: 30 minutes
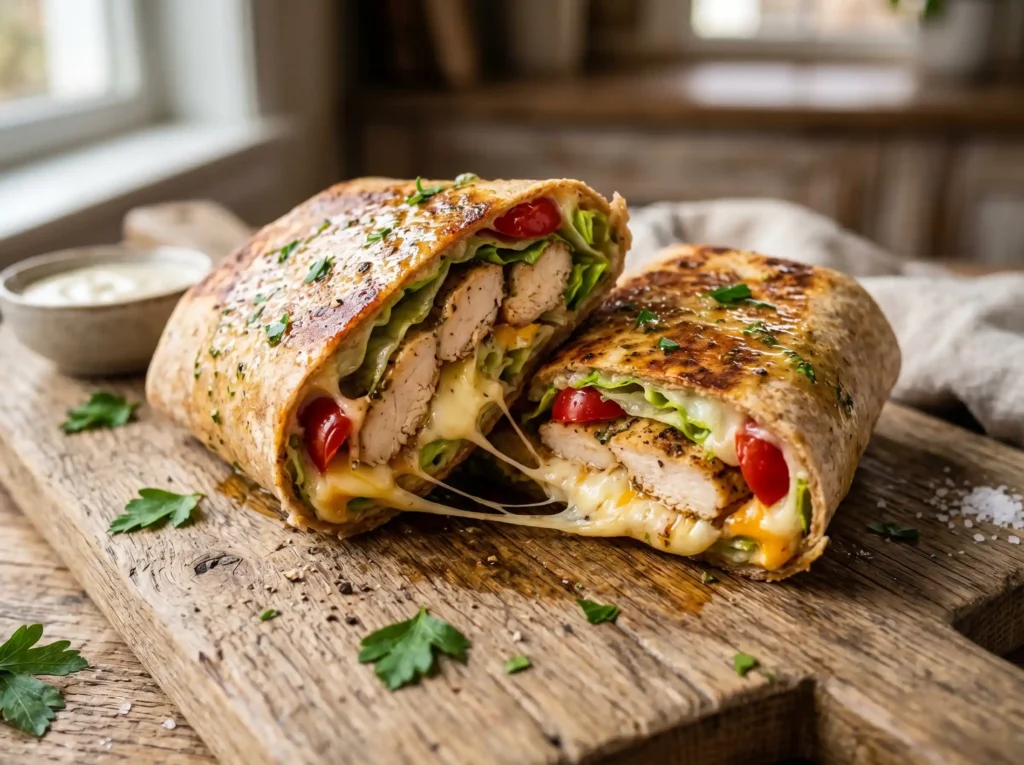
A wrap that actually keeps you full, actually tastes like something, and actually takes less than 30 minutes to make. Cheesy Garlic Chicken Wraps check all three boxes, and honestly that feels like a rare achievement in the weeknight dinner department.
I stumbled onto this combination late one evening with leftover grilled chicken, a block of mozzarella, and garlic butter I had sitting in the fridge. One pan-toasted wrap later, I had a new permanent fixture in my meal rotation.
These wraps are loaded with juicy seasoned chicken, melted cheese, garlic butter, and fresh toppings, all wrapped up and toasted golden on the outside. They are fast, filling, and genuinely delicious. Let us get into exactly how to make them.
Ingredients You Will Need
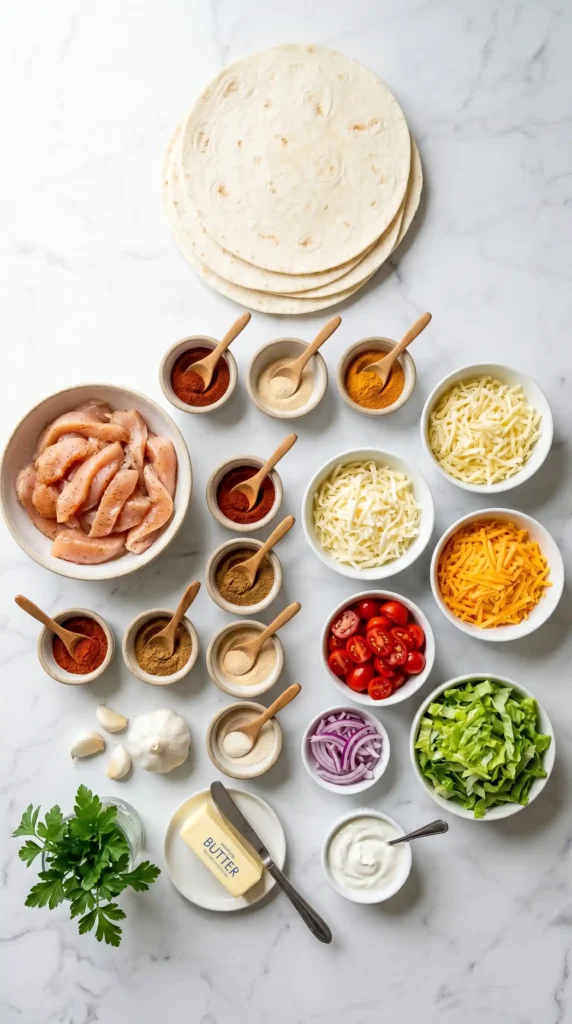
This recipe makes 4 Cheesy Garlic Chicken Wraps. Here is everything you need, with exact quantities:
For the Chicken
- 1.5 lbs boneless skinless chicken breast or thighs, cut into thin strips
- 1 tbsp olive oil
- 1 tsp garlic powder
- 1 tsp smoked paprika
- 0.5 tsp onion powder
- 0.5 tsp cumin
- 0.5 tsp salt
- 0.25 tsp black pepper
- 0.25 tsp cayenne pepper (optional, for heat)
For the Garlic Butter
- 3 tbsp unsalted butter, softened
- 3 garlic cloves, minced
- 1 tbsp fresh parsley, finely chopped
- Pinch of salt
Prepare the Cheese Laye
- 1.5 cups shredded mozzarella cheese
- 0.5 cup shredded sharp cheddar cheese
For the Wrap and Toppings
- 4 large flour tortillas (10-inch size works best)
- 1 cup romaine lettuce, shredded
- 0.5 cup cherry tomatoes, halved
- 0.25 cup red onion, thinly sliced
- 0.25 cup sour cream or Greek yogurt
- 2 tbsp hot sauce (optional)
How to Make Cheesy Garlic Chicken Wraps
This recipe moves quickly once you start, so having everything prepped and ready before you turn on the heat makes the process much smoother. The chicken cooks fast, the garlic butter comes together in seconds, and the assembly takes about 2 minutes per wrap. Here is every step in detail.
Step 1 – Prep and Season the Chicken
Start by cutting your chicken into thin, even strips. Strips cook faster and more evenly than whole breasts, and they also fit much better inside the wrap. Aim for pieces about half an inch wide and 2 to 3 inches long. Consistent sizing means everything finishes at the same time.
Place the strips in a bowl and drizzle the olive oil over them. Add the garlic powder, smoked paprika, onion powder, cumin, salt, black pepper, and cayenne if you are using it. Toss everything together thoroughly so each piece of chicken gets an even coating of the seasoning blend.
Do not skip the cumin. It adds a subtle earthy warmth that rounds out the garlic and paprika beautifully. A lot of people overlook it in chicken seasoning blends, but it genuinely makes a difference here. Let the chicken sit in the seasoning for 5 to 10 minutes if you have time.
Step 2 – Make the Garlic Butter
While the chicken sits, make the garlic butter. Place the softened butter in a small bowl. Add the minced garlic, chopped fresh parsley, and a pinch of salt. Mix everything together with a fork until fully combined and the garlic is evenly distributed throughout the butter.
FYI, softened butter mixes much more easily than cold butter straight from the fridge. If you forgot to take it out ahead of time, microwave it for 8 to 10 seconds just until it softens without melting. You want it spreadable, not liquid.
Set the garlic butter aside at room temperature while you cook the chicken. You will use it in two ways: to toast the tortilla on the outside and to add flavor inside the wrap. Both applications make a big difference to the final result.
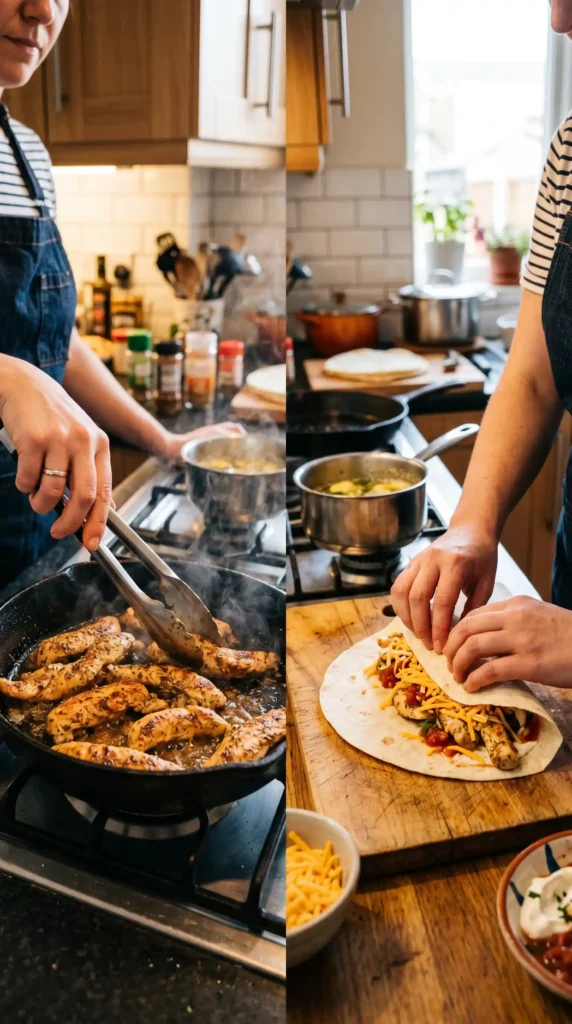
Step 3 – Cook the Chicken
Heat a large skillet or cast iron pan over medium-high heat. You do not need any additional oil because the olive oil coating on the chicken is enough. Once the pan is hot, add the seasoned chicken strips in a single layer without crowding them.
Let the chicken cook undisturbed for 3 to 4 minutes on the first side. Resist the urge to move it around constantly. Leaving it alone lets the surface develop a proper sear, which adds color, texture, and flavor. You will see the edges turning opaque as it cooks through from the bottom up.
Flip the strips and cook for another 2 to 3 minutes on the second side. The chicken is done when it reaches an internal temperature of 165 degrees Fahrenheit and the outside looks golden with slightly charred edges. Remove the pan from heat and let the chicken rest for 2 minutes before assembling.
That resting time keeps the juices inside the chicken instead of running out all over your tortilla. Cutting into chicken the second it comes off the heat is one of the most common mistakes people make. Two minutes is all it takes to make a noticeable difference in juiciness.
Step 4 – Mix the Cheese Blend
Combine the shredded mozzarella and sharp cheddar in a bowl and toss them together. This two-cheese blend is deliberate. Mozzarella gives you the stretchy, gooey melt that makes a wrap feel truly indulgent. Cheddar adds a sharp, tangy flavor that mozzarella alone does not provide.
Have you ever noticed how wraps from fast food places always taste slightly flat on the cheese front? That is because they typically use a single processed cheese. Mixing fresh-shredded mozzarella and cheddar fixes that problem completely.
Step 5 – Assemble the Wraps
Lay one large flour tortilla flat on your work surface. Spread a thin layer of the garlic butter directly onto the tortilla, covering the whole surface right to the edges. This is the inner butter layer, and it infuses the entire wrap with garlic flavor from the inside out.
Sprinkle a generous handful of the cheese blend across the lower two-thirds of the tortilla, leaving the top third clear for folding. Add a quarter of the cooked chicken strips on top of the cheese layer. Scatter some shredded romaine, cherry tomatoes, and red onion over the chicken.
Add a tablespoon of sour cream or Greek yogurt and a drizzle of hot sauce if you like heat. Do not overload the wrap. It is tempting to pile everything in, but overfilled wraps burst at the seams and are impossible to eat neatly. Keep the filling generous but controlled.
To fold: fold the two side edges of the tortilla inward, then roll the bottom edge up and over the filling, tucking it tightly as you go. Keep rolling forward while maintaining firm pressure until the wrap is fully sealed. Press it gently to hold its shape before moving to the pan.
Step 6 – Toast the Wraps in Garlic Butter
This step is what separates a good wrap from a great one. Heat the same skillet over medium heat. Spread a thin layer of the remaining garlic butter across the pan and let it melt. Place the assembled wrap seam-side down in the pan first to seal it shut.
Toast each side for about 2 to 3 minutes, pressing down gently with a spatula to ensure full contact with the pan surface. You are looking for a deep golden crust on the outside with the cheese fully melted and gooey inside. The garlic butter caramelizes on the tortilla surface and creates a flavor that is hard to describe but impossible to forget.
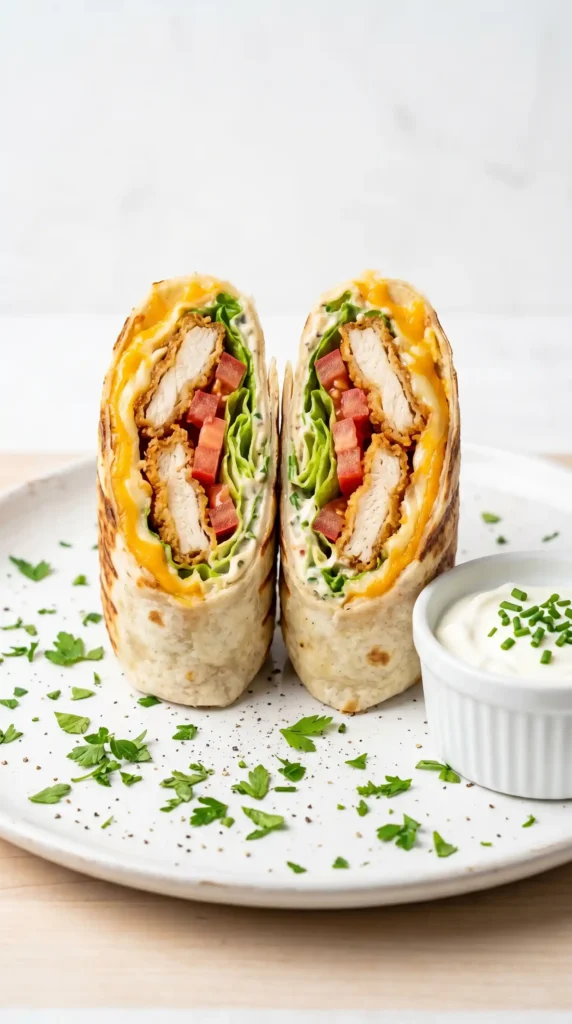
Work through all four wraps, keeping the finished ones warm in a low oven at 200 degrees Fahrenheit while you toast the rest. Serve them whole or sliced diagonally in half, which makes the cross-section look great and makes them easier to handle. 🙂
What to Serve with These Wraps
These Cheesy Garlic Chicken Wraps work well as a standalone meal, but pairing them with a simple side takes things up a notch:
- Crispy sweet potato fries or regular fries
- A simple corn and black bean salad
- Coleslaw with a light vinegar dressing
- Tomato soup for a warm, comforting pairing
- Sliced avocado or guacamole on the side
Tips for Getting These Right Every Time
- Use chicken thighs for extra juiciness if you find breast tends to dry out.
- Shred your own cheese from a block. Pre-shredded bags contain anti-caking agents that prevent smooth melting.
- Do not skip toasting the wrap. It transforms the texture and seals in all the fillings.
- Use room temperature tortillas. Cold tortillas crack when you try to fold them tightly.
- Rest the chicken before assembling. Always. Every single time.
Easy Variations to Try
IMO, the base recipe is already excellent, but these tweaks are all worth experimenting with:
- BBQ Chicken Version: Toss the cooked chicken in 2 tbsp of your favorite barbecue sauce before assembling.
- Southwest Style: Add black beans, corn, and swap sour cream for chipotle mayo.
- Low Carb Version: Use large lettuce leaves instead of flour tortillas. Skip toasting and serve fresh.
- Vegetarian Version: Replace the chicken with sliced portobello mushrooms seasoned the same way and sauteed until golden.
Why These Wraps Work So Well
The garlic butter is doing the heavy lifting in this recipe, and it works on two levels. Inside, it adds richness directly into the filling. Outside, it caramelizes against the pan and creates a savory, golden crust that makes the whole thing feel like something you would pay for at a restaurant.
The two-cheese blend keeps the filling interesting. The chicken seasoning adds depth without overwhelming the other flavors. And the fresh toppings provide contrast to all the richness. Every component has a job, and every component shows up.
These Cheesy Garlic Chicken Wraps are balanced, fast, and satisfying in a way that very few weeknight meals manage to be. That is why this recipe keeps earning a spot on the weekly rotation.
Frequently Asked Questions
Can I use rotisserie chicken instead of cooking fresh?
Yes, and it is a great time-saver. Shred the rotisserie chicken and toss it with the same spice blend plus a small drizzle of olive oil. Warm it in the skillet for 2 to 3 minutes before assembling. The flavor is slightly different but still very good and the whole recipe gets even faster.
How do I keep the tortilla from tearing when I fold it?
Warm the tortilla first. Place it in the dry skillet over low heat for 20 to 30 seconds per side, or microwave it between two damp paper towels for 15 seconds. A warm tortilla is pliable and folds easily without cracking. Cold tortillas are stiff and split under pressure.
Can I make these ahead of time?
You can cook and season the chicken up to 2 days ahead and store it in the refrigerator. Assemble and toast the wraps fresh when you are ready to eat. A pre-assembled untoasted wrap stores for up to 24 hours in the fridge, tightly wrapped in foil. Toast it just before serving.
What is the best cheese for this recipe?
The mozzarella and cheddar blend in this recipe gives the best combination of melt and flavor. If you want to switch it up, pepper jack adds heat and melts beautifully. Gruyere gives a nuttier, more complex flavor. Avoid processed cheese slices as they do not melt as smoothly and the flavor is noticeably flat.
Can I bake these instead of pan-toasting them?
You can. Place assembled wraps seam-side down on a baking sheet, brush the tops with melted garlic butter, and bake at 400 degrees Fahrenheit for 10 to 12 minutes until golden. You will not get quite the same crust as pan-toasting, but they still come out warm, melty, and delicious. :/
Final Thoughts
Cheesy Garlic Chicken Wraps are the kind of meal that makes you wonder why you ever spent money on takeout. They hit every note at once: cheesy, garlicky, savory, fresh, and satisfying, all in one neatly toasted package.
The whole thing comes together in 30 minutes and requires ingredients most people already have at home. Once you nail the garlic butter toasting step, you will not go back to making wraps any other way.
Make them this week. Serve them on a weeknight when you want something fast and good. Share them on a weekend when you want to impress without the effort. Either way, they deliver. You have been warned.

Cheesy Garlic Chicken Wraps
Ingredients
Method
- Start by cutting your chicken into thin, even strips. Aim for pieces about half an inch wide and 2 to 3 inches long.
- Place the strips in a bowl, drizzle olive oil over them, and add the garlic powder, smoked paprika, onion powder, cumin, salt, black pepper, and cayenne pepper if desired. Toss to coat evenly.
- Let the chicken sit in the seasoning for 5 to 10 minutes if time allows.
- In a small bowl, mix together softened butter, minced garlic, chopped parsley, and a pinch of salt until fully combined.
- Set the garlic butter aside at room temperature.
- Heat a large skillet or cast iron pan over medium-high heat.
- Add the seasoned chicken strips in a single layer without crowding, and cook undisturbed for 3 to 4 minutes.
- Flip the strips and cook for another 2 to 3 minutes, or until the chicken reaches an internal temperature of 165°F. Let the chicken rest for 2 minutes.
- Combine shredded mozzarella and cheddar in a bowl and toss to mix well.
- Spread a thin layer of garlic butter onto one tortilla. Sprinkle a handful of cheese across the lower two-thirds, add a quarter of cooked chicken strips, some romaine, cherry tomatoes, and red onion.
- Add a tablespoon of sour cream or Greek yogurt and drizzle with hot sauce if desired.
- Fold the sides inward and roll the bottom edge up tightly, sealing the wrap.
- Heat the skillet over medium heat and melt some garlic butter. Place the assembled wrap seam-side down in the pan.
- Toast each side for 2 to 3 minutes until golden brown and crispy. Keep finished wraps warm while toasting the others.


