Prep Time: 30 minutes | Cook Time: 35 minutes | Servings: 4 (12 rolls)
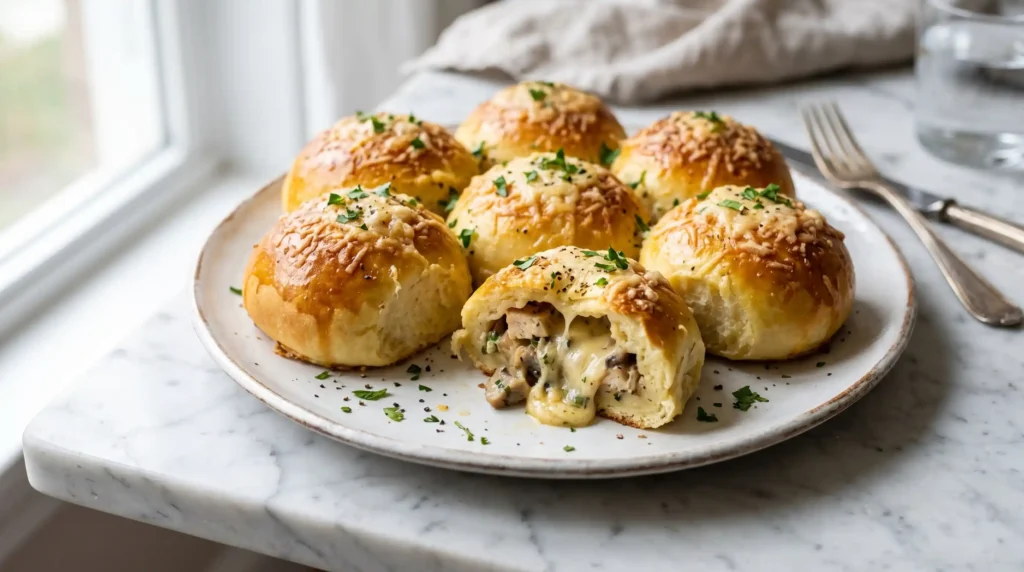
Some recipes stop people mid-conversation. These cheesy potato rolls with chicken mushroom filling are exactly that kind of recipe. Soft potato dough wrapped around a savory, creamy chicken and mushroom filling, then baked until golden. The first time you serve them, someone will ask for the recipe immediately.
I first made these on a whim during a cold weeknight when I had leftover mashed potatoes and some mushrooms threatening to go bad. I threw together a filling, wrapped it in potato dough, and baked the whole thing. My family thought I had been planning this for days. I had not.
If you want a recipe that looks impressive, tastes incredible, and uses ingredients you probably already have, you just found it. These rolls work as a main dish, a party snack, or an anytime comfort food that never overstays its welcome.
What Are Cheesy Potato Rolls With Chicken Mushroom Filling?
These are soft, pillowy rolls made from a potato-based dough wrapped around a seasoned filling of cooked chicken, sauteed mushrooms, onion, garlic, and melted cheese. The potato dough gives these rolls a uniquely tender, slightly dense texture that you simply do not get from standard bread dough.
The filling is rich, savory, and deeply satisfying. Mushrooms bring an earthy, umami depth. Chicken adds protein and body. Cheese ties everything together with that creamy, melty richness. Every bite delivers the dough, the filling, and the cheese all at once. That combination is genuinely hard to beat.
IMO, these beat any stuffed bread or roll you will find at a bakery. The potato dough is what sets them apart. It bakes up golden on the outside and stays incredibly soft on the inside. And making them at home means you control every ingredient from start to finish.
Ingredients You Need
For the Potato Dough
Here is everything for the dough to make 12 rolls, serving 4 people:
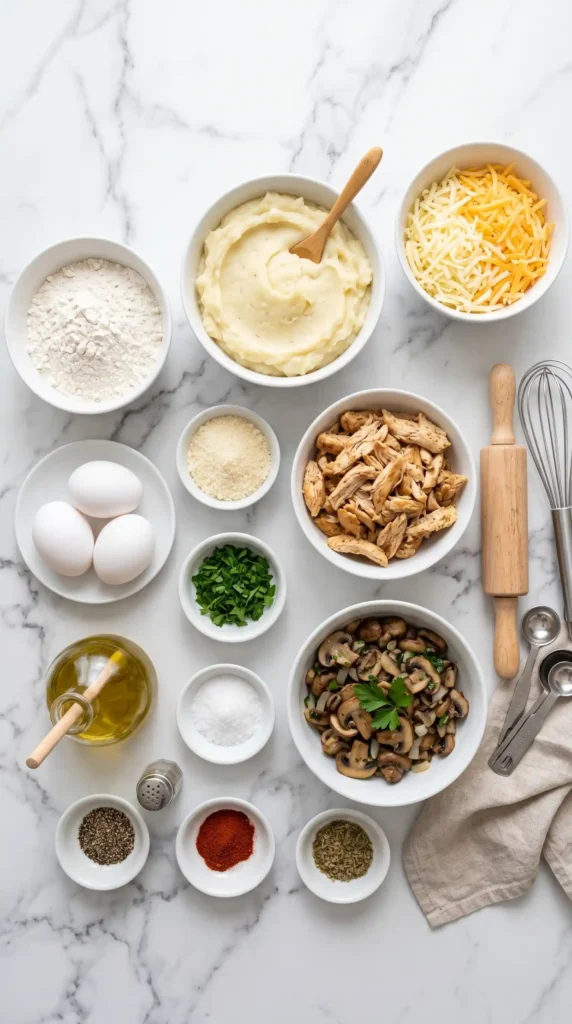
- 2 cups (400g) mashed potatoes, cooled to room temperature
- 2 cups (250g) all-purpose flour, plus extra for dusting
- 1 large egg
- 1/2 teaspoon salt
- 1/2 teaspoon garlic powder
- 1 cup (115g) shredded cheddar or mozzarella cheese, divided
For the Chicken Mushroom Filling
- 1 1/2 cups (225g) cooked chicken breast, shredded or finely diced
- 2 cups (200g) cremini or button mushrooms, finely chopped
- 1 medium onion (about 150g), finely diced
- 3 garlic cloves, minced
- 2 tablespoons (30ml) olive oil or unsalted butter
- 1/2 cup (55g) shredded mozzarella or cream cheese
- 1/2 teaspoon dried thyme
- 1/2 teaspoon paprika
- Salt and black pepper to taste
For the Topping
- 1 egg, beaten (for egg wash)
- 2 tablespoons grated Parmesan cheese
- 1 tablespoon fresh parsley, finely chopped (optional)
FYI, the mashed potatoes should be plain and cooled before you use them. No butter, no cream, no extra mix-ins. Warm or seasoned potatoes change the dough texture significantly. Plain, cooled mash gives you the most consistent, workable dough that rolls out and seals without cracking or sticking.
Equipment You Will Need
- A large mixing bowl
- A medium skillet or saute pan
- A rolling pin
- A baking sheet lined with parchment paper
- A pastry brush for the egg wash
- A sharp knife or pizza cutter
How to Make Cheesy Potato Rolls With Chicken Mushroom Filling
Let us go through every step carefully. These cheesy potato rolls with chicken mushroom filling have two main components: the dough and the filling. Both are straightforward but each has a few key moments that determine whether your rolls come out perfect or just okay. Pay attention and you will nail it.
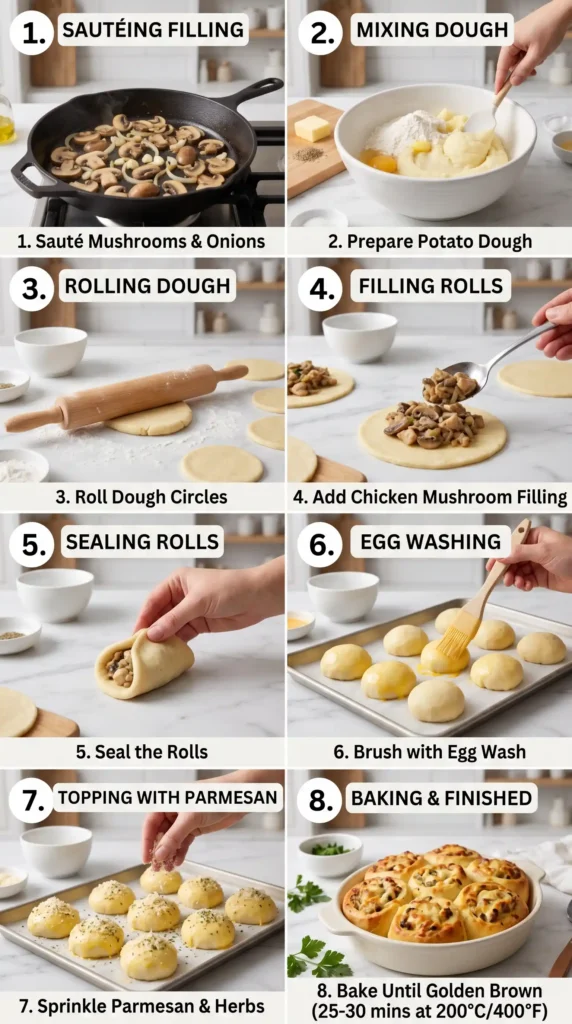
Step 1: Make the Chicken Mushroom Filling
Start with the filling so it has time to cool before you assemble the rolls. Heat 2 tablespoons of olive oil or butter in a medium skillet over medium heat. Once the fat shimmers, add the diced onion and cook for 4 to 5 minutes, stirring occasionally, until softened and slightly translucent.
Add the minced garlic and stir constantly for 30 seconds. Garlic burns quickly and burnt garlic makes the whole filling taste bitter, so watch it closely. You want it fragrant and golden, not brown. This happens fast so keep your spatula moving.
Add the finely chopped mushrooms to the pan. They will release a significant amount of liquid as they cook. Let them cook uncovered over medium-high heat for 6 to 8 minutes, stirring occasionally, until that liquid evaporates completely and the mushrooms look golden and reduced in volume.
Do not rush the mushroom cooking step. Adding cheese or chicken to wet mushrooms creates a soggy filling that leaks out of the rolls during baking. You want the pan looking almost dry before you move forward. Golden, dry mushrooms equal a concentrated, deeply flavored filling.
Add the shredded chicken, dried thyme, paprika, salt, and black pepper. Stir everything together and cook for another 2 minutes to warm the chicken through and blend the flavors. Taste the filling and adjust seasoning. It should taste well-seasoned and savory on its own.
Remove the pan from heat and stir in the shredded mozzarella or cream cheese. The residual heat melts the cheese into the filling, binding everything together into a cohesive mixture. Transfer the filling to a bowl and let it cool to room temperature before assembling. Hot filling tears the dough.
Step 2: Make the Potato Dough
Add the 2 cups of cooled mashed potatoes to a large mixing bowl. Add the egg, salt, and garlic powder. Mix with a fork until combined. The mixture will look slightly lumpy at this stage but that is fine. You just need the egg fully incorporated before adding flour.
Add 1 cup of the shredded cheddar or mozzarella and stir it through. Then add the flour half a cup at a time, mixing after each addition. As the dough forms, it will pull away from the sides of the bowl and start to feel cohesive. Stop adding flour when the dough is soft but no longer sticky.
Turn the dough out onto a lightly floured surface and knead gently for about 1 to 2 minutes. You do not need to knead aggressively here. This is not bread dough. Just a gentle fold and press until the surface looks smooth. Over-kneading develops too much gluten and makes the rolls tough instead of tender.
The dough should feel soft, smooth, and pliable. It should not stick to your hands or the counter with a light flour dusting. If it still feels tacky, add flour one tablespoon at a time. If it feels dry and cracks when you fold it, add a teaspoon of water and knead it in.
Step 3: Roll Out and Fill the Dough
Preheat your oven to 375 degrees F (190 degrees C) and line your baking sheet with parchment paper. Divide the dough into 12 equal portions. Roll each piece into a ball between your palms. Even sizing ensures all the rolls bake at the same rate.
Take one dough ball and flatten it on a lightly floured surface with your rolling pin or the palm of your hand. Roll or press it into a circle about 4 to 5 inches in diameter. You want it thin enough to wrap around the filling without the dough being too thick at the seams.
Place about 1 to 1.5 tablespoons of filling in the center of each dough circle. Do not overfill. Overstuffed rolls burst open during baking because the dough cannot seal under the pressure of expanding filling. Less filling than you think you need is the right amount the first time you make these.
Fold the edges of the dough up and over the filling, pinching them together firmly at the top. Rotate the roll and pinch along any seams to create a fully sealed ball. Place it seam side down on the parchment-lined baking sheet. The seam-down position keeps the roll sealed during baking.
Repeat with all 12 portions. Space the rolls about 2 inches apart on the baking sheet. They will expand slightly in the oven and you want air to circulate around each one for even browning. If they touch during baking, the contact point stays pale instead of golden.
Step 4: Apply the Egg Wash and Topping
Brush each roll generously with the beaten egg wash using a pastry brush. Cover the entire surface of each roll, including the sides. The egg wash is what gives these rolls their beautiful, deep golden color in the oven. Pale rolls are usually the result of skipped or thin egg wash.
Sprinkle a pinch of grated Parmesan over the top of each roll. The Parmesan forms a lightly crispy, savory crust on top that adds both texture and flavor to the finished roll. If you want a little color and freshness, scatter a pinch of finely chopped parsley over the tops as well.
Step 5: Bake Until Golden
Slide the baking sheet into your preheated oven and bake for 25 to 30 minutes. At the 25-minute mark, the rolls should look deeply golden brown on top and the bottoms should feel firm when you gently lift one with a spatula. If they need more color, give them another 3 to 5 minutes.
The internal filling will be hot and the cheese inside fully melted. Let the rolls rest on the baking sheet for 5 minutes before serving. This resting time allows the filling to settle and the structure to firm up slightly so the rolls do not collapse when you bite into them.
How to Serve These Rolls
- With sour cream – the cool tang pairs perfectly with the savory filling
- With a green salad – a simple side salad balances the richness of the rolls
- As a party appetizer – slice each roll in half diagonally for elegant bite-sized portions
- With garlic butter – brush warm rolls with melted garlic butter right before serving
- With tomato soup – the combo of potato rolls and tomato soup is genuinely excellent
Tips for Perfect Results Every Time
- Cool the filling fully – hot filling tears dough and creates steam that opens seams
- Use plain cooled mash – no butter or cream in the potatoes keeps the dough texture consistent
- Do not overfill – 1 to 1.5 tablespoons per roll is the right amount
- Seal seams firmly – pinch hard and place seam side down for rolls that stay closed
- Generous egg wash – cover every surface for that gorgeous golden color
- Space them on the pan – 2 inches apart lets heat circulate and browns all sides evenly
Storage and Reheating

Store leftover cheesy potato rolls in an airtight container in the refrigerator for up to 3 days. Reheat in an oven at 350 degrees F for 10 minutes or in an air fryer at 370 degrees F for 5 to 6 minutes. Both methods restore the crispy exterior.
These rolls also freeze beautifully. Cool them completely, wrap individually in plastic wrap, and store in a freezer bag for up to 1 month. Reheat from frozen at 375 degrees F for 18 to 20 minutes. They come out nearly as good as fresh and make an excellent quick meal option :/.
Frequently Asked Questions
Can I use leftover rotisserie chicken for the filling?
Absolutely. Rotisserie chicken is one of the best shortcuts for this recipe. Shred the meat from the carcass, skip the step of cooking raw chicken, and proceed directly to sauteing the mushrooms and onions. Rotisserie chicken actually adds extra flavor because it is already seasoned. Use both white and dark meat for the richest filling.
Can I make the dough and filling ahead of time?
Yes. Make both components up to 24 hours in advance and store them separately in the refrigerator. Bring the dough to room temperature for 15 minutes before rolling as cold dough cracks more easily. Assemble and bake when ready. This make-ahead approach makes these rolls practical for entertaining without day-of stress.
Why do my rolls burst open during baking?
Two common causes: overfilling and weak seams. Use no more than 1.5 tablespoons of filling per roll and pinch the seams very firmly before placing them seam side down. Also make sure your filling is fully cooled. Hot filling creates steam inside the roll during baking, which builds pressure and forces the seams open.
Can I use a different type of mushroom?
Yes. Cremini and button mushrooms are the most accessible and work perfectly. Shiitake mushrooms add a more intense, earthy flavor if you want something bolder. Portobello mushrooms also work well, just chop them finely. Avoid canned mushrooms if possible since they hold too much water and make the filling soggy even after cooking.
Can I make these without meat for a vegetarian version?
Easily. Replace the chicken with an extra cup of mushrooms and add 1/2 cup of drained, rinsed lentils or finely diced firm tofu for protein and texture. The rest of the recipe stays identical. The filling tastes just as rich and satisfying without the chicken and works beautifully inside the potato dough :).
What type of potato works best for the dough?
Starchy potatoes like Russets or Yukon Golds make the best dough. They mash smoothly and have less moisture than waxy potatoes, which gives you a more workable, less sticky dough. Avoid waxy varieties like red potatoes or new potatoes as they produce a denser, gluier texture that is harder to roll and shape cleanly.
Wrapping Up
These cheesy potato rolls with chicken mushroom filling deliver on every front. The potato dough stays soft and tender. The filling is rich, savory, and loaded with flavor. The cheese ties everything together in the best way possible. And the whole thing comes together in about an hour from scratch.
They work for a weeknight dinner, a weekend gathering, or any moment you want to put something genuinely special on the table without spending the whole day in the kitchen. Once you make these once, you will find yourself planning the next batch before the first batch is even finished.
Preheat that oven, mash those potatoes, and make something worth talking about. Your kitchen is about to smell absolutely incredible and the people at your table will remember this one.

Cheesy Potato Rolls with Chicken Mushroom Filling
Ingredients
Method
- Heat olive oil or butter in a medium skillet over medium heat.
- Add diced onion and cook for 4 to 5 minutes until softened.
- Stir in minced garlic and cook for 30 seconds.
- Add the chopped mushrooms and cook for 6 to 8 minutes until liquid evaporates.
- Stir in chicken, thyme, paprika, salt, and pepper. Cook for 2 minutes.
- Remove from heat and stir in cheese. Let cool before using.
- Combine mashed potatoes, egg, salt, and garlic powder in a bowl.
- Add one cup of shredded cheese and mix.
- Add flour half a cup at a time until dough forms.
- Knead gently for 1 to 2 minutes until smooth.
- Preheat oven to 375°F (190°C) and line a baking sheet with parchment.
- Divide dough into 12 portions and roll into balls.
- Flatten each ball into a circle about 4 to 5 inches in diameter.
- Place 1 to 1.5 tablespoons of filling in the center of each circle.
- Fold edges of dough over filling and pinch to seal.
- Place seam side down on the baking sheet.
- Brush each roll generously with beaten egg.
- Sprinkle Parmesan and parsley on top.
- Bake in preheated oven for 25 to 30 minutes until golden brown.
- Let rolls rest for 5 minutes before serving.