Servings: 16 bombs | Prep Time: 15 minutes | Cook Time: 15 minutes | Total Time: 30 minutes
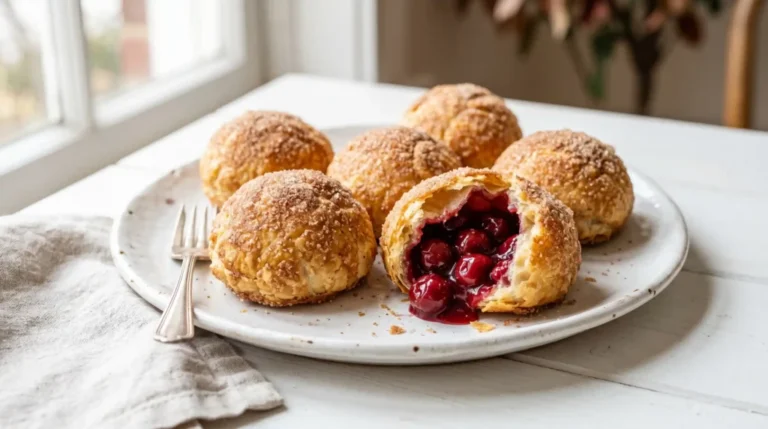
Picture a warm, golden, pillowy dough pocket stuffed with sweet cherry pie filling, coated in cinnamon sugar. That’s a Cherry Pie Bomb, and it’s exactly as good as it sounds. I made these on a whim one Saturday afternoon and genuinely couldn’t stop eating them.
They come together in 30 minutes with ingredients you likely already have. No rolling pins, no pie dishes, no complicated pastry work. Just simple, satisfying, cherry-stuffed perfection that disappears from the plate before it cools down.
What Makes Cherry Pie Bombs So Irresistible
These aren’t just a dessert — they’re an experience. You bite through a soft, buttery shell and hit a burst of warm cherry filling. The cinnamon sugar coating on the outside adds just enough sweetness and crunch to make it complete.
What I love most is how forgiving they are. You don’t need any baking experience to pull these off. If you can open a can and pinch some dough shut, you’ve already mastered the technique.
They work as a dessert, a snack, a party treat, or — and I’m not judging — breakfast. IMO, cherry pie filling on a Saturday morning is a completely valid life choice.
Ingredients You’ll Need
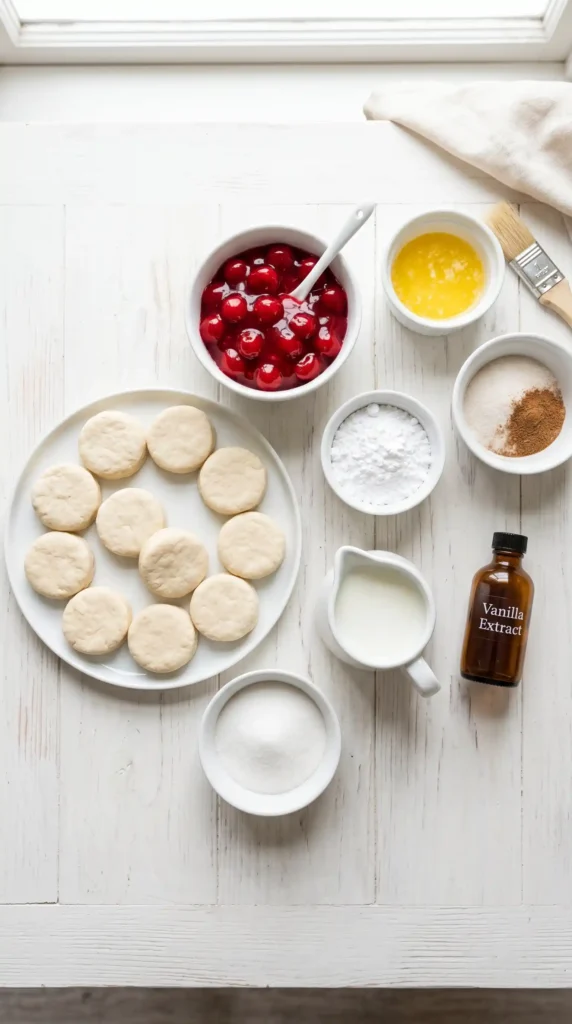
Everything here comes from a standard grocery store. Nothing exotic, nothing that requires a specialty shop.
For the bombs:
- 1 can (16 oz) refrigerated biscuit dough (8 large biscuits, cut in half = 16 pieces)
- 1 can (21 oz) cherry pie filling
- 2 tablespoons unsalted butter, melted
For the cinnamon sugar coating:
- 1/2 cup granulated sugar
- 1 teaspoon ground cinnamon
Optional glaze:
- 1/2 cup powdered sugar
- 1 to 2 tablespoons milk
- 1/4 teaspoon vanilla extract
Twelve ingredients total, and the optional glaze takes less than two minutes to make. Simple, right?
How to Make Cherry Pie Bombs
Step 1: Preheat the Oven and Prep Your Pan
Start by preheating your oven to 375 degrees Fahrenheit. While the oven heats up, line a standard baking sheet with parchment paper or lightly grease it with cooking spray.
Parchment paper is the better option here. It prevents the bottoms from getting too dark and makes cleanup effortless. Without it, melted sugar from the filling can stick stubbornly to the pan and become a real annoyance to scrub off.
Set the prepared baking sheet aside and move on to the dough.
Step 2: Prep the Biscuit Dough
Open the can of refrigerated biscuit dough and separate the biscuits. You should have 8 large biscuits, depending on the brand you buy.
Cut each biscuit in half horizontally through the middle, as if you were splitting a sandwich bun. This gives you 16 thinner rounds of dough, which is the perfect size for individual cherry pie bombs.
If the dough feels stiff or springy when you try to flatten it, let it sit at room temperature for five minutes. Slightly warmer dough is much easier to shape and seal without tearing.
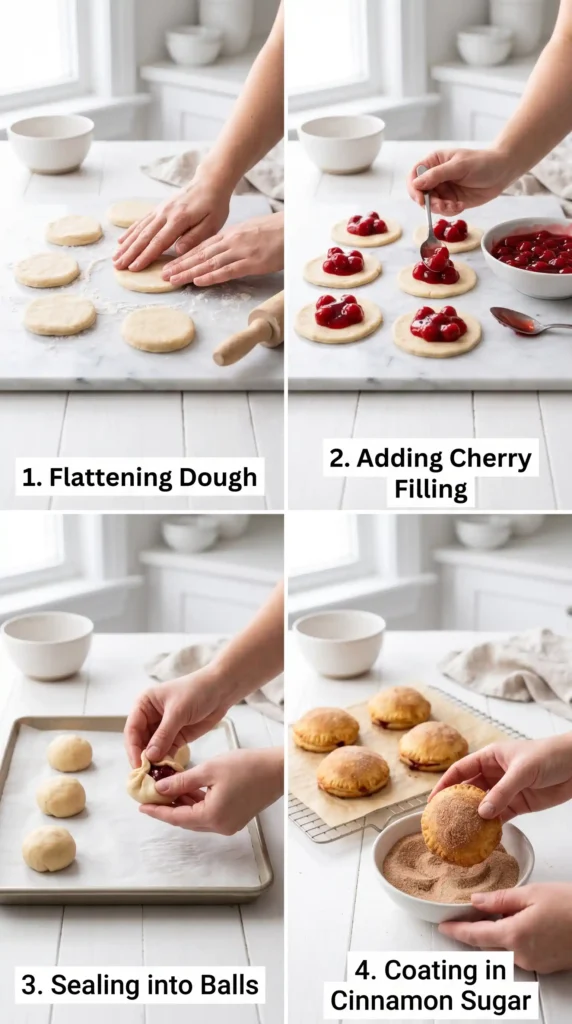
Step 3: Flatten Each Dough Round
Take one dough round and place it on a clean surface. Use your fingers or the palm of your hand to gently press it into a flat circle about 3 to 4 inches in diameter.
You don’t need it perfectly round. A rough circle works just fine — the dough stretches and reshapes as you fill and fold it. The key is making it thin enough to wrap around the filling without tearing at the seams.
Repeat this for all 16 pieces before you start filling them. Working through the flattening step in bulk saves time and keeps your hands from getting sticky mid-process.
Step 4: Add the Cherry Pie Filling
Here’s where things get exciting. Spoon about 1 heaping tablespoon of cherry pie filling onto the center of each flattened dough circle.
Don’t overfill. I know it’s tempting to load them up — the filling smells incredible straight from the can — but too much filling makes the edges impossible to seal. When they bake, an unsealed edge pops open and the filling spills out onto the pan. Not the end of the world, but messy.
Stick to one tablespoon of filling, making sure you get at least one or two whole cherry pieces per bomb. That gives you a proper cherry pocket rather than just a sugary syrup center.
Step 5: Seal the Dough Tightly
This step determines whether your cherry pie bombs hold together or fall apart in the oven. Take it seriously.
Lift the edges of the dough circle up and around the filling, gathering them together at the top like you’re closing a bundle. Pinch the dough firmly at the gathered point, pressing and twisting slightly to make a strong seal.
Run your fingers around the entire seam to check for any gaps or thin spots. Press those areas firmly shut. If you notice a hole, pinch a small piece of dough from the edge and use it to patch the spot.
Place each sealed bomb seam-side down on the prepared baking sheet. The seam-down position adds extra insurance against opening during baking. Space them at least one inch apart so they have room to expand.
Step 6: Brush With Butter
Melt the 2 tablespoons of unsalted butter and use a pastry brush or a spoon to coat the top of each dough ball generously.
The butter does two things. First, it helps the cinnamon sugar stick evenly rather than sliding off. Second, it promotes a golden, slightly crisp exterior as the bombs bake. Don’t skip this step — dry dough just doesn’t get that beautiful golden color.
Make sure you coat the sides as well, not just the tops. Every surface that gets butter gets better color and better flavor.
Step 7: Roll in Cinnamon Sugar
Mix the 1/2 cup of granulated sugar and 1 teaspoon of cinnamon together in a small bowl. Stir them well so the cinnamon distributes evenly through the sugar.
Roll each buttered dough ball in the cinnamon sugar mixture, turning it to coat all sides. Set it back on the baking sheet seam-side down. The coating should look generous — a light dusting isn’t enough here.
If any spots look thin after placing them back on the sheet, sprinkle a little extra cinnamon sugar directly on top. More coating means more flavor and a better texture on the outside.
Step 8: Bake Until Golden
Slide the baking sheet into the preheated oven and bake for 13 to 16 minutes. Check them at the 13-minute mark by looking at the bottoms — lift one gently with a spatula to peek.
You want a deep golden brown color on the bottom and a lighter but set golden top. The cinnamon sugar coating will look slightly caramelized, and the dough should feel firm when you tap it gently. If they look pale, give them another two minutes.
Don’t underbake. Raw biscuit dough in the center is a disappointment that no amount of cherry filling can fix. :/ Pull them when you’re confident the dough has cooked through.
Step 9: Cool Slightly and Add the Optional Glaze
Remove the bombs from the oven and let them cool on the baking sheet for five minutes. The filling inside stays extremely hot for several minutes after baking, so resist eating one immediately. The burn is not worth it — trust me on this.
While they cool, whisk together the powdered sugar, milk, and vanilla extract in a small bowl until smooth. Start with one tablespoon of milk and add more a little at a time until the glaze drizzles easily without being watery.
Use a spoon to drizzle the glaze back and forth over the warm bombs. It sets quickly and adds a sweet, bakery-style finish that makes them look polished and professional.
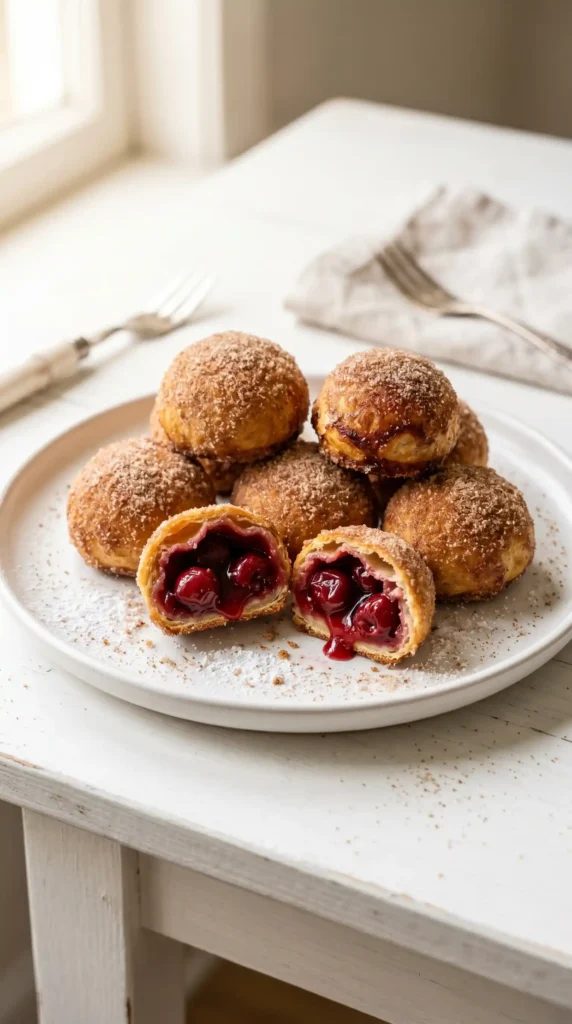
Step 10: Serve Warm
These Cherry Pie Bombs taste best served warm, about 10 minutes out of the oven. The filling stays gooey and the cinnamon sugar coating stays slightly crisp at that stage.
Arrange them on a plate or a wooden board for serving. Watch how fast they go — forewarning, you may need to make a second batch.
Tips for the Best Cherry Pie Bombs
A few things that genuinely improve the result:
- Use full-size biscuits, not mini ones — they give you enough dough to seal properly without the edges tearing.
- Chill the filling slightly if it feels very runny — cold filling is easier to spoon and less likely to soak through the dough before baking.
- Place bombs seam-side down always — gravity does the work of keeping them sealed during baking.
- Don’t crowd the pan — give each bomb space to expand so the sides bake evenly instead of steaming.
- Serve the same day — they’re at their absolute best fresh. Day-old bombs lose some of that outer crispness.
Variations Worth Making
Have you ever considered how many directions one simple recipe can go?
- Apple pie bombs — swap cherry filling for apple pie filling and add a pinch of nutmeg to the cinnamon sugar.
- Blueberry bombs — use blueberry pie filling and add lemon zest to the glaze for a bright citrus finish.
- Cream cheese cherry bombs — add a small cube of cream cheese alongside the cherry filling before sealing for a richer, tangier center.
- Air fryer version — cook at 350 degrees Fahrenheit for 8 to 10 minutes for a faster, slightly crispier result.
- Chocolate drizzle — skip the vanilla glaze and drizzle melted dark chocolate over the top instead.
Storing and Reheating
FYI, these store surprisingly well for a next-day snack. Place cooled leftovers in an airtight container at room temperature for up to two days, or refrigerate for up to four days.
Reheat them in the oven at 325 degrees Fahrenheit for about eight minutes to bring back some of that outer crispness. The microwave works in a pinch but softens the coating. The oven method always wins.
You can also freeze unbaked, assembled bombs on a baking sheet until solid, then transfer to a freezer bag. Bake from frozen at 375 degrees for 18 to 20 minutes.
Frequently Asked Questions
Can I use homemade cherry pie filling instead of canned?
Absolutely. Homemade filling tastes even better if you have the time. Just make sure it’s fully cooled before you use it — hot filling softens the dough and makes it harder to seal. A thick, jam-like consistency works best.
What brand of biscuit dough works best?
Grands-style biscuits from any major brand work well because they’re larger and give you more dough to work with per bomb. Smaller biscuit varieties are harder to seal without the dough tearing at the edges.
Can I make these ahead of time?
You can assemble them a few hours ahead and refrigerate them unbaked on a covered baking sheet. Pull them out 10 minutes before baking so the dough relaxes slightly, then bake as directed. They come out just as good.
Why do my bombs keep opening in the oven?
The most common reason is too much filling or a weak seal. Use no more than one tablespoon of filling per bomb and press the seam firmly several times. Placing them seam-side down on the pan also helps hold the seal during baking.
Can I make these without the cinnamon sugar coating?
You can, but the coating is honestly one of the best parts. If you want something less sweet, try brushing them with just butter and a light sprinkle of regular sugar. Or skip the coating entirely and go straight for the glaze on top.
Final Thoughts
Cherry Pie Bombs are one of those rare recipes that look impressive, taste incredible, and require almost no skill or effort. Thirty minutes, a handful of pantry ingredients, and you’re pulling a tray of golden, cherry-stuffed perfection out of the oven.
The cinnamon sugar crust, the warm gooey filling, the optional drizzle of glaze — every element works together in a way that feels way more impressive than the effort involved. That’s the best kind of recipe.
Make them once and they’ll become a permanent fixture in your dessert rotation. Or your breakfast rotation. No judgment here.
Cherry Pie Bombs
Ingredients
Method
- Preheat the oven to 375°F and line a baking sheet with parchment paper.
- Open the biscuit dough and separate the biscuits. Cut each biscuit in half horizontally to create 16 thinner rounds.
- Flatten each dough round into a circle about 3-4 inches in diameter using your fingers or palm.
- Spoon 1 heaping tablespoon of cherry pie filling onto the center of each dough round.
- Seal the dough tightly around the filling by lifting the edges and pinching them together.
- Place the sealed bombs seam-side down on the prepared baking sheet.
- Brush the tops of each bomb with melted butter.
- Mix the granulated sugar and cinnamon together in a bowl, then roll each buttered bomb in the mixture.
- Bake for 13-16 minutes until golden brown and cooked through.
- Let the bombs cool on the baking sheet for five minutes.
- (Optional) Prepare the glaze by whisking together powdered sugar, milk, and vanilla extract. Drizzle over the bombs.
- Serve warm for the best experience.