
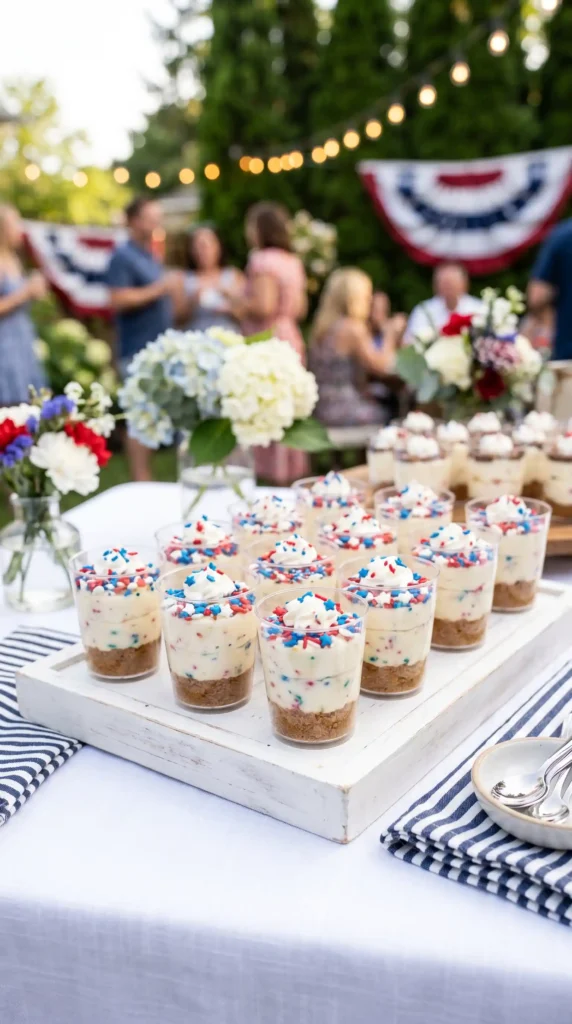
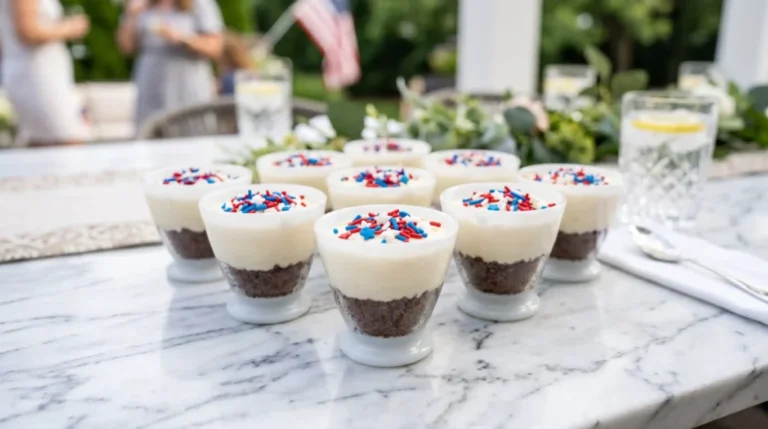
You want a crowd-pleasing dessert that looks like you spent hours on it. You also want to avoid turning on the oven in the middle of summer. Enter Firecracker Cheesecake Bites — the no-bake answer to every party table problem you’ve ever had.
I first made these for a Fourth of July cookout a couple of years back. They disappeared in about eleven minutes flat. Twelve bites, gone, before I even grabbed one for myself. That’s when I knew this recipe was a keeper.
These little cups pack a creamy cheesecake filling, a chocolate-kissed graham cracker crust, and a pop of red, white, and blue sprinkles on top. No oven. No stress. Just straightforward, delicious results.
Why Firecracker Cheesecake Bites Work Every Single Time
Most no-bake desserts either turn out too soft or too bland. These bites avoid both problems. The cocoa in the crust adds a deep, slightly bitter contrast to the sweet cheesecake filling. That balance is what makes them so addictive.
Have you ever noticed how individual-serving desserts always go faster than a big cake? There’s something about a bite-sized treat that makes people reach for seconds without thinking twice. These bites use that psychological trick to your full advantage.
IMO, the best part is the prep time. You spend 20 minutes actively making these, then the refrigerator does the rest of the heavy lifting. No babysitting required. You can clean up, get dressed, or actually enjoy your party.
Ingredients for Firecracker Cheesecake Bites
You don’t need anything exotic here. Every ingredient serves a specific purpose, and the quantities below make exactly 12 bites. Scale up easily if you’re feeding a bigger crowd.
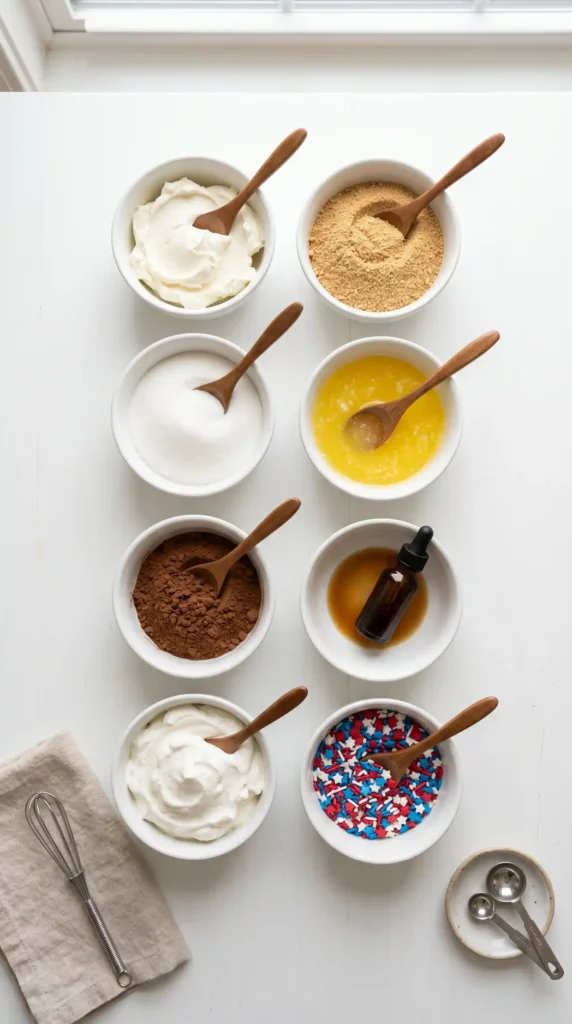
Full Ingredient List
- 8 gluten-free graham cracker sheets (about 1 cup of crumbs)
- 2 tablespoons unsweetened cocoa powder
- 3 tablespoons unsalted butter, melted
- 2 tablespoons granulated sugar (for the crust)
- 8 ounces (225g) full-fat cream cheese, softened to room temperature
- 1/3 cup granulated sugar (for the filling)
- 1 teaspoon pure vanilla extract
- 1 cup whipped cream (store-bought or homemade)
- 3 tablespoons red, white, and blue sprinkles (for topping)
A few quick notes. Full-fat cream cheese is non-negotiable here. Low-fat versions introduce too much moisture, and your filling won’t hold its shape after chilling. Also, pull the cream cheese out of the fridge at least 45 minutes before you start. Cold cream cheese creates lumps that no amount of beating will fully smooth out.
Equipment You Need
This recipe keeps the gear list short. Here’s everything you’ll want on your counter before you start.
- Food processor — Makes quick work of the graham crackers. A zip-lock bag and a rolling pin work as a backup, but a food processor saves 5 minutes.
- Electric hand mixer or stand mixer — Beating cream cheese by hand is genuinely not worth the effort. Use a mixer.
- Two medium mixing bowls — One for the crust mixture, one for the filling.
- 12 small dessert cups, mason jars, or muffin liners — These hold the bites and become the serving vessels.
- Spatula — For folding the whipped cream gently and scraping bowls clean.
How to Make Firecracker Cheesecake Bites — Step by Step
The whole process runs in five steps. Each one is straightforward, and together they build a dessert that looks far more complicated than it actually is. Let’s go through each part carefully so you get it right the first time.
Make the Graham Cracker Crust
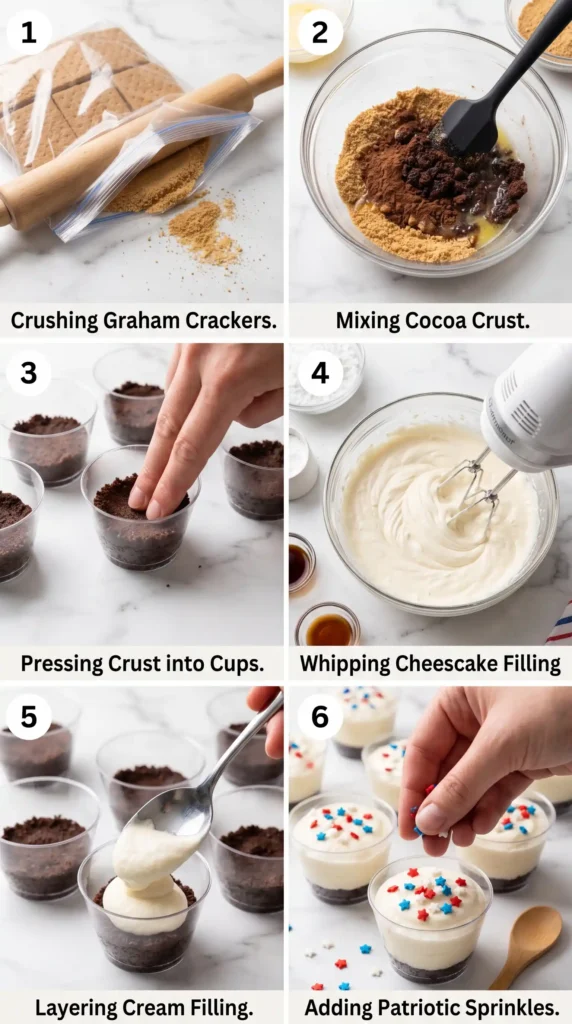
Break the gluten-free graham cracker sheets into rough pieces and drop them into your food processor. Add the 2 tablespoons of unsweetened cocoa powder and 2 tablespoons of granulated sugar. Pulse for about 20 to 25 seconds, pausing twice to scrape the sides.
You’re aiming for a consistency that looks like fine, dark sand. When you pinch a small amount between your fingers, it should hold together briefly before crumbling apart. If it still feels chunky, pulse for another 10 seconds.
Transfer the crumb mixture to a bowl and pour in the 3 tablespoons of melted butter. Stir everything together with a fork until every crumb looks coated and slightly damp. The mixture should hold its shape when you press a spoonful against the side of the bowl.
Now spoon about 1 heaping tablespoon of the crust mixture into the bottom of each of your 12 cups. Use the back of the spoon or the flat bottom of a small glass to press the crust down firmly. A packed crust holds together when you eat the bite. A loose one collapses. Take the extra 10 seconds to press it properly.
Set all 12 cups on a flat tray and slide them into the refrigerator while you work on the filling. The crust benefits from a quick chill before the filling goes on top.
Whip Up the Cheesecake Filling
Take your softened cream cheese and add it to a large mixing bowl. Beat it on medium speed for about 90 seconds, until it looks completely smooth with no visible lumps. Stopping here and checking is important — any lumps in the cream cheese will stay lumps in your finished bites.
Add the 1/3 cup of granulated sugar and the teaspoon of vanilla extract. Beat again on medium speed for another 60 seconds. The mixture will turn slightly lighter in color and silkier in texture. Run a spatula around the bowl to catch anything stuck to the sides, then beat for 15 more seconds.
Now add the whipped cream. This is where people commonly go wrong. Do not use the electric mixer for this step. Use your spatula and fold the whipped cream in slowly, using a gentle scooping motion from the bottom of the bowl up and over the top. Three or four strokes. Stop when you can no longer see white streaks of whipped cream.
Folding keeps the air bubbles in the whipped cream intact, which gives the filling that light, almost mousse-like quality when you bite into it. Stirring aggressively deflates those bubbles and leaves you with a dense, heavy filling. The difference is significant, and the extra care here is worth it.
Layer the Bites
Pull your chilled cups out of the fridge. The crust should feel slightly firm to the touch now. Spoon a generous dollop of cheesecake filling onto the crust in each cup. Use about 2 to 3 tablespoons of filling per cup, depending on how tall your cups are.
If you want to go all-in on the layers, add a second thin layer of the crust mixture on top of the first round of filling, then finish with another layer of cheesecake filling on top. This gives you a gorgeous cross-section when guests dig in. It also makes each bite feel more substantial.
Either way, your final layer should always be the cheesecake filling. Use a small spoon or an offset spatula to smooth the top surface of each cup so it looks clean and intentional. Presentation matters, especially for a party dessert.
Add the Sprinkles
Here’s the fun part. Grab your red, white, and blue sprinkles and scatter them over the top of each cup. Don’t hold back. A generous topping of sprinkles is what gives these bites their Firecracker Cheesecake personality and makes them instantly eye-catching on a dessert table.
Sprinkle from a height of about 6 inches above the cups for an even, natural scatter. If you drop them from too close, they clump in the center. If you drop them correctly, you get a confetti-like spread across the whole top. Takes two seconds, makes a huge visual difference.
Chill and Serve
Place all 12 cups on your flat tray and transfer them to the refrigerator. Let them chill for at least 2 full hours. This resting time allows the filling to firm up slightly and the flavors to come together properly. The bites you eat after 2 hours taste noticeably better than ones eaten immediately.
If you make these the night before, cover each cup loosely with plastic wrap and leave them in the fridge overnight. The next-day version is honestly even better 🙂 The crust softens slightly from contact with the filling and transforms into something closer to a proper cheesecake texture.
When you’re ready to serve, pull the tray out and set it directly on your dessert table. No reheating, no extra prep. Just grab a spoon and let people dig in.
Tips for Getting These Right
- Soften the cream cheese properly. Leave it at room temperature for at least 45 minutes before mixing. Cold cream cheese ruins the texture of the filling.
- Press the crust firmly. A packed crust holds together when you eat. A loose one crumbles everywhere — messy and frustrating
- Fold, don’t stir, the whipped cream. This keeps the filling light and airy instead of dense and heavy.
- Make these a day ahead when possible. The extra refrigerator time dramatically improves both texture and flavor.
- Keep cups small. These bites are rich. A smaller serving feels more satisfying and prevents waste.
Variations Worth Trying
The base recipe is straightforward, but swapping a few ingredients opens up a lot of possibilities. Have you ever thought about how many different flavor profiles you could create with the same structure?
- Raspberry ribbon: Add a thin layer of raspberry jam between the crust and the filling for a fruity tart contrast.
- Chocolate chip filling: Fold 3 tablespoons of mini chocolate chips into the cheesecake filling before layering.
- Nutty crust: Replace half the graham crackers with crushed salted pretzels for a salty-sweet crunch.
- Vegan version: Use plant-based cream cheese and coconut whipped cream. The texture holds up surprisingly well.
- Lemon cheesecake: Add 1 tablespoon of fresh lemon zest and 1 tablespoon of lemon juice to the filling for a bright, citrusy twist.
Serving Suggestions
FYI, these bites work as a standalone dessert or as part of a larger spread. Here’s what pairs well with them at a party.
- Serve alongside a bowl of fresh strawberries and blueberries to extend the patriotic color theme without extra effort.
- Iced tea, lemonade, or a fruity sparkling water cuts through the richness of the cheesecake filling perfectly.
- Arrange the cups on a tiered dessert stand for a visual impact that makes guests stop and look before they eat.
- For kids’ parties, use colorful paper cups instead of glass jars — easier to hold and no breakage risk.
Frequently Asked Questions
Can I make Firecracker Cheesecake Bites a day ahead?
Yes, and I actually recommend it. Making them the night before gives the filling more time to set and the flavors more time to develop. Cover each cup loosely with plastic wrap and keep them in the fridge. They’ll be ready to serve whenever you need them.
What can I use instead of gluten-free graham crackers?
Regular graham crackers work perfectly if gluten isn’t a concern. Crushed digestive biscuits, vanilla wafers, or Oreos (with filling scraped out) all make excellent substitutes. Each one shifts the flavor of the crust slightly, so pick based on your preferences.
How long do these keep in the refrigerator?
Store leftovers in an airtight container in the fridge. They stay fresh for up to three days. After that, the crust starts to soften too much and loses its texture. Honestly though, they rarely last that long once people discover them.
Can I freeze Firecracker Cheesecake Bites?
You can. Place the cups in a freezer-safe container, separate layers with parchment paper, and freeze for up to 6 weeks. Thaw them overnight in the refrigerator before serving. Add fresh sprinkles after thawing since frozen sprinkles tend to bleed color as they defrost.
My filling turned out lumpy. What went wrong?
The cream cheese wasn’t soft enough before mixing. Cold cream cheese refuses to beat smooth no matter how long you run the mixer. Always let it sit at room temperature for at least 45 minutes — longer if your kitchen is cold. Start over with softened cream cheese and the lumps will disappear.
Can I use Cool Whip instead of homemade whipped cream?
Absolutely. Cool Whip or any store-bought whipped topping works well in this recipe. Use the same 1-cup quantity as called for with regular whipped cream. The texture of the finished filling will be slightly denser but still delicious.
Final Thoughts
These Firecracker Cheesecake Bites earn their reputation at every party I bring them to. They look impressive, they taste even better than they look, and they take less effort than 90 percent of other desserts you could make for the same occasion.
The no-bake format makes them genuinely stress-free. You can put these together during a commercial break, slide them into the fridge, and walk away. The refrigerator handles everything from there. That’s the kind of recipe worth keeping in regular rotation.
Make a batch this weekend. Adjust the sprinkles for whatever occasion you’re celebrating. Then watch them disappear off the table in approximately eleven minutes. You’ve been warned.
Firecracker Cheesecake Bites
Ingredients
Method
- Break the gluten-free graham cracker sheets into rough pieces and drop them into a food processor with cocoa powder and granulated sugar. Pulse for 20-25 seconds.
- Transfer the crumb mixture to a bowl, pour in the melted butter, and stir until crumb mixture is evenly coated.
- Spoon the crust mixture into 12 cups and press down firmly. Refrigerate while preparing the filling.
- Beat softened cream cheese in a mixing bowl until smooth, about 90 seconds.
- Add the granulated sugar and vanilla extract, and beat for another 60 seconds.
- Gently fold in the whipped cream using a spatula until fully combined without losing air.
- Spoon cheesecake filling over the chilled crust in each cup. Optionally, create layers with crust and filling.
- Smooth the top surface of each cup with a spatula.
- Scatter red, white, and blue sprinkles over the top of each filled cup.
- Refrigerate the filled cups for at least 2 hours before serving to allow the flavors to meld and the filling to firm.


