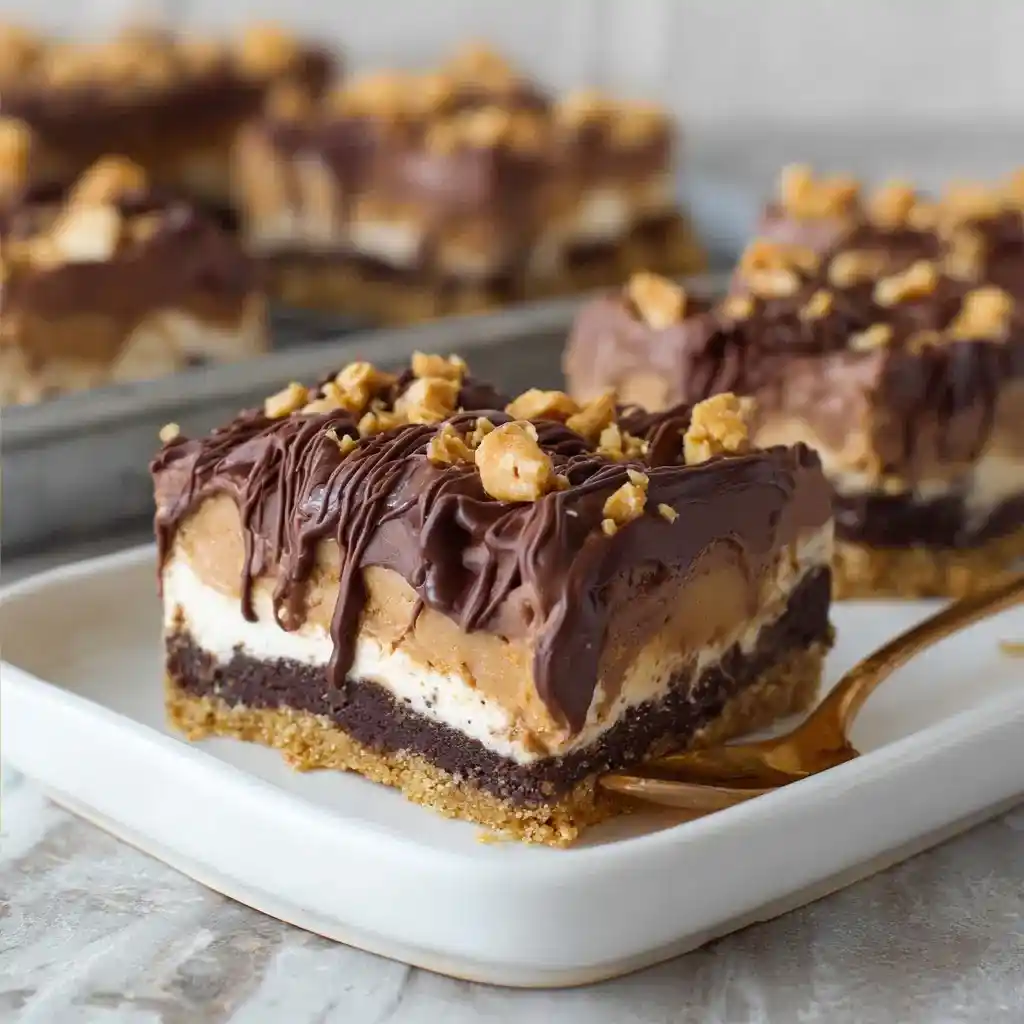
Chocolate or peanut butter? Why choose when you can layer both into one ridiculously good dessert? I made these dream bars for a family cookout last summer, and my brother-in-law asked for the recipe before he even finished his slice.
Servings: 9 bars | Prep time: 25 minutes | Chill and freeze time: about 3 hours | Total time: roughly 3 hours 25 minutes
What Makes These Dream Bars So Irresistible?
These bars stack peanut butter sandwich cookies, chocolate pudding, and a cream cheese peanut butter layer into one no-bake dessert. Every bite gives you crunch, cream, and chocolate all at once. Have you ever eaten something that felt like four desserts smashed into one? That’s exactly this.
The best part is that nothing here requires an oven. Your stove stays off, your kitchen stays cool, and you still end up with a dessert that looks like you fussed over it for hours. IMO, that’s the dream combo for summer entertaining.
I’ve brought these to potlucks, birthday parties, and one memorable Tuesday when I just needed chocolate. They disappear fast every single time. That alone tells you everything you need to know about this recipe.
What You’ll Need for Chocolate Peanut Butter Dream Bars
This recipe has a few components, but don’t let that intimidate you. Each layer takes just a couple of ingredients, and I’ll break it down section by section with exact quantities.
For the Crust
- 16 oz peanut butter sandwich cookies (like Nutter Butters), divided
- 4 tablespoons butter, melted
For the Cream Cheese Peanut Butter Layer
- 6 oz cream cheese, room temperature
- 1/2 cup confectioners’ sugar
- 1/3 cup creamy peanut butter
- 1/2 teaspoon pure vanilla extract
- 1 cup Cool Whip, divided from an 8 oz tub
For the Chocolate Pudding Layer
- 3.9 oz instant chocolate pudding mix
- 1 1/2 cups milk
For the Topping
- Remaining 7 oz Cool Whip
- 1/4 cup milk chocolate chips
- 1/4 cup peanut butter chips
- Remaining cookies, broken
FYI, that’s four short ingredient lists that come together into one seriously impressive dessert. Nothing here requires a specialty grocery run either.
How to Make Chocolate Peanut Butter Dream Bars, Step by Step
This dessert takes some patience because of the chilling time, but the actual hands-on work moves quickly. Let’s break down each layer so nothing feels overwhelming.
Building the Cookie Crust
Start by crushing 20 of your peanut butter sandwich cookies into fine crumbs using a blender or food processor. You want a texture similar to graham cracker crumbs, not big chunks. Set the remaining cookies aside for the topping later.
Melt your butter in a microwave-safe bowl until fully liquid. Pour that melted butter over your crushed cookies and stir until every crumb looks evenly coated. This step takes maybe two minutes, but it’s what gives your crust structure.
Press this mixture firmly into an 8×8 inch baking dish, using the back of a spoon or the flat bottom of a measuring cup. Press all the way into the corners so your crust holds together once sliced. Pop the dish into the freezer for at least 30 minutes to firm up.
Making the Chocolate Pudding Layer
While your crust chills, combine the instant chocolate pudding mix with 1 1/2 cups of milk in a small bowl. Whisk it together until completely smooth with no dry pockets of powder remaining. This step takes about a minute of active whisking.
Place the bowl in the refrigerator and let the pudding set according to the package instructions. This usually takes around five minutes, though letting it sit a bit longer never hurts. A properly set pudding layer holds its shape once you spread it onto the crust.
Preparing the Cream Cheese Peanut Butter Layer
In a mixing bowl, combine your room temperature cream cheese, confectioners’ sugar, peanut butter, and vanilla extract. Beat these together with a hand mixer until the mixture turns completely smooth. This should take about two to three minutes on medium speed.
Once smooth, fold in 1 cup of Cool Whip using a spatula rather than the mixer. Gentle folding keeps the mixture light and airy instead of dense. You’re aiming for a fluffy, spreadable texture that holds its shape when dolloped.
Assembling the Layers
Pull your chilled crust out of the freezer once it’s fully set. Drop spoonfuls of the cream cheese peanut butter mixture across the surface, then gently spread it into an even layer using an offset spatula or the back of a spoon. Take your time here so you don’t disturb the crust underneath.
Next, spoon dollops of your set chocolate pudding directly on top of the cream cheese layer. Gently spread the pudding using light strokes, being careful not to mix the two layers together. Have you ever tried to keep layers distinct in a dessert like this? Patience is everything.
Finish by spreading your remaining 7 oz of Cool Whip evenly over the pudding layer. Use a light hand and smooth strokes so the surface looks even and clean. This top layer is what everyone sees first, so it’s worth taking an extra minute to get it right.
Chilling, Freezing, and Decorating
Cover your assembled dessert and refrigerate it for a full 2 hours. This chilling time allows every layer to set properly and hold its shape once sliced. Skipping this step leads to messy, sliding layers instead of clean bars.
After chilling, transfer the dish to the freezer for an additional 30 minutes. This quick freeze makes slicing dramatically easier and cleaner. Right before serving, break your reserved cookies roughly and sprinkle them over the top along with the chocolate and peanut butter chips.
Tips for the Best Results
I’ve made these bars enough times to know exactly where things can go sideways. These small details make a noticeable difference in the final texture and presentation.
- Use room temperature cream cheese. Cold cream cheese leaves lumps that never fully smooth out.
- Chill before slicing. Cutting warm or unset bars turns them into a delicious but messy pile.
- Use a hot knife for clean slices. Run your knife under hot water and wipe it dry between cuts.
- Don’t overmix the folded layers. Overmixing deflates the Cool Whip and flattens the texture.
Serving and Storage Tips
Slice these bars into neat squares for individual servings, perfect for parties or an after-dinner treat. They hold up well on a dessert table and look impressive without much extra effort. Serve them straight from the fridge for the best texture.
Store leftovers in an airtight container in the refrigerator for up to 5 days. If you want them extra firm, freeze the bars for up to a month. Thaw them in the refrigerator before serving again for the best consistency.
Fun Variations Worth Trying
Once you’ve mastered the basic recipe, these bars become an easy base for endless twists. Here are a few of my favorite variations to switch things up.
- Dark chocolate lover: Swap in dark chocolate pudding and chips for a richer flavor.
- Extra crunch: Add chopped roasted peanuts into the cream cheese layer.
- Salted caramel twist: Drizzle caramel sauce over the Cool Whip topping before serving.
- Nutella delight: Replace the peanut butter with Nutella for a chocolate-hazelnut spin.
Frequently Asked Questions About Chocolate Peanut Butter Dream Bars
Can I make these bars ahead of time?
Yes, and they actually taste better after chilling overnight. The flavors have more time to meld together, and the layers set even firmer.
Do I have to use Cool Whip?
No, stabilized whipped cream or homemade whipped cream works as a substitute. Either option gives you a slightly fresher taste than the frozen topping.
Can I use crunchy peanut butter instead of creamy?
Yes, crunchy peanut butter adds extra texture to the cream cheese layer. It’s a small swap that changes the mouthfeel in a fun way.
Is it safe to freeze these bars?
Absolutely. Freeze them for up to a month and thaw in the refrigerator before serving for the best texture.
Can I use different cookies for the crust?
Yes, any peanut butter or chocolate sandwich cookie works well here. Oreos make a great substitute if you want a more chocolatey base.
How do I get clean, neat slices?
Chill or slightly freeze the bars before cutting, and use a hot knife wiped clean between slices. This combination gives you bakery-style squares every time.
Wrapping This Up
Chocolate peanut butter dream bars combine crunch, cream, and chocolate into one no-bake dessert that always steals the spotlight. Four simple layers, zero oven time, and a few hours of patience get you a dessert people will talk about for weeks. Isn’t that exactly what a great no-bake recipe should deliver?
Grab your ingredients, layer everything up, and let the fridge do the heavy lifting. Just make sure you hide a slice for yourself before everyone else finds the pan



