Servings: 20-24 roll ups | Prep Time: 15 minutes | Chill Time: 1-2 hours | Total Time: About 2 hours
You know that one appetizer that disappears from the party platter before you’ve even finished arranging the napkins? That’s pickle roll ups. Three ingredients, zero cooking, maximum flavour. I’ve been making these for years and people still ask me for the recipe every single time.
The first time I made pickle roll ups was for a last-minute get-together. I had cream cheese, deli meat, and a jar of pickles. Fifteen minutes later I had a platter of roll ups that everyone went absolutely wild for. Since then, this has been my go-to snack for every occasion imaginable.
Whether you’re hosting a party, need a quick lunch, or just want something salty and satisfying to snack on, pickle roll ups are the answer. Let’s walk through everything you need to know to make them perfectly.
What Are Pickle Roll Ups?
Pickle roll ups are exactly what they sound like — dill pickles wrapped in a layer of cream cheese and deli meat, then sliced into neat little rounds. Think of them as the love child of a sandwich and a pinwheel, except better than both.
They’re cold, no-cook snacks that require almost no effort but look surprisingly impressive on a platter. The combination of tangy pickle, creamy cheese, and savoury deli meat works in a way that honestly shouldn’t be this good. But it is.
People serve pickle roll ups at everything from Super Bowl parties to holiday gatherings to casual weeknight snacking. Once you make them once, you’ll understand why they never go out of style.
Ingredients You Will Need
The beauty of this recipe is its simplicity. You need just a handful of ingredients, and most of them are probably sitting in your fridge right now.
Classic Pickle Roll Ups
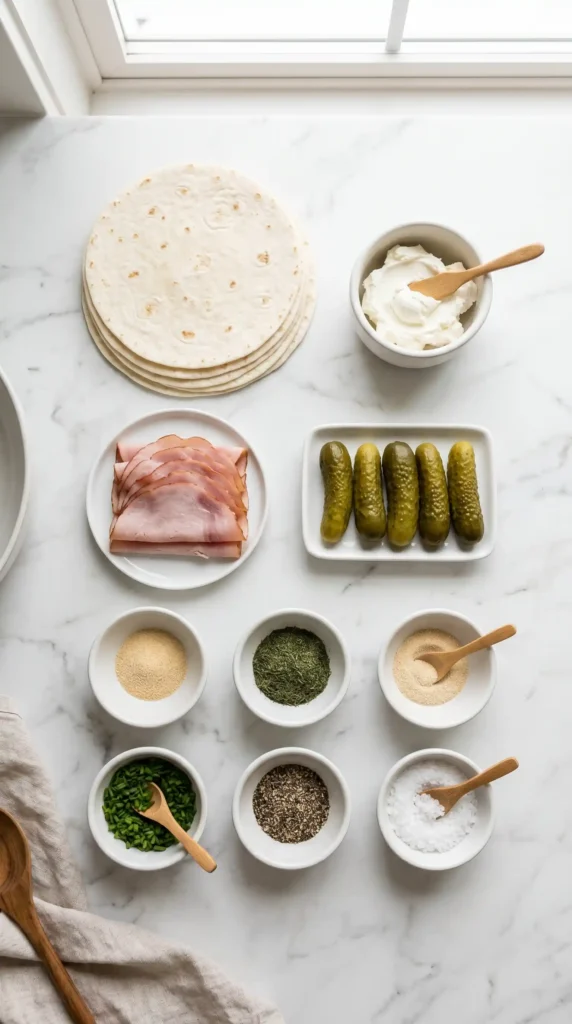
- 8 large flour tortillas (10-inch size)
- 450g (16 oz) full-fat cream cheese, softened
- 250g (about 20 slices) thinly sliced deli ham or roast beef
- 20-24 whole dill pickles, patted dry
- 1 teaspoon garlic powder
- 1 teaspoon dried dill
- Half a teaspoon of onion powder
- Salt and black pepper to taste
Optional Add-Ins
- 2 tablespoons chopped fresh chives
- 1 tablespoon Dijon mustard (mixed into the cream cheese)
- 50g shredded cheddar cheese
- A pinch of red pepper flakes for heat
Step-By-Step: How to Make Pickle Roll Ups
Ready to make the easiest appetizer of your life? Follow these steps and you’ll have a platter of perfect pickle roll ups in under 20 minutes of active prep time.
Step 1: Soften the Cream Cheese
This step sounds obvious, but it makes a massive difference to your final result. Take your 450g of cream cheese out of the fridge at least 30 minutes before you start. Softened cream cheese spreads easily and evenly without tearing your tortilla.
If you forgot to take it out early, you can microwave it in 10-second bursts, stirring between each one, until it softens up. Just don’t overheat it or it will become runny and hard to spread. You want it soft and spreadable, not liquid.
Cold cream cheese is the number one reason pickle roll ups fall apart. Soft cream cheese sticks to the tortilla and holds everything in place. Don’t skip this step.
Step 2: Season Your Cream Cheese
Place the softened cream cheese in a mixing bowl. Add your garlic powder, dried dill, onion powder, a pinch of salt, and a few cracks of black pepper. Use a fork or spatula to mix everything together thoroughly until the seasoning is evenly distributed throughout.
Give it a quick taste. The cream cheese should have a savoury, slightly herby flavour with a hint of garlic. If you want more punch, add a teaspoon of Dijon mustard or a pinch of red pepper flakes. FYI, this seasoned cream cheese is also incredible on bagels, so make a little extra.
If you’re adding chopped chives or shredded cheddar, fold those in now as well. The more flavour you build into the cream cheese layer, the better every single bite of your pickle roll ups will taste.
Step 3: Prep Your Tortillas
Lay a flour tortilla flat on a clean cutting board or work surface. If your tortillas feel stiff or dry, warm them in the microwave for about 10 seconds. This makes them pliable and much easier to roll without cracking.
A cracked tortilla means a messy, falling-apart roll up. Nobody wants that when they’re trying to impress guests. A quick 10-second warm-up is all it takes to avoid this entirely. It’s a small step that makes a big difference.
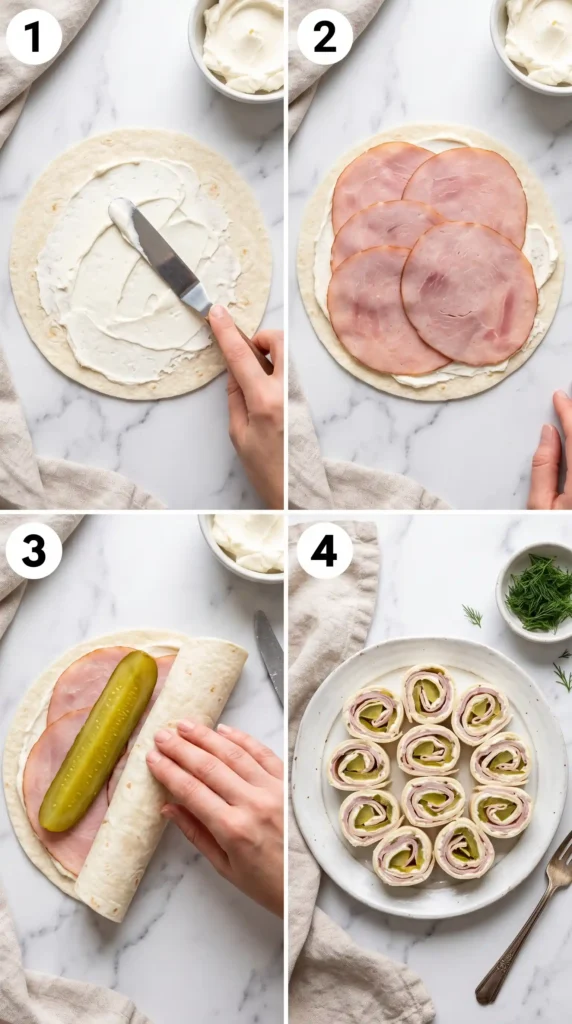
Step 4: Spread the Cream Cheese
Scoop a generous portion of your seasoned cream cheese onto the tortilla. Use a spatula or the back of a spoon to spread it in an even layer across the entire surface. Go right to the edges but leave about half an inch of bare tortilla at the far end — this will help the roll seal properly.
The cream cheese layer should be thick enough that you can see it clearly but not so thick that it squeezes out when you roll. Aim for roughly a 3-4mm layer. Think of it like spreading butter on toast — confident, even strokes.
An even cream cheese layer is what holds your pickle roll ups together. Patchy or uneven spreading leads to roll ups that slide apart when you slice them. Take your time with this step.
Step 5: Layer the Deli Meat
Place 2-3 slices of deli ham or roast beef on top of the cream cheese in a single layer. Lay them flat and slightly overlapping so the entire cream cheese surface is covered. The deli meat adds the savoury, protein-packed element that makes pickle roll ups so satisfying.
Ham gives you a milder, slightly sweet flavour. Roast beef gives you something richer and more robust. Turkey works brilliantly too if you want a lighter version. IMO, ham is the classic choice and the one that most people know and love.
Make sure the meat lies flat and doesn’t bunch up. Bunched or folded meat creates uneven thickness, which makes rolling difficult and causes the roll to lose its round shape when sliced.
Step 6: Place the Pickle
Now for the star of the show. Take a whole dill pickle and pat it completely dry with a paper towel. This step is absolutely non-negotiable. A wet pickle releases moisture as the roll ups chill, which makes the tortilla soggy and the cream cheese slide. Dry pickles mean firm, clean roll ups every time.
Place the dried pickle near the edge of the tortilla closest to you. Position it parallel to that edge, right at the bottom of your layered ingredients. This placement ensures the pickle ends up neatly in the centre of your roll when you slice it — giving you that satisfying cross-section that makes pickle roll ups so visually appealing.
Use one full-sized dill pickle per tortilla for the classic version. If your pickles are on the thicker side, you might want to use two thinner spears instead. The goal is a single, well-centred pickle running the full length of your roll.
Step 7: Roll Tightly
Here’s where your pickle roll ups either succeed or fall apart — literally. Starting from the edge closest to you where the pickle sits, begin rolling the tortilla away from you. Use your fingers to keep the roll tight and even as you go.
Apply gentle, consistent pressure as you roll. You want it snug enough to hold together but not so tight that the cream cheese squeezes out the sides. Think of it like rolling a sleeping bag — firm and even all the way through. Once you’ve rolled to the end, the bare half-inch of tortilla should stick against the cream cheese and seal the roll.
If it won’t seal on its own, spread a tiny amount of extra cream cheese on that bare edge as glue. Press it gently and it will hold perfectly during chilling.
Step 8: Wrap and Chill
Place each completed roll seam-side down on a sheet of plastic wrap. Roll it up tightly in the plastic wrap and twist the ends shut like a candy wrapper. This keeps the roll in its shape while it chills and prevents it from drying out.
Line all your wrapped rolls onto a tray or plate and pop them in the fridge for at least 1 hour. Two hours is even better. The chilling time firms up the cream cheese, which makes slicing clean and precise. Trying to slice them straight away gives you squashed, messy roll ups :/
Step 9: Slice and Serve
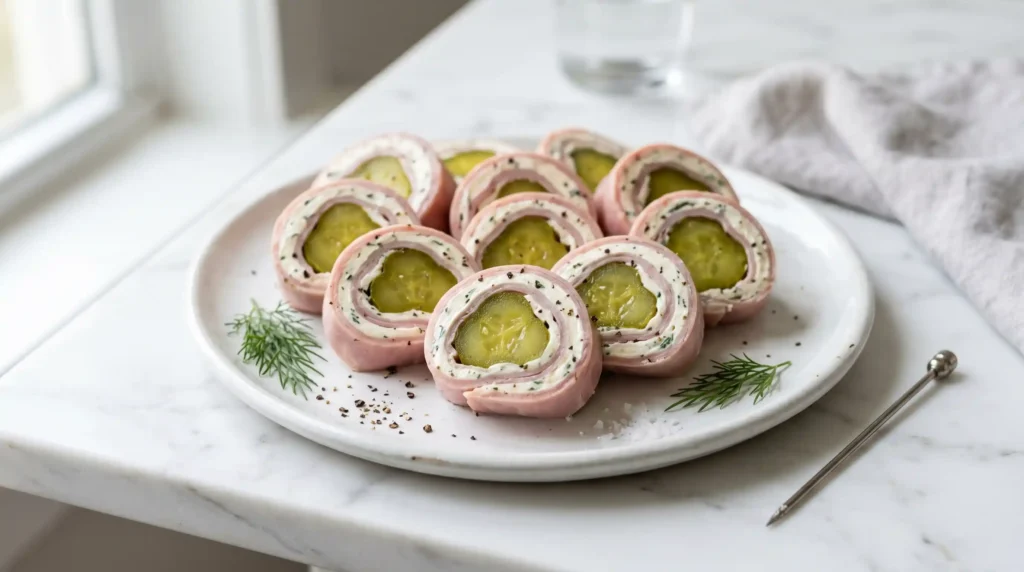
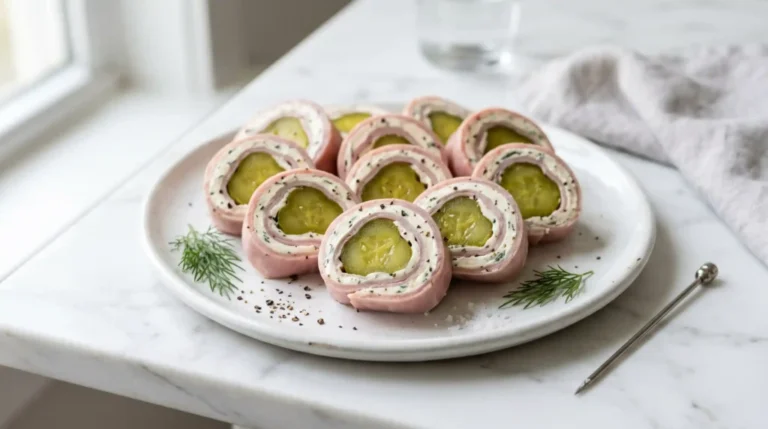
When you’re ready to serve, take the rolls out of the fridge and remove the plastic wrap. Place each roll on a cutting board and use a sharp knife to slice it into rounds about 2.5 to 3cm thick. A sharp knife is key here — a dull blade will drag and crush the roll rather than cut cleanly through it.
Each tortilla should give you about 5-6 round slices, depending on how thick you cut them. Arrange the rounds cut-side up on a serving platter so everyone can see that gorgeous spiral of pickle, meat, and cream cheese in the centre. That presentation alone will have people reaching for them before you’ve finished setting up.
Tips for Perfect Pickle Roll Ups Every Time
- Always dry your pickles: Moisture is the enemy. Pat every pickle completely dry before rolling.
- Use full-fat cream cheese: Low-fat versions are too watery and won’t hold the roll together properly.
- Chill before slicing: Minimum one hour in the fridge — two is better. Do not skip this step.
- Sharp knife only: A sharp knife slices cleanly. A dull knife crushes and drags.
- Warm your tortillas: Cold, stiff tortillas crack when you roll them. Ten seconds in the microwave prevents this.
- Thin deli meat works best: Thick slices create uneven rolls. Ask for thin slices at the deli counter.
Variations Worth Trying

The classic ham and dill pickle version is hard to beat, but pickle roll ups are incredibly versatile. Have you ever considered swapping the ingredients to create a completely different flavour profile?
- Spicy version: Add pickled jalapenos alongside the dill pickle and mix hot sauce into the cream cheese.
- Turkey and ranch: Use turkey slices and stir a tablespoon of dry ranch seasoning into the cream cheese.
- Veggie version: Skip the meat entirely and add roasted red peppers, spinach, and cucumber alongside the pickle.
- Everything bagel: Mix everything bagel seasoning into the cream cheese for an addictive savoury bite.
How to Store Pickle Roll Ups
Store unsliced rolls in the fridge, wrapped tightly in plastic wrap, for up to 3 days. They actually taste better on day two once the flavours have had more time to meld together.
Once sliced, arrange them on a plate, cover with cling film, and eat within 24 hours. Sliced roll ups start to dry out at the edges after that. Do not freeze pickle roll ups — the cream cheese and tortilla do not hold up well after freezing and thawing.
Frequently Asked Questions
1. Can I make pickle roll ups the night before?
Yes, and you absolutely should. Making them the night before gives the cream cheese extra time to firm up and the flavours time to blend together beautifully. Just keep them wrapped tightly in plastic wrap in the fridge and slice them right before serving for the cleanest results.
2. Why are my pickle roll ups soggy?
Soggy roll ups almost always come down to wet pickles. You must pat the pickles completely dry with paper towels before placing them on the tortilla. Any moisture left on the pickle will seep into the cream cheese and tortilla during chilling, making everything wet and soft.
3. What deli meat works best for pickle roll ups?
Ham is the classic choice and works brilliantly with dill pickles. Roast beef gives a richer, bolder flavour. Turkey keeps things lighter. Salami works if you want something with more spice and intensity. Avoid thick-cut meats — thin slices roll evenly and create a better cross-section when sliced.
4. Can I use low-fat cream cheese?
You can, but the results won’t be as good. Low-fat cream cheese contains more water, which makes the filling looser and harder to spread evenly. It also makes the tortilla soggy faster. Full-fat cream cheese gives you the firm, stable filling that holds pickle roll ups together properly.
5. How many pickle roll ups does one tortilla make?
One large 10-inch tortilla makes approximately 5 to 6 roll up rounds, depending on how thick you slice them. This recipe using 8 tortillas gives you 20 to 24 individual pieces, which is a generous platter for a party of 8 to 10 people as an appetizer.
Final Thoughts
Pickle roll ups are the kind of recipe that proves great food doesn’t need to be complicated. Three main ingredients, fifteen minutes of prep, and you have an appetizer that genuinely impresses every single time.
The key to nailing them is in the small details — soft cream cheese, dry pickles, tight rolling, and proper chilling time. Get those four things right and you’ll turn out perfect pickle roll ups every time without fail.
So go raid your fridge, grab that jar of dill pickles, and get rolling. Your next party snack situation is officially sorted.
Pickle Roll Ups
Ingredients
Method
- Soften the cream cheese by taking it out of the fridge at least 30 minutes before starting or microwaving it in 10-second bursts until spreadable.
- In a mixing bowl, combine the softened cream cheese with garlic powder, dried dill, onion powder, salt, and black pepper. Mix until evenly distributed.
- Lay a tortilla flat and warm it in the microwave for about 10 seconds if it's stiff.
- Spread a generous layer of the seasoned cream cheese on the tortilla, leaving a half-inch margin at one edge.
- Layer 2-3 slices of deli meat over the cream cheese evenly.
- Place a whole dill pickle at the edge closest to you, patting it dry first.
- Roll the tortilla tightly, starting from the edge where the pickle is placed, applying gentle pressure.
- Wrap each roll tightly in plastic wrap and chill in the fridge for at least 1 hour.
- Slice the chilled rolls into rounds about 2.5 to 3cm thick using a sharp knife and arrange them on a serving platter.


Thanks for stopping by! 😊 Pickle Roll-ups are definitely a great appetizer option. I’m glad you mentioned them—they’re easy to make and always a crowd favorite. Thanks for sharing your suggestion!