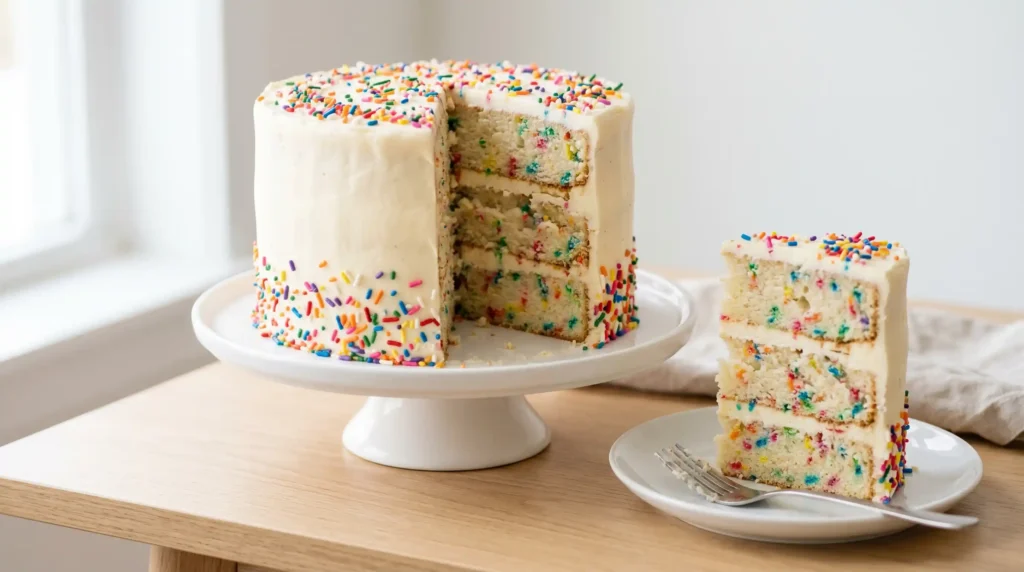
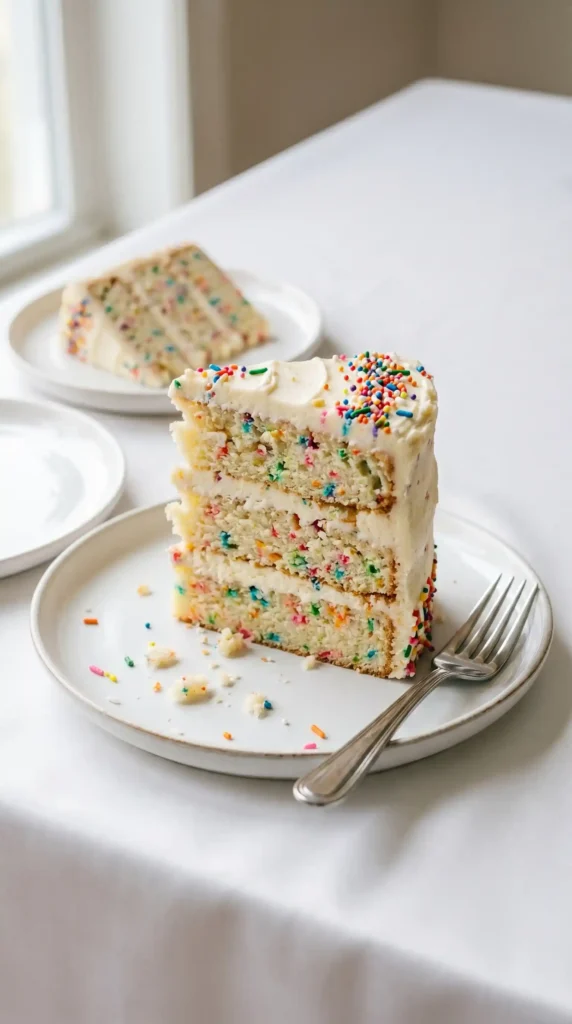
There are birthday cakes and there are birthday cakes that make people genuinely excited the moment they appear at the table. Vanilla Funfetti Cake is firmly in the second category. Those rainbow sprinkles suspended through every soft, fluffy crumb create a visual effect that is simultaneously childlike and genuinely beautiful — every single slice reveals a different pattern of colour and nobody, at any age, looks at it without smiling.
I started making this from scratch several years ago when I realised that boxed funfetti cake had set an extremely low bar and convinced everyone that funfetti was supposed to taste that way. It is not supposed to taste that way. A properly made vanilla funfetti cake from scratch tastes rich, buttery, and genuinely vanilla-forward with a tender crumb that the box version never achieves because it simply cannot. The difference is dramatic.
Have you ever made something from scratch that permanently ruined the shortcut version for you? That is the funfetti effect and it is worth embracing completely. Let us build it properly.
What Makes This Vanilla Funfetti Cake Different From Every Box Version
Box funfetti uses vegetable oil as the fat, which produces a moist crumb but a flat, somewhat generic vanilla flavour. This recipe uses real butter, which adds a richness and depth that oil cannot deliver — butter carries far more flavour compounds than neutral oil and produces a cake that actually tastes of something beyond generic sweetness.
The buttermilk in this recipe is the other key element. Buttermilk reacts with the baking powder and baking soda in the batter to produce a lighter, more tender crumb than regular milk alone. The slight acidity of the buttermilk also activates the baking soda and adds a very faint tang that prevents the cake from tasting one-dimensionally sweet. That balance is what makes a vanilla cake taste complex rather than flat.
The sprinkles are the fun element and they require one specific decision: use rainbow jimmie sprinkles, not nonpareils. Jimmies are the long, thin, slightly waxy ones. Nonpareils are the tiny round balls. Nonpareils bleed aggressively into the batter and turn the entire cake grey-brown during baking. Jimmies hold their colour beautifully and remain visually distinct dots of colour in the finished crumb. IMO, this is the most important sprinkle decision of your baking career.
What You Need
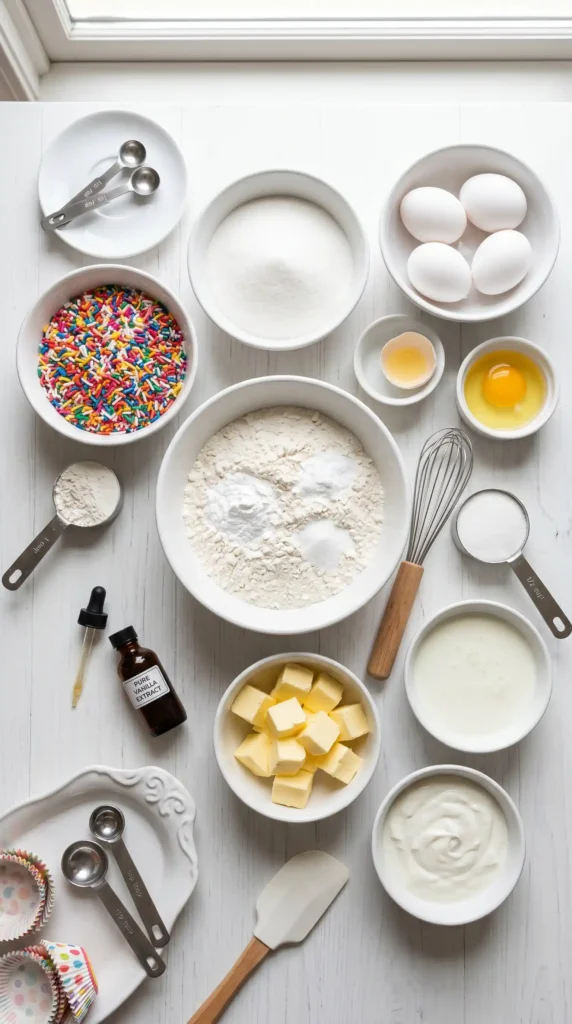
Two components: the cake layers and the vanilla buttercream. The cake uses standard baking pantry ingredients plus buttermilk, which is widely available in most grocery stores and keeps in the fridge for several weeks. If you do not have buttermilk, make a quick substitute — add 1 tablespoon of white vinegar or lemon juice to 1 cup of whole milk, stir, and let it sit for 5 minutes until it curdles slightly.
For the Vanilla Funfetti Cake Layers
- 2 and 3/4 cups (345g) all-purpose flour
- 2 and 1/2 teaspoons baking powder
- 1/2 teaspoon baking soda
- 1/2 teaspoon salt
- 1 cup (226g) unsalted butter, softened to room temperature
- 1 and 3/4 cups (350g) granulated white sugar
- 4 large eggs, room temperature
- 2 teaspoons pure vanilla extract (use the best quality you can find — it is the primary flavour)
- 1 teaspoon almond extract (optional — adds a subtle bakery-like depth to the vanilla flavour)
- 1 cup (240ml) full-fat buttermilk, room temperature
- 1/4 cup (60ml) sour cream, room temperature (adds moisture and tenderness)
- 1 cup (170g) rainbow jimmie sprinkles — not nonpareils
For the Vanilla Buttercream
- 1 and 1/2 cups (340g) unsalted butter, softened to room temperature
- 5 cups (600g) powdered sugar, sifted
- 1/4 cup (60ml) heavy cream or whole milk
- 2 teaspoons pure vanilla extract
- Pinch of salt
- Extra rainbow sprinkles for decorating the outside of the cake
Why Every Dairy Ingredient Must Be Room TemperatureButter, eggs, buttermilk, and sour cream all need to be at genuine room temperature before mixing — not slightly cool, not just out of the fridge. Cold dairy ingredients cannot incorporate properly into creamed butter, creating a curdled or broken batter that produces a dense, uneven crumb rather than a light, fluffy cake. FYI — pull everything from the fridge 90 minutes before you plan to bake. This one step has more impact on the finished texture than almost any other preparation step.
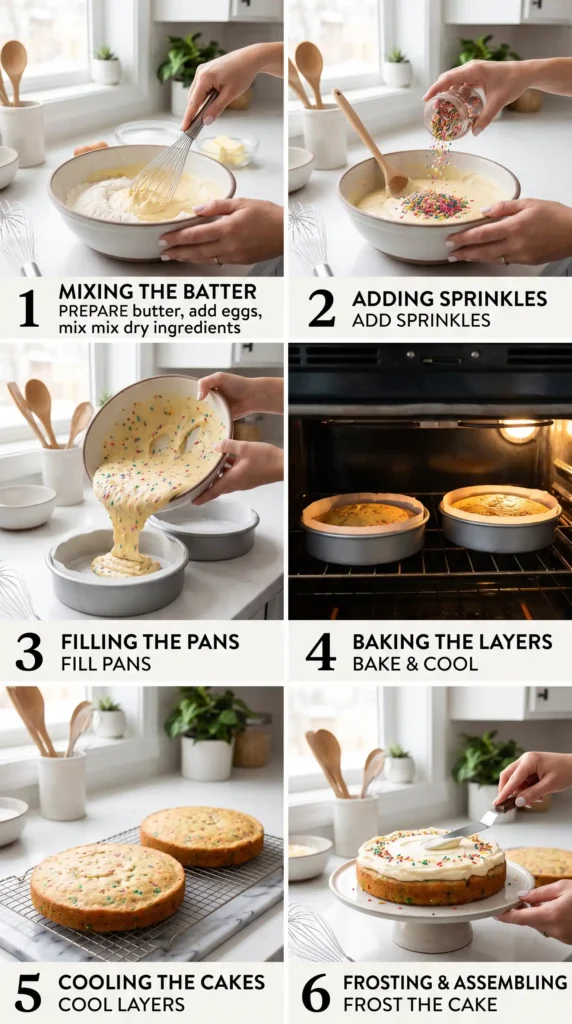
How to Make Vanilla Funfetti Cake Step by Step
Three stages: bake the cake layers, cool completely, then make and apply the buttercream. The most important technical steps are in the cake batter — creaming the butter properly, adding eggs at the right stage, and alternating the wet and dry ingredients correctly. Each of these contributes directly to the cake’s texture and each is simple once you understand the reasoning behind it.
Step 1: Prepare the Tins and Preheat
Preheat your oven to 175°C (350°F). Grease two 23cm (9-inch) round cake tins generously with butter and line the base of each with a circle of parchment paper. Grease the parchment too. Run flour around the inside of each greased tin, tapping out any excess. This double-insurance — grease, parchment, grease, flour — means the cakes release cleanly every time rather than tearing and sticking, which tends to happen at the worst possible moment in the baking process.
Step 2: Mix the Dry Ingredients
In a medium bowl, whisk together the flour, baking powder, baking soda, and salt until evenly combined. Whisking the dry ingredients together before they go into the batter ensures the leaveners are distributed evenly throughout the flour rather than sitting in concentrated pockets. Uneven distribution of baking powder or baking soda produces cakes with irregular rise — taller in some spots, flatter in others — and inconsistent texture throughout.
Step 3: Cream the Butter and Sugar
Place the softened butter and granulated sugar in the bowl of a stand mixer fitted with the paddle attachment — or use a large bowl with a hand mixer. Beat on medium-high speed for a full 4–5 minutes until the mixture looks pale, almost white, and feels genuinely light and fluffy when rubbed between your fingers. Set a timer for this step — most home bakers undermix the creaming stage by 2–3 minutes, producing a cake that bakes up slightly denser and less tall than it should be.
The creaming stage is where the structure of the cake begins. Beating the butter and sugar together at high speed forces air into the butter, and those air bubbles provide the primary leavening that makes the cake light. The baking powder and soda add additional lift, but the aerated butter structure is the foundation. Under-creamed butter produces a flat, dense cake. Properly creamed butter produces a tall, fluffy, beautifully textured cake. Give this step the full 4–5 minutes it requires.
Step 4: Add Eggs and Vanilla
Add the eggs one at a time to the creamed butter and sugar, beating for 20–25 seconds after each addition on medium speed. Adding all the eggs at once overwhelms the emulsion and the batter may break — curdling into a greasy, lumpy mixture rather than staying smooth and cohesive. The 20-second beating between each egg gives the batter time to fully incorporate each addition before the next one arrives. After the final egg, add the vanilla extract and almond extract if using. Beat for another 20 seconds.
Step 5: Alternate Wet and Dry Ingredients
Combine the buttermilk and sour cream in a measuring jug and stir briefly. Now add the flour mixture and the buttermilk mixture to the batter in alternating additions — starting and ending with the flour. The sequence is: one third flour mixture, mix briefly; half the buttermilk mixture, mix briefly; one third flour mixture, mix briefly; remaining buttermilk, mix briefly; final third flour mixture, mix until just combined.
Use the lowest speed on your mixer or switch to a rubber spatula for this step. Never overmix after the flour goes in — overmixing activates the gluten in the flour and produces a tough, dense, slightly rubbery cake rather than the tender, soft crumb you are building toward. Mix each addition only until the streaks of flour or liquid just disappear — no longer. The finished batter will look smooth and thick but still slightly wobbly when the bowl is tilted.
Step 6: Fold In the Sprinkles
Add the cup of rainbow jimmie sprinkles to the batter. Fold them in using a rubber spatula with four or five large, gentle sweeping strokes from the bottom of the bowl upward. The goal is even distribution throughout the batter while causing as little bleeding of colour as possible. Work quickly and stop as soon as the sprinkles look reasonably distributed — overmixing at this stage both develops too much gluten and causes the sprinkles to bleed colour throughout the batter, which dulls the visual effect in the finished slices.
Step 7: Bake the Layers
Divide the batter evenly between the two prepared tins — use a kitchen scale if you have one, weighing each tin to ensure you have equal amounts in both. Even layers produce a level, professional-looking cake that stacks without tilting. Smooth the top of each tin with an offset spatula and slide both tins into the preheated oven on the same rack or on adjacent racks if they do not fit side by side. Bake for 28–32 minutes until a toothpick inserted into the centre comes out clean or with just a few moist crumbs. The edges will have pulled slightly from the sides of the tin and the top will spring back when pressed lightly.
Cool the cakes in their tins on wire racks for 15 minutes, then turn them out onto the racks and peel off the parchment. Allow them to cool completely to room temperature before frosting — a minimum of 1 hour, though 2 hours produces a more fully cooled cake that the buttercream will adhere to without sliding or melting. Do not rush this step. A warm cake melts buttercream immediately and produces a sliding, collapsing finish rather than the smooth, stable frosted result you want.
Step 8: Make the Vanilla Buttercream
Beat the room-temperature butter in a stand mixer or with a hand mixer on medium-high speed for 3–4 minutes until pale and fluffy. Add the sifted powdered sugar one cup at a time, beating on low speed after each addition to prevent a powdered sugar cloud from coating your kitchen. After all the sugar is incorporated, add the vanilla extract, pinch of salt, and heavy cream. Beat on medium-high speed for 2–3 minutes until the buttercream looks very light, fluffy, and bright white rather than pale yellow.
If the buttercream looks too thick for spreading, add cream one teaspoon at a time and beat briefly after each addition. If it looks too soft, refrigerate for 15 minutes, then beat again. The finished buttercream should hold its shape when scooped with a spoon — forming a defined peak rather than flowing immediately.
Step 9: Frost and Decorate
Place the first fully cooled cake layer on a cake stand or flat plate. Spread about a third of the buttercream across the top in an even layer. Place the second layer on top, aligning the edges as neatly as possible. Use the remaining buttercream to frost the top and sides of the assembled Vanilla Funfetti Cake — apply a rough coat first to trap any crumbs, refrigerate for 15 minutes to firm up, then apply the final smooth coat. Press additional rainbow sprinkles generously against the sides of the cake while the buttercream is still soft.
The Crumb Coat — Do Not Skip ItA crumb coat is a thin, rough first layer of buttercream that traps loose crumbs from the cake surface before the final smooth coat goes on. Without it, crumbs from the cake surface get dragged through the final layer of buttercream and appear as brown specks throughout the white frosting. Apply a thin coat, refrigerate 15 minutes to firm the buttercream and lock the crumbs in place, then apply the final smooth frosting layer.
Variations Worth Making
Chocolate Funfetti Cake
Replace 1/2 cup of the flour with 1/2 cup of unsweetened cocoa powder. The chocolate batter still shows the sprinkles beautifully — deep chocolate cake with vivid rainbow spots throughout each slice creates an even more dramatic visual contrast than the vanilla version. Frost with a chocolate buttercream (add 1/3 cup of good quality cocoa powder to the basic buttercream recipe) and decorate with additional sprinkles.
Funfetti Cupcakes
This exact batter makes 24 standard cupcakes. Fill each cupcake liner two thirds full and bake at 175°C for 16–20 minutes until a toothpick comes out clean. Frost with the same vanilla buttercream and top each with a generous pile of additional sprinkles. Cupcakes require no slicing, no plates, and no serving utensils — which makes them the ideal format for any gathering where the goal is joyful chaos over elegant presentation.
Lemon Funfetti Cake
Add 2 tablespoons of fresh lemon zest and 2 tablespoons of fresh lemon juice to the batter along with the vanilla extract. Make a lemon buttercream by replacing the heavy cream with fresh lemon juice and adding a tablespoon of lemon zest to the finished frosting. The lemon funfetti version tastes bright, fresh, and summery — the citrus lifts the vanilla and makes the entire cake feel lighter and more elegant than the straightforward vanilla version.
Storage Tips
Store the frosted Vanilla Funfetti Cake under a cake dome or loosely covered at room temperature for up to 3 days. The buttercream stays soft and fresh at room temperature — refrigerating a frosted cake dries the crumb significantly and makes the buttercream dense and hard. If you must refrigerate it, bring individual slices to room temperature for 30 minutes before eating to allow the buttercream to soften and the flavour to bloom.
The unfrosted, cooled cake layers freeze beautifully for up to 3 months. Wrap each layer individually in cling film and then foil. Thaw at room temperature for 2–3 hours, then frost as directed. The frosted assembled cake can also freeze for up to 1 month — freeze uncovered until the buttercream is solid, then wrap. Thaw overnight in the fridge and bring to room temperature before serving.
Frequently Asked Questions
Why do my sprinkles bleed into the batter and turn it grey?
Bleeding sprinkles are almost always nonpareils — the tiny, round, sugar-coated sprinkles. Their thin sugar shell dissolves quickly in wet batter and the dye bleeds throughout the batter before baking. Switch to rainbow jimmie sprinkles — the long, waxy, cylindrical ones — which have a wax coating that resists dissolving and holds their colour beautifully through both mixing and baking. Jimmies are widely available in any supermarket baking aisle and produce the vivid, distinct sprinkle dots you want in every slice.
Can I make Vanilla Funfetti Cake without buttermilk?
Yes. To substitute, combine 1 cup of whole milk with 1 tablespoon of white wine vinegar or fresh lemon juice. Stir briefly and let it sit at room temperature for 5 minutes until the milk curdles slightly and looks lumpy — this is normal and correct. Use this immediately in place of buttermilk. The acidic component is important for activating the baking soda and tenderising the crumb — do not simply substitute plain milk without the acid addition.
How do I get my funfetti cake layers to be perfectly flat and even?
Three techniques produce flat, even layers. First, weigh the batter in each tin rather than eyeballing it. Second, tap each filled tin firmly on the counter 2–3 times before baking to burst any large air bubbles and even out the batter. Third, use cake strips — damp fabric strips wrapped around the outside of each tin — which insulate the sides during baking and prevent the domed, cracked top that uninsulated tins produce. Flat layers stack more easily and look more professional when cut.
Can I make the cake and buttercream ahead of time?
Yes, and this is an excellent strategy for reducing day-of stress. The baked and cooled cake layers keep wrapped in cling film at room temperature for 24 hours or frozen for up to 3 months. The vanilla buttercream keeps covered at room temperature for 24 hours or refrigerated for up to 1 week — beat it briefly before using to restore its fluffy texture. Assembling and frosting the cake the morning of serving is the ideal approach for most celebrations.
Why is my vanilla funfetti cake dense instead of fluffy?
Dense funfetti cake almost always results from one of four causes: the butter was too cold during creaming and could not trap enough air bubbles; the creaming step was too short and did not build adequate air structure; the dairy ingredients were cold and caused the batter to curdle and lose air during mixing; or the batter was overmixed after the flour was added, developing too much gluten and producing a tough crumb. The most common cause is rushing the creaming step — it genuinely needs 4–5 minutes to build the right structure.
Final Thoughts
This Vanilla Funfetti Cake earns its place as the definitive celebration cake for every occasion that deserves something beautiful, delicious, and genuinely memorable. The buttery, tender vanilla crumb, the rainbow sprinkles dotted through every slice, the fluffy vanilla buttercream — every element works together to produce a cake that looks like a party and tastes like one too.
It works for birthdays, for celebrations, for Tuesday afternoons when someone deserves cake and the occasion does not strictly require one, and for any gathering where you want the dessert to generate audible happiness. Use jimmie sprinkles. Room-temperature dairy. Cream that butter for the full five minutes. Those three decisions make the difference between a good funfetti cake and a great one.
Preheat that oven. Pull that butter from the fridge now. And please, for the love of everything vibrant and colourful in baking, use the jimmies. Your slices will thank you.

Vanilla Funfetti Cake
Ingredients
Method
- Preheat your oven to 175°C (350°F). Grease two 23cm (9-inch) round cake tins and line the bases with parchment paper.
- Whisk together the flour, baking powder, baking soda, and salt in a medium bowl.
- Cream the unsalted butter and granulated sugar for about 4–5 minutes until light and fluffy.
- Add eggs one at a time, mixing well after each addition. Then mix in the vanilla extract and almond extract.
- Alternate adding the dry mixture and buttermilk/sour cream mixture to the batter, starting and ending with flour. Do not overmix.
- Fold in the rainbow jimmies gently and evenly distribute them without overmixing.
- Divide the batter between the prepared tins and smooth the tops with an offset spatula.
- Bake for 28–32 minutes until a toothpick inserted comes out clean. Let cool in tins for 15 minutes before transferring to wire racks to cool completely.
- Beat the unsalted butter for 3–4 minutes until pale and fluffy, then gradually add powdered sugar, mixing at low speed.
- Add vanilla extract, salt, and heavy cream, mixing for another 2–3 minutes.
- Once cake layers are completely cooled, frost the top of the first layer with a third of the buttercream.
- Place the second layer on top and frost the top and sides of the cake with the remaining buttercream.
- Press extra rainbow sprinkles onto the sides of the buttercream while soft.