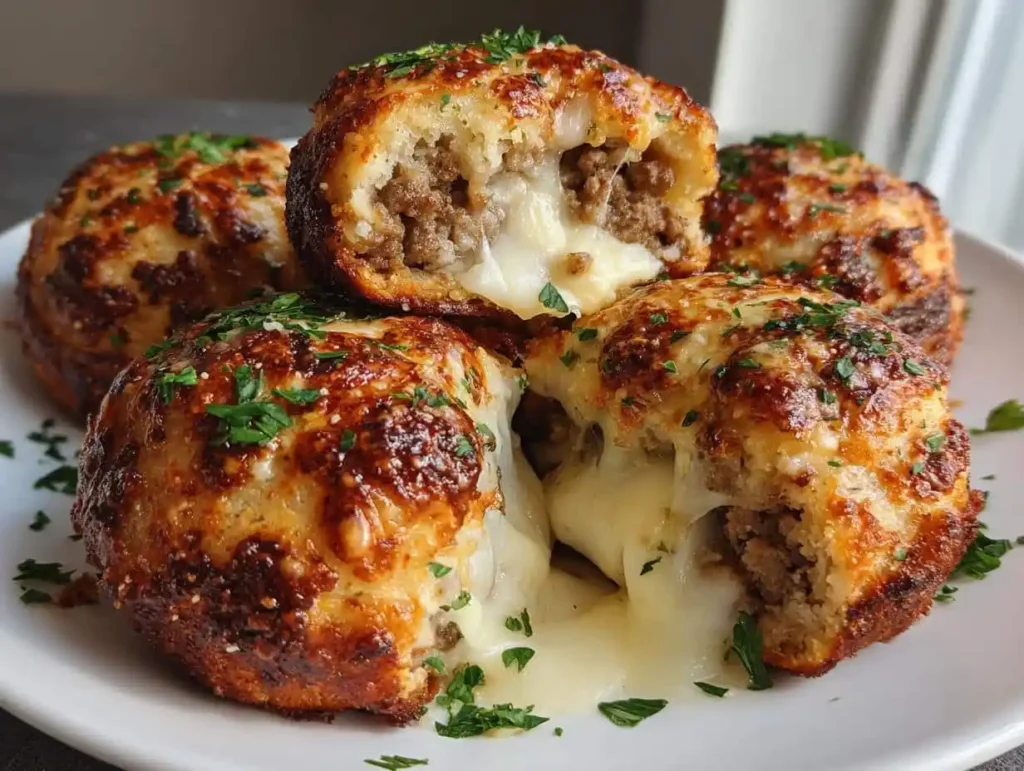
Servings: 8 bombs (serves 4) | Prep Time: 20 minutes | Cook Time: 12-15 minutes | Total Time: About 35 minutes
Golden biscuit dough. Molten mozzarella. Savory beef wrapped in garlic Parmesan butter. These garlic Parmesan cheeseburger bombs disappear off the plate faster than you can plate the next batch.
I made these for a potluck once and came home with an empty tray and three people demanding the recipe. That’s basically the highest compliment food can receive.
Ready to make the appetizer everyone fights over? Let’s get into it.
Why These Garlic Parmesan Cheeseburger Bombs Work So Well
Some recipes sound impressive but taste like a letdown. This one does the opposite, delivering way more flavor than its short ingredient list suggests it should.
The combination of textures is what really sells it. Crispy biscuit exterior, juicy seasoned beef, and a molten cheese center that stretches with every bite. That’s a serious trio.
Have you ever bitten into something and immediately needed a second one before finishing the first? That’s the exact experience waiting for you here.
Garlic Parmesan Cheeseburger Bombs Ingredients
This recipe uses simple, accessible ingredients that come together into something far more impressive than the shopping list suggests.
For the Filling:
- 1 pound ground beef (80/20 blend)
- 1 tube refrigerated biscuit dough (8-count)
- ½ cup shredded parmesan cheese
- 4 ounces mozzarella cheese, cut into 8 cubes
For the Seasoning:
- 1 teaspoon garlic powder
- 1 teaspoon onion powder
- ½ teaspoon salt
- ½ teaspoon black pepper
For the Finish:
- 2 tablespoons melted butter
- 1 tablespoon chopped fresh parsley (optional)
That’s the entire list. Ten ingredients, most already sitting in your kitchen right now.
Equipment You’ll Need
Nothing complicated here, just a few basics most kitchens already have on hand.
- A baking sheet
- A large skillet
- A mixing bowl
- A pastry brush, or just a spoon works fine too
How to Make Garlic Parmesan Cheeseburger Bombs, Step by Step
This process breaks down into three manageable stages: cooking the filling, assembling the bombs, and baking them to golden perfection. Let’s walk through each one in detail.
Step One: Preheat the Oven and Brown the Beef
Start by preheating your oven to 375°F so it’s fully ready once your bombs are assembled. Getting this step done early saves you from waiting around later with sticky hands and impatient hunger.
Heat a large skillet over medium heat and add the ground beef, breaking it apart with a spatula as it cooks. Continue cooking for about five to seven minutes, until no pink remains anywhere in the meat.
Tilt the skillet slightly and spoon off any excess fat that’s collected at the bottom. Skipping this step leaves you with greasy, soggy bombs instead of ones with a satisfying crisp exterior.
Step Two: Season the Beef Mixture
Sprinkle the garlic powder, onion powder, salt, and black pepper directly into the cooked beef. Stir everything together thoroughly, making sure the seasoning distributes evenly rather than clumping in just one section of the pan.
Let the seasoned beef cook for another minute so the spices bloom slightly in the residual heat. Your kitchen should start smelling seriously good around this point, which is generally a good sign you’re doing something right.
Remove the skillet from heat and set the beef mixture aside to cool slightly. Working with beef that’s too hot makes assembly trickier and increases the risk of burnt fingers.
Step Three: Flatten the Biscuit Dough
Open your tube of biscuit dough and separate the individual biscuits. Using your hands, gently press and stretch each one into a flat circle roughly four inches across.
You don’t need a rolling pin for this step. Just work the dough evenly with your fingers, rotating it slightly as you press so it stretches into a relatively uniform circle instead of an odd, lopsided shape.
Keep the dough circles consistent in thickness across the batch. Uneven thickness means uneven baking, and you want every bomb finishing at the same golden-brown moment.
Step Four: Fill and Seal Each Bomb
Spoon about two tablespoons of the seasoned beef mixture into the center of each flattened dough circle. Place one mozzarella cube directly on top of the beef in each portion.
Gather the edges of the dough up and around the filling, pinching them firmly together to seal. This step matters enormously, since a loose seal lets cheese leak out during baking and creates a genuinely disappointing mess.
If the dough resists sticking together, wet your fingertips slightly with water before pinching the edges. This small trick makes a noticeably better seal and keeps that molten cheese exactly where it belongs.
Roll each sealed bomb gently between your palms to smooth it into a round shape. Place it seam-side down on your prepared baking sheet, then repeat with the remaining seven portions.
Step Five: Bake Until Golden Brown
Slide the baking sheet into your preheated oven and bake for 12 to 15 minutes. Start checking around the 12-minute mark, since ovens vary and you want golden brown, not a deep, dark brown that means overbaking.
You’ll know they’re finished when the tops turn evenly golden and the bottoms develop a nice, crisp color. If you spot cheese peeking through any seams, that’s a good sign they’re close to done.
Step Six: Add the Garlic Parmesan Finish
While the bombs are still hot from the oven, brush each one generously with melted butter. This step is exactly what creates that final layer of crispiness and rich, garlicky flavor everyone notices immediately.
Immediately sprinkle grated parmesan cheese over the buttered tops. The residual heat helps the cheese stick perfectly instead of just falling off onto the pan.
If you’re using fresh parsley, sprinkle it on now for a pop of color against the golden crust. Let the bombs rest for about two minutes before serving so nobody burns their tongue on that molten cheese center.
Tips for Foolproof Garlic Parmesan Cheeseburger Bombs
A handful of small habits separate a good batch from a genuinely great one. Keep these in mind every time you make this recipe.
- Keep the dough cold. Biscuits handle much easier straight from the fridge; if they warm up too much, chill them for five minutes.
- Seal tightly. Wet fingertips help stubborn dough stick together and prevent leaks during baking.
- Match your thickness. Keep every dough circle roughly the same thickness for even, consistent baking.
- Prevent sticking. A light spray of cooking spray on the baking sheet saves considerable frustration during cleanup.
- Double the batch. These disappear fast, and one tray is rarely enough when people know what’s coming.
Fun Variations on Garlic Parmesan Cheeseburger Bombs
Once you’ve made the basic version, feel free to get creative. This recipe handles substitutions and add-ins remarkably well without losing what makes it great.
- Lighter option: Swap ground beef for ground turkey or chicken, adding a bit of extra seasoning since leaner meat carries less natural flavor.
- Cheese swap: Try sharp cheddar for a classic burger flavor, or pepper jack if you want a spicy kick.
- Veggie boost: Stir finely diced onions or mushrooms into the beef while it cooks for extra texture and flavor.
- Dough alternative: Use crescent roll dough for extra flakiness, or puff pastry for a fancier presentation, reducing bake time slightly.
Serving Suggestions for Garlic Parmesan Cheeseburger Bombs
These bombs practically beg for a good dipping sauce, thanks to that molten cheese center. Here are a few pairings worth trying.
- Marinara sauce, for a mini pizza-bomb experience.
- Ranch dressing, which cuts through the richness nicely.
- Spicy mayo, made by mixing mayonnaise with a squeeze of hot sauce.
- A crisp green salad, if you’re turning this into a full meal.
- Sweet potato fries, for that classic salty-sweet combination.
Storing and Reheating Garlic Parmesan Cheeseburger Bombs
If any bombs somehow survive the first serving, let them cool before transferring to an airtight container. They’ll keep in the fridge for about two days without much quality loss.
For longer storage, wrap each bomb individually in foil and freeze in a bag for up to a month. Freezing before adding the final parmesan topping preserves the best texture once reheated.
Skip the microwave when reheating, since it turns the crispy exterior soggy almost instantly. Instead, warm them in a 350°F oven for five to seven minutes, brushing with a bit more melted butter beforehand for extra crispness.
Garlic Parmesan Cheeseburger Bombs FAQs
Can I freeze these cheeseburger bombs? Yes, definitely. Assemble them without the final butter and parmesan topping, freeze on a baking sheet, then transfer to a freezer bag. Bake from frozen, adding three to five extra minutes.
Can I use puff pastry instead of biscuit dough? Absolutely. Cut the puff pastry into squares and reduce the bake time to about 10-12 minutes, since puff pastry browns considerably faster than biscuit dough.
How do I stop the cheese from leaking out during baking? Pinch the dough edges tightly, using a bit of water on your fingertips if needed for a better seal. Always place the bombs seam-side down on the baking sheet.
Can I assemble these ahead of time? Yes. Assemble the bombs up to two hours before baking and keep them chilled in the fridge. Cold dough actually seals better and holds its shape well during baking.
What’s the best way to reheat leftover bombs? Avoid the microwave, since it makes the exterior soggy. Reheat in a 350°F oven for five to seven minutes instead, which restores much of the original crispness.
Can I make these with a different type of ground meat? Sure. Ground turkey or chicken both work well as lighter substitutes, though adding a touch more seasoning helps compensate for their milder natural flavor.
Final Thoughts on Garlic Parmesan Cheeseburger Bombs
This garlic Parmesan cheeseburger bombs recipe delivers everything a great appetizer should: crispy exterior, juicy filling, and a cheese pull that makes people stop mid-conversation. Simple ingredients, straightforward steps, seriously impressive results every time.
Have you ever made a party snack that vanished before you even got a plate for yourself? That’s exactly the fate waiting for this recipe.
Make a batch this weekend and watch them disappear. FYI, doubling the recipe upfront saves you the trouble of making a second round later.



