Prep Time: 20 minutes | Cook Time: 1 hour 15 minutes | Chilling Time: 4 hours (minimum) | Servings: 10 to 12 slices
Why Would Anyone Make Luncheon Meat From Scratch?
That is probably the first thing running through your head right now. You can just grab a can from the grocery store, so why bother making your own luncheon meat at home? I asked myself the exact same thing before I actually tried it.
Here is what changed my mind: when you make luncheon meat from scratch, you control every single ingredient that goes in. No mystery preservatives, no excess sodium, and no wondering what that unpronounceable additive actually is. You get real, honest-to-goodness flavored meat that tastes ten times better than anything from a tin.
I grew up eating canned luncheon meat fried golden in a pan with eggs on the side. It was a staple in our house. But the first time I made my own version at home, I genuinely could not believe how much better it tasted. The texture alone was worth every minute of effort.
What Exactly Is Luncheon Meat?
Luncheon meat is a cooked, processed meat product — usually made from ground pork or a pork and ham blend — that gets seasoned, packed into a mold, and cooked until firm. It is mild, slightly salty, and has that smooth, dense texture that makes it so versatile.
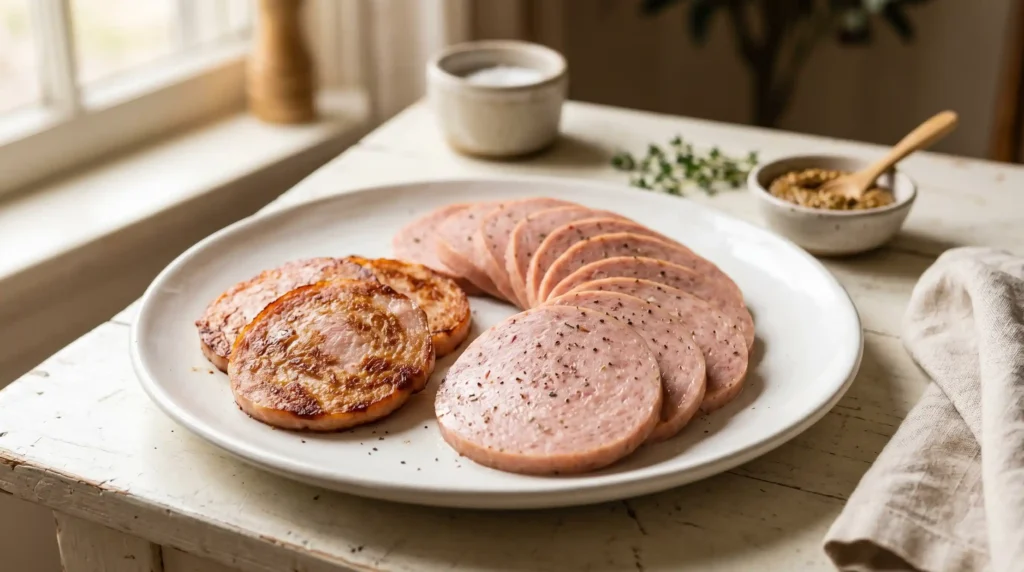
You can slice it thin for sandwiches, cube it into fried rice, or cut it thick and pan-fry it until the edges turn crispy and caramelized. IMO, the pan-fried version is where luncheon meat truly reaches its peak. Something magical happens to it in a hot skillet.
The homemade version uses simple, real ingredients and skips the shelf-stable preservatives that canned versions rely on. It does need to be refrigerated and eaten within a week, but honestly, it never lasts that long anyway.
Ingredients You Need to Make Luncheon Meat
Nothing on this list requires a special trip to a specialty store. Everything here comes from a standard supermarket, and you likely already have most of it at home.
For the Meat Base
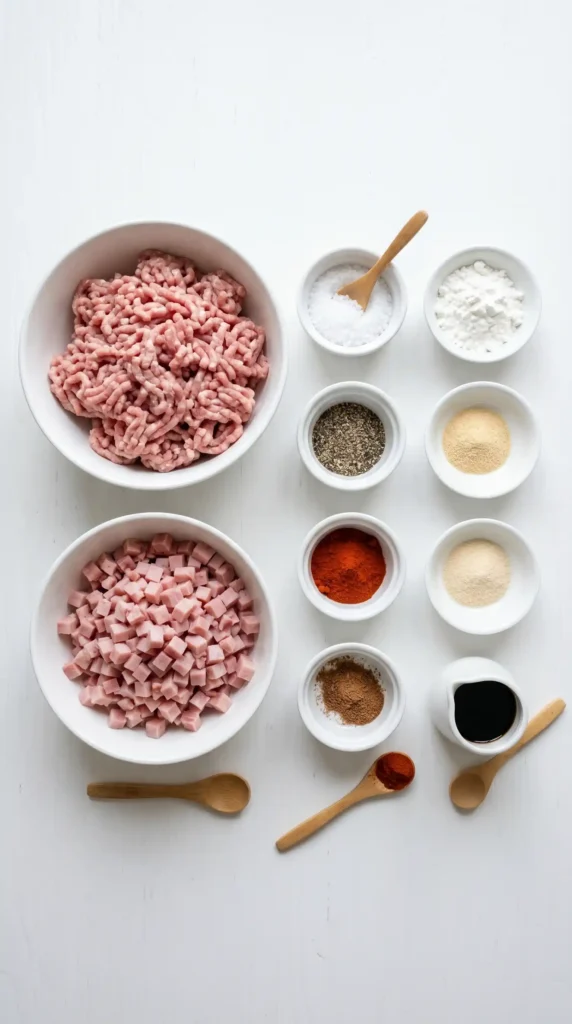
- 900g (2 lbs) ground pork — choose a blend with about 20% fat for the best texture and flavor
- 150g (5 oz) cooked ham, finely diced or processed — this adds that classic luncheon meat character
- 2 tablespoons cold water
- 1 tablespoon potato starch or cornstarch — helps bind the mixture and keeps the texture smooth
For the Seasoning
- 1 and 1/2 teaspoons fine salt
- 1 teaspoon white sugar
- 1/2 teaspoon white pepper
- 1/4 teaspoon garlic powder
- 1/4 teaspoon onion powder
- 1/4 teaspoon smoked paprika — optional but adds a lovely subtle depth
- 1/8 teaspoon ground nutmeg — sounds odd, but this is the secret ingredient in classic luncheon meat
- 1 tablespoon light soy sauce
For the Curing Mix (Optional but Recommended)
- 1/2 teaspoon Prague Powder No. 1 (curing salt) — gives that classic pink color and adds food safety for longer storage
- Note: If you prefer to skip curing salt entirely, the recipe still works beautifully — your luncheon meat will just be slightly grey in color and should be consumed within 4 to 5 days
How to Make Homemade Luncheon Meat — Full Step-by-Step
This process is more straightforward than it looks. Once you make it the first time, it becomes genuinely easy. Let me walk you through every step clearly so you know exactly what to expect.
Step 1 : Prepare the Pork Mixture
Take your ground pork out of the refrigerator about 10 minutes before you start. You want it cold but not rock-hard frozen. Cold meat processes better and holds its texture through the cooking process.
Place the ground pork into a large mixing bowl. If you are using a food processor, you can pulse the meat for 10 to 15 seconds to achieve a finer, smoother consistency. This mimics the processed texture of commercial luncheon meat more closely. Either way works — it just depends on your texture preference.
Add the finely diced ham into the bowl with the ground pork. The ham pieces add little pockets of flavor and give your homemade luncheon meat that characteristic texture variation you will recognize from the canned version.
Step 2 : Mix in the Seasonings
In a small bowl, combine all your dry seasonings — the salt, sugar, white pepper, garlic powder, onion powder, smoked paprika, nutmeg, and curing salt if you are using it. Mix them together first so everything distributes evenly into the meat.
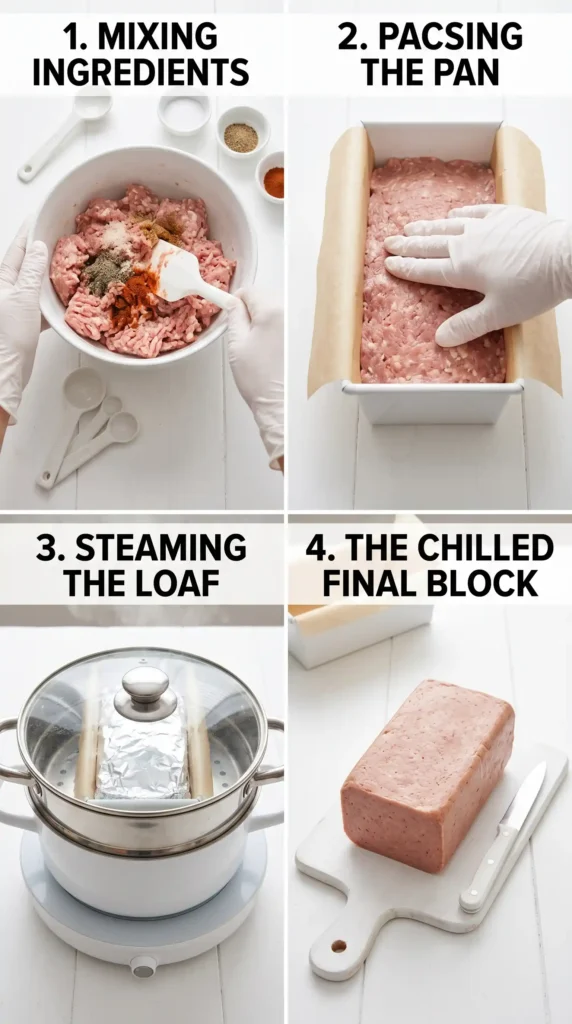
Pour the soy sauce and cold water over the ground pork. Add the dry seasoning mixture on top. Now mix everything together using your hands or a sturdy spatula. You want to mix this quite thoroughly — at least 3 to 4 minutes of active mixing. The mixture should become slightly sticky and hold together when you press it.
Sprinkle the cornstarch or potato starch over the meat mixture and mix it in completely. The starch acts as a binder and gives the finished luncheon meat that smooth, sliceable texture. Without it, the meat can crumble when you try to slice it cold.
Cover the bowl tightly with plastic wrap and refrigerate the seasoned meat mixture for at least 30 minutes. This resting period allows the salt to draw out a little moisture from the meat, which helps bind everything together even better during cooking.
Step 3 : Pack and Prepare for Cooking
Choose your cooking vessel. A standard loaf pan works perfectly — about 8 by 4 inches gives you a classic rectangular shape. You can also use a smaller baking dish or even a heat-safe food storage container if you want a different shape for slicing.
Line your loaf pan with a double layer of plastic wrap, leaving plenty of overhang on all sides. Press the plastic wrap firmly into the corners so it sits flush against the pan. This makes removing the cooked luncheon meat much easier later.
Spoon the seasoned meat mixture into the lined pan in layers. After each spoonful, press the meat down firmly with the back of a spoon or your fingers. You want to eliminate any air pockets completely. Air pockets cause the luncheon meat to have holes in it when sliced, which affects both texture and appearance.
Once all the meat is in the pan, fold the overhanging plastic wrap tightly over the top of the meat, pressing it down flat. Then cover the entire pan with a sheet of aluminum foil, crimping the edges tightly to seal it.
Step 4 : Steam Cook the Luncheon Meat
Set up your steamer. You need a large pot with a tight-fitting lid and a steaming rack that keeps the loaf pan above the waterline. Bring the water to a full rolling boil before you add the pan.
Place your sealed loaf pan on the steaming rack, cover the pot tightly, and steam over medium heat for 60 to 75 minutes. The internal temperature of the luncheon meat needs to reach 71 degrees Celsius (160 degrees Fahrenheit) to be fully cooked through. Use a meat thermometer to check this — do not guess.
Check the water level halfway through cooking. Steam cooking can burn through water faster than you expect, and a dry pot is a ruined pot. Add boiling water if the level drops low.
Alternatively, you can bake the luncheon meat. Place the sealed pan inside a larger roasting pan, add about 2 cm of hot water to the roasting pan (creating a water bath), and bake at 160 degrees Celsius (325 degrees Fahrenheit) for 75 to 90 minutes. The water bath ensures even, gentle heat — the same principle as steaming.
Step 5 : Chill and Unmold
Once fully cooked, remove the pan from the steamer or oven. Let it cool at room temperature for 20 minutes — do not rush this. Then place the whole pan in the refrigerator and chill for a minimum of 4 hours. Overnight is even better.
The chilling step is not optional. Luncheon meat needs to firm up completely in the cold before you can slice it cleanly. Trying to cut it while warm will give you a crumbling, messy result that tastes fine but looks nothing like what you are aiming for.
Once fully chilled, lift the luncheon meat out of the pan using the plastic wrap overhang. Peel the plastic wrap away carefully and place the meat block on a cutting board. Use a sharp knife to slice it to whatever thickness you prefer.
Step 6 :Serve It Your Way
Pan-fry thick slices in a lightly oiled non-stick skillet over medium-high heat for 2 to 3 minutes per side until deeply golden and slightly crispy on the edges. This is the best way to eat it, full stop.
Slice it thin and layer it into sandwiches with mustard and cheese. Cube it and toss it into fried rice or noodles. Dice it small and add it to scrambled eggs. However you use it, homemade luncheon meat holds up beautifully to heat and handles exactly like the store-bought version — just better
Tips That Make a Real Difference

Keep everything cold. Warm meat becomes sticky and hard to work with. If the mixture feels too soft at any point, put it back in the fridge for 15 minutes.
Do not under-season. Cold food always tastes less flavorful than warm food. Season the mixture generously — it will taste perfect once chilled and sliced.
Use a food processor for smoother texture. If you want a very smooth, commercial-style luncheon meat, process the entire meat mixture in a food processor for 20 seconds before packing it into the pan.
Wrap individual slices for freezing. You can freeze homemade luncheon meat for up to 2 months. Wrap each slice separately in plastic wrap, then place them in a freezer bag.
Frequently Asked Questions
Can I use ground chicken or turkey instead of pork?
Yes, you can substitute ground chicken or turkey for a lighter version. The texture will be slightly different — a bit firmer and leaner — but the flavor is still excellent. Add an extra tablespoon of oil to the mixture to compensate for the lower fat content and prevent the luncheon meat from turning dry.
How long does homemade luncheon meat last in the fridge?
Without curing salt, homemade luncheon meat stays good in the refrigerator for 4 to 5 days. With curing salt added, it keeps well for up to 7 days. Always store it wrapped tightly in plastic wrap or in an airtight container. FYI, the flavor actually improves slightly on day two as the seasonings settle in.
Why does my luncheon meat crumble when I slice it?
Crumbling usually means one of three things: the meat was not mixed long enough to develop the protein bonds, the starch was skipped or under-measured, or the luncheon meat was not chilled long enough before slicing. Make sure you mix thoroughly, include the full amount of starch, and chill for at least 4 hours before cutting.
Can I add other flavors or mix-ins?
Absolutely — and this is where homemade luncheon meat gets really fun. Try adding finely diced jalapenos for heat, a teaspoon of fish sauce for extra umami, or a pinch of five-spice powder for an Asian-inspired flavor profile. Just avoid adding anything too wet or chunky, as it can affect the texture and binding.
Do I need curing salt to make this recipe?
No, curing salt is optional. It gives the luncheon meat its classic pink color and extends its shelf life slightly, but the recipe works fine without it. If you skip it, your luncheon meat will have a natural grey color once cooked, which looks different but tastes just as good. Use it if you can find it; skip it if you cannot.
Can I make this recipe in advance for a party or meal prep?
This recipe is perfect for meal prep. Make a full batch on Sunday and you have luncheon meat ready to go all week. Slice it as needed rather than slicing the whole block at once — this keeps the uncut portion fresher for longer. It works beautifully in breakfast plates, packed lunches, and quick dinners throughout the week.
Make It Once and You Will Not Go Back to the Can
Homemade luncheon meat takes a little more effort than pulling a ring tab, but the payoff is completely worth it. You get better flavor, cleaner ingredients, and the genuine satisfaction of making something from scratch that tastes this good.
Whether you pan-fry it for breakfast, tuck it into a sandwich, or toss it through fried rice, this luncheon meat recipe delivers every single time. Once you taste the real thing, the canned version is going to feel like a significant step down.
Get that ground pork out and give this a go this weekend. Your future self — the one eating golden, crispy-edged luncheon meat with a perfectly runny egg on the side — will thank you.

Luncheon Meat
Ingredients
Method
- Take the ground pork out of the refrigerator about 10 minutes before you start.
- Place the ground pork into a large mixing bowl or pulse in a food processor for a finer consistency.
- Add the finely diced ham into the bowl.
- In a small bowl, combine all dry seasonings and mix them together.
- Pour the soy sauce and cold water over the ground pork and add the dry seasoning mixture.
- Mix thoroughly for at least 3 to 4 minutes until the mixture is slightly sticky.
- Sprinkle the starch over the mixture and mix completely.
- Cover the bowl tightly and refrigerate the mixture for at least 30 minutes.
- Line a loaf pan with a double layer of plastic wrap.
- Spoon the seasoned meat mixture into the lined pan, pressing firmly to eliminate air pockets.
- Fold the overhanging plastic wrap over the meat and cover the entire pan with aluminum foil.
- Set up your steamer with water boiling prior to adding the pan.
- Place the sealed loaf pan on the steaming rack and steam over medium heat for 60 to 75 minutes.
- Alternately, bake in a water bath at 160°C (325°F) for 75 to 90 minutes.
- Remove from the steamer or oven and let cool at room temperature for 20 minutes.
- Refrigerate for a minimum of 4 hours before slicing.
- Pan-fry slices in a non-stick skillet over medium-high heat until golden and crispy.
- Alternatively, slice it thin, cube it for fried rice, or add it to scrambled eggs.


