
Prep: 10 min Cook: 10 min Set: 30 min Total: ~50 min Servings: 16 bars Difficulty: Easy
There are Rice Krispie treats. And then there are Banana Pudding Rice Krispies. The difference between them is approximately the same as the difference between a good day and an excellent one. One small tweak — banana pudding mix stirred into the marshmallow base — transforms the most familiar snack in the world into something genuinely extraordinary.
I brought these to a potluck expecting them to sit politely next to the more impressive-looking desserts. They disappeared first. Before the fancy layer cake. Before the brownies. A grown adult asked me if there were more in the car. There were not, and I still think about that day with mild regret.
Have you ever made something that required almost no effort but generated a completely disproportionate amount of excitement? This is that recipe. Let us make it properly.
Why Banana Pudding Rice Krispies Are So Irresistible
The genius of this recipe is how one ingredient changes everything. Instant banana pudding mix stirred into the hot marshmallow butter mixture does three things simultaneously: it adds deep banana flavour throughout every single bite, it introduces a faint vanilla custard note that echoes classic banana pudding, and it makes the finished bars slightly chewier and more substantial than a standard treat.
The crushed vanilla wafers add a second layer of banana pudding authenticity. Vanilla wafers are inseparable from the classic Southern banana pudding recipe — including them here makes the connection between the two desserts immediate and unmistakable. They also add a pleasant, slightly crunchy texture contrast against the chewy marshmallow base.
The white chocolate drizzle on top completes the picture. White chocolate is sweeter and creamier than milk chocolate and pairs with banana flavour far more harmoniously. It adds a visual finish that makes these look like they came from a bakery rather than a saucepan and a baking dish. IMO, this is the best version of a Rice Krispie treat that exists.
What You Need
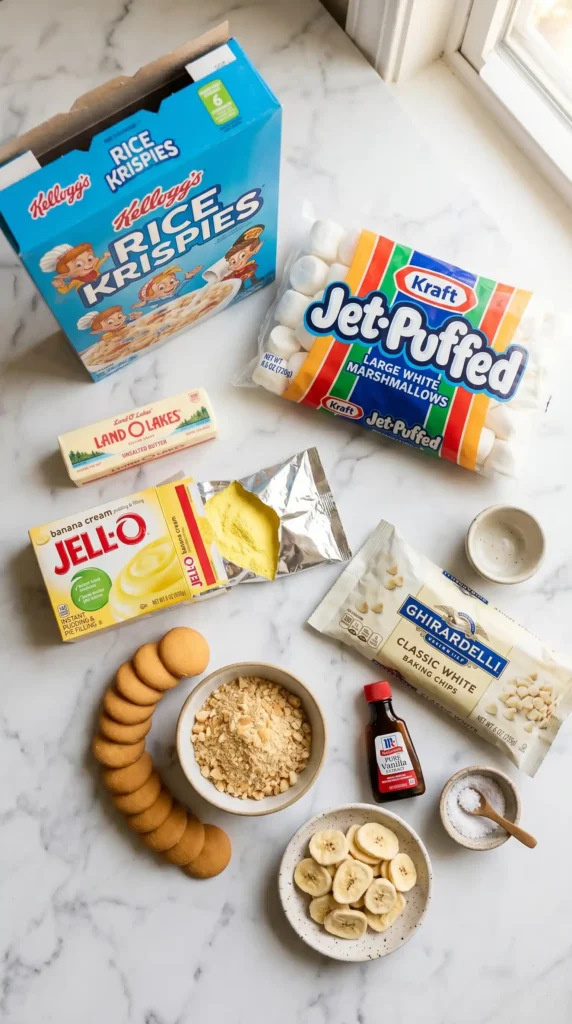
Six core ingredients, all readily available at any grocery store. Nothing here requires specialty sourcing. The instant banana pudding mix does most of the flavour work — use the standard 3.4 oz (96g) box of Jell-O instant banana cream pudding or any equivalent brand. Do not use cook-and-serve pudding, which behaves differently in this recipe.
For the Rice Krispie Base
- 6 cups (168g) Rice Krispies cereal (or any crisp rice cereal)
- 1 package (283g / 10oz) large marshmallows, or 5 cups of mini marshmallows
- 4 tablespoons (57g) unsalted butter
- 1 package (96g / 3.4oz) instant banana cream pudding mix, dry — do not prepare it
- 1 teaspoon pure vanilla extract
- 1/4 teaspoon salt
- 1 cup (about 30–35) vanilla wafer cookies, roughly crushed into small pieces
- 1/2 cup (85g) white chocolate chips, stirred into the mixture
For the Topping
- 1/2 cup (85g) white chocolate chips, melted for drizzling
- 1 teaspoon neutral oil (to thin the melted white chocolate for drizzling)
- 1/2 cup additional crushed vanilla wafers for sprinkling on top
- Optional: 1/4 cup freeze-dried banana slices, roughly crumbled
Dry Pudding Mix — Do Not Prepare ItThis recipe uses the dry instant pudding powder straight from the package — not prepared pudding. You add the dry powder directly into the hot marshmallow mixture where it dissolves and disperses throughout the base. Preparing the pudding first and then adding it would make the mixture far too wet and produce bars that never set properly. Always add it dry.
How to Make Banana Pudding Rice Krispies

This is one of the fastest dessert recipes you will ever make. The active cooking time is under 10 minutes. The rest is just pressing, drizzling, and waiting for the bars to set. Read through the full process once before starting — the marshmallow mixture moves quickly once it is hot and you need to have everything measured and ready before the butter hits the pan.
Step 1: Prepare Your Pan and Measure Everything First
Grease a 9×13-inch (23x33cm) baking pan generously with butter or cooking spray and set it aside within arm’s reach of your stovetop. Line it with parchment paper with overhang on two sides if you want to lift the bars out cleanly for slicing — this makes cutting dramatically easier and produces neater squares. Press the parchment flat against the greased base.
Before you turn on the heat, measure out all your ingredients and have them standing ready in individual bowls or cups. Measure the cereal into a large mixing bowl. Crush the vanilla wafers into rough, irregular pieces — aim for a mix of small crumbs and pea-sized chunks for the best texture — and have them in a separate bowl. Measure out the white chocolate chips. Open the pudding mix. Have the vanilla extract ready. This mise en place takes three minutes and prevents the single biggest mistake people make with this recipe: adding things in the wrong order because you were not ready.
Step 2: Melt the Butter and Marshmallows
Place the butter in a large, heavy-bottomed saucepan over medium-low heat. Let it melt slowly — do not rush this on high heat. High heat scorches the butter before the marshmallows go in, which gives the finished bars a slightly burnt undertone that competes with the banana flavour. Medium-low is the correct setting throughout this entire step.
Once the butter is fully melted and just starting to foam slightly, add all the marshmallows at once. Stir continuously using a wooden spoon or a heat-resistant silicone spatula. The marshmallows will resist melting for the first 60 seconds — keep stirring and they will begin to soften and collapse into the butter. Continue stirring steadily for 3–4 minutes until every marshmallow has fully melted and the mixture looks completely smooth, glossy, and uniform with no visible marshmallow chunks remaining.
FYI — do not walk away during this step, not even for 30 seconds. Marshmallow-butter mixture sitting unattended on heat sticks to the bottom of the pan and burns quickly. Keep stirring from the moment the marshmallows go in until the moment you remove the pan from the heat. This is the only genuinely hands-on part of the recipe and it lasts less than five minutes.
Step 3: Add the Pudding Mix, Vanilla, and Salt
Remove the saucepan from the heat entirely — slide it off the burner completely rather than just turning the heat off. Add the dry banana pudding powder, vanilla extract, and salt to the hot marshmallow mixture immediately. Stir vigorously and continuously for about 30–45 seconds until the pudding powder dissolves completely into the mixture and no dry yellow streaks remain visible.
The mixture will turn a soft, pale yellow colour from the banana pudding powder — this is exactly right and it smells absolutely wonderful at this stage. Taste a tiny amount from the spoon if you like. The banana flavour should be present and pleasant, not artificial or overpowering. If you want a stronger banana note, you can add a 1/4 teaspoon of banana extract at this point alongside the vanilla, though the pudding mix alone provides a very solid flavour base without it.
Step 4: Fold In the Cereal, Wafers, and White Chocolate
Working quickly, add the Rice Krispies cereal to the saucepan all at once. Using your spatula, fold the cereal into the marshmallow mixture using large, sweeping strokes. Every piece of cereal needs to get coated — keep folding and turning the mixture in the pan until no dry cereal remains visible and everything looks evenly coated in the pale yellow marshmallow mixture. This takes about 60–90 seconds of steady folding.
Add the crushed vanilla wafer pieces and the 1/2 cup of white chocolate chips to the coated cereal mixture. Fold them in with the same gentle, sweeping strokes — about 10–12 folds total. The white chocolate chips will begin to melt slightly against the warm mixture, which creates small pockets of creamy white chocolate distributed throughout the finished bar. The vanilla wafer pieces should stay relatively intact — you want distinct crunchy bits rather than them crumbling completely into the mixture.
Move efficiently through this step. As the mixture cools, it becomes increasingly difficult to fold and press. The entire folding process — cereal, wafers, and chips — should take no more than 90–120 seconds total before you transfer to the pan. Cold Rice Krispie mixture does not press flat; it crumbles and tears instead of forming a cohesive, even layer.
Step 5: Press Into the Pan
Transfer the mixture to your prepared baking pan immediately. Using lightly greased hands or a piece of parchment paper pressed over the top, firmly press the mixture into an even layer across the entire pan. Press it into the corners and push down with consistent, even pressure across the whole surface. A flat-bottomed glass or measuring cup works well for getting the top perfectly level.
The key word here is firmly. A light press leaves the bars too airy and they fall apart when sliced. Press with genuine force — the mixture needs to be compact and dense so the bars hold their shape cleanly once set. Press every section of the pan, including the edges and corners which tend to get neglected and end up crumbly. After pressing, the surface should feel solid and flat, not spongy or yielding.
Step 6: Add the Topping and Set
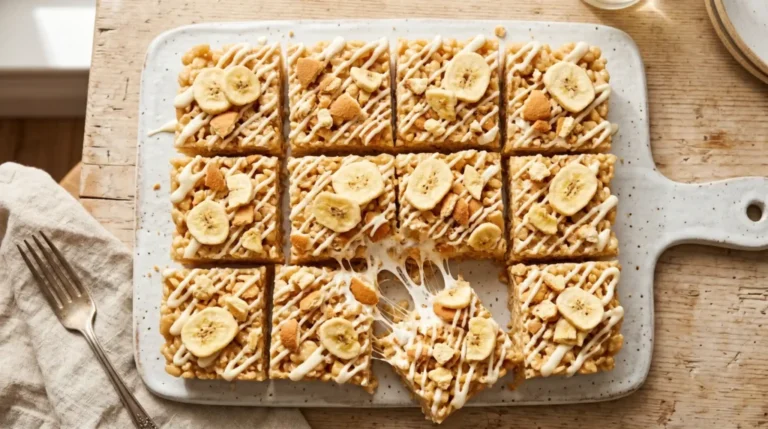
Melt the remaining 1/2 cup of white chocolate chips with the neutral oil in a microwave-safe bowl in 30-second intervals, stirring between each, until completely smooth. The oil thins the chocolate slightly so it drizzles freely rather than sitting in thick blobs. Transfer the melted white chocolate to a zip-lock bag, snip one very small corner, and pipe it back and forth across the top of the pressed bars in thin, even lines.
Immediately scatter the additional crushed vanilla wafers and any freeze-dried banana slices over the warm white chocolate drizzle. The drizzle acts as a glue that holds the toppings in place as it sets. Press the toppings very gently into the chocolate with your fingertips so they adhere properly. Allow the Banana Pudding Rice Krispies to set at room temperature for at least 30 minutes before slicing, or refrigerate for 15 minutes to speed up the process.
Cutting Clean Bars Every TimeUse a sharp knife sprayed lightly with cooking oil spray for the cleanest cuts. The oil prevents the marshmallow from dragging and tearing as the knife moves through. Wipe the blade clean between cuts. For the most precise squares, score the surface lightly with a ruler and knife before making full cuts — this gives you a guide to follow and produces professional-looking, even bars.
Variations Worth Making

Chocolate-Covered Banana Pudding Bars
Instead of a white chocolate drizzle, spread a full layer of melted milk chocolate over the top of the pressed bars using a spatula. Allow it to set completely before slicing — this takes about 45 minutes at room temperature or 20 minutes in the fridge. The milk chocolate layer adds a contrasting richness against the sweet banana base that makes these taste like a sophisticated candy bar.
Peanut Butter Banana Pudding Rice Krispies
Add 1/4 cup of smooth peanut butter to the marshmallow mixture at the same time as the butter, stirring it in before the marshmallows go in. The peanut butter melts into the base and adds a salty, nutty richness that pairs with banana flavour the way it does in every great banana-peanut butter combination. Swap the white chocolate chips for peanut butter chips throughout. :/
Strawberry Cheesecake Version
Swap the banana pudding mix for instant cheesecake pudding mix. Replace the vanilla wafers with crushed graham crackers. Add freeze-dried strawberry pieces to the mixture and the topping. The result is a strawberry cheesecake Rice Krispie bar that delivers the same impressive results with a completely different flavour profile — equally crowd-pleasing and just as fast to make.
Storage and Make-Ahead Tips
Store Banana Pudding Rice Krispies in an airtight container at room temperature for up to 3 days. Separate layers with parchment paper to prevent them sticking together. The vanilla wafer pieces soften slightly over time as they absorb moisture from the marshmallow base — they taste great on day one and day two but lose their distinct crunch by day three. For crunchier bars throughout, store in the fridge and bring to room temperature before eating.
These bars freeze surprisingly well. Wrap individual bars in cling film, place in a zip-lock bag, and freeze for up to 6 weeks. Thaw at room temperature for 30–45 minutes before eating. The texture stays remarkably consistent after freezing and thawing, which makes these an excellent make-ahead option for parties or gatherings where you want impressive treats ready without day-of effort.
Frequently Asked Questions
Can I use cook-and-serve banana pudding instead of instant?
No — this recipe specifically requires instant banana pudding mix used dry, directly from the package. Cook-and-serve pudding mix has a different starch formulation that does not dissolve and disperse the same way when added dry to hot marshmallow mixture. It can leave grainy pockets in the finished bars and does not deliver the same smooth banana flavour throughout. Stick to instant pudding mix for consistent, reliable results every time.
Why are my Rice Krispie bars too hard after setting?
Hard bars almost always result from one of three causes: cooking the marshmallow mixture on too high heat, which caramelises the sugars and creates a firmer set; pressing the bars too hard with excessive force, which compacts them beyond the ideal density; or letting the mixture cool too much before pressing, which means you had to press harder to get it flat. Use medium-low heat, press firmly but not aggressively, and always transfer and press while the mixture is still warm and pliable.
Can I add real banana slices to the bars?
Fresh banana slices are not recommended inside the bars because they release moisture as they sit, which makes the surrounding Rice Krispies soggy and causes the bars to deteriorate quickly. Freeze-dried banana slices are the far better option — they deliver real banana flavour and a pleasant light crunch without releasing any moisture. Use them as a topping pressed into the white chocolate drizzle rather than stirred into the base for the best result.
How do I prevent the mixture from sticking to my hands while pressing?
Lightly spray your hands with cooking oil spray or coat them with a thin layer of softened butter before pressing. Both methods create a non-stick barrier between your skin and the marshmallow mixture. Alternatively, place a sheet of parchment paper over the top of the mixture and press through the paper — this gives you even pressure distribution across the surface and keeps the mixture completely off your hands. Rewet the parchment if it starts sticking.
Can I make a smaller batch in an 8×8 pan?
Yes. Halve all ingredient quantities and use an 8×8-inch (20x20cm) pan. The bars will be slightly thicker than the 9×13 version and will need a few extra minutes to set fully before slicing. The process stays identical. An 8×8 batch makes about 9 larger bars or 16 smaller bite-sized squares depending on how you slice them — great for a smaller household or when you want a test batch before committing to the full recipe.
Final Thoughts
These Banana Pudding Rice Krispies are the definition of maximum reward for minimum effort. Twenty minutes of active work, thirty minutes of setting time, and you have sixteen bars that taste like someone spent their entire afternoon baking. The banana pudding flavour, the vanilla wafer crunch, and the white chocolate drizzle all work together to create something that feels genuinely special rather than just convenient.
They work for every occasion imaginable: bake sales, potlucks, school lunches, game day spreads, late-night cravings, or gift boxes for people you want to impress. Keep a box of instant banana pudding mix in your pantry at all times. You will be glad you did.
Now go melt some marshmallows. Your kitchen is about to smell incredible and your friends are about to ask why you have been holding out on them.
Banana Pudding Rice Krispies
Ingredients
Method
- Grease a 9x13-inch (23x33cm) baking pan generously with butter or cooking spray and line it with parchment paper.
- Measure out and prepare all ingredients before starting.
- Melt the butter in a large, heavy-bottomed saucepan over medium-low heat.
- Once the butter is foaming, add all the marshmallows and stir continuously until fully melted and smooth.
- Remove from heat and mix in the dry banana pudding powder, vanilla extract, and salt until well combined.
- Fold in the Rice Krispies cereal, crushed vanilla wafers, and white chocolate chips quickly until evenly coated.
- Transfer the mixture to the prepared baking pan and press down firmly into an even layer.
- Melt the remaining white chocolate chips with the neutral oil and drizzle over the pressed bars.
- Sprinkle the additional crushed vanilla wafers and optional freeze-dried banana slices on top.
- Allow the bars to set at room temperature for at least 30 minutes or refrigerate for 15 minutes.


