Those adorable donut skewers from Pinterest? You can totally make them at home. These mini donut skewers turn simple store-bought donuts into an Instagram-worthy dessert that kids and adults both love.
I’m going to show you how to create the ultimate party treat. Get ready for seriously cute and delicious skewers.
Prep Time: 15 minutes
Total Time: 15 minutes
Servings: 12 skewers
Why These Skewers Work
Here’s what makes mini donut skewers absolutely perfect for parties. The presentation makes simple donuts feel special and elevated.
The skewers make them easy to eat. No sticky fingers or messy plates required.
I made these for my niece’s birthday and they were gone in minutes. Everyone wanted to know where I ordered them.
The customization options are endless. Match any party theme or color scheme easily.
The Essential Ingredients
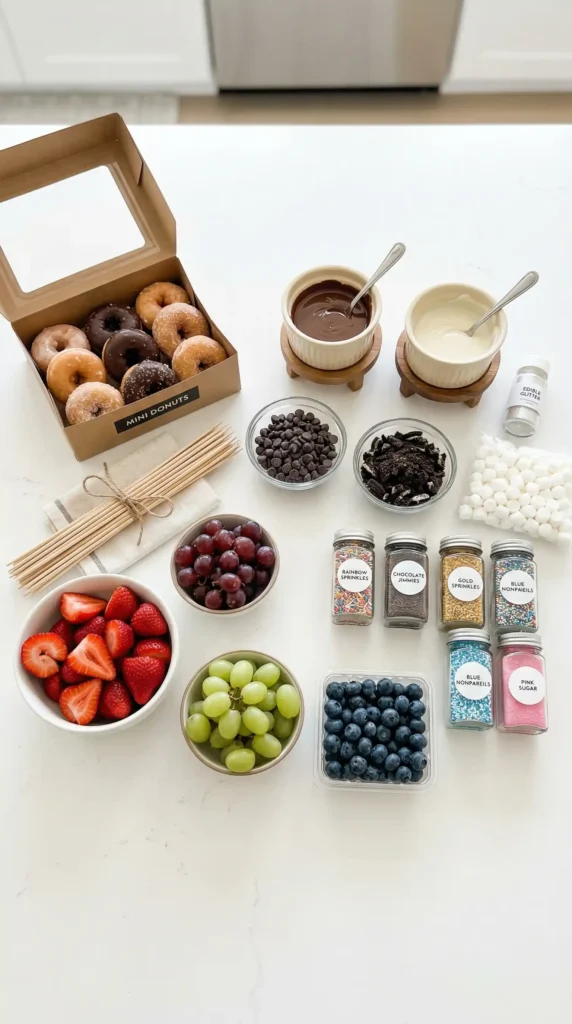
Let’s break down what you need for these party-perfect skewers. Simple components create impressive results.
For the Base:
- 24-36 mini donuts (plain or powdered)
- 12 wooden skewers (6-8 inches long)
- Fresh fruit (strawberries, grapes, blueberries)
- Marshmallows (optional)
Now For Decoration:
- 2 cups chocolate chips (melted)
- Sprinkles in various colors
- Crushed cookies or candy
- Edible glitter (optional)
- Chopped nuts (optional)
For Drizzle:
- White chocolate chips
- Food coloring
- Caramel sauce
Choosing Your Mini Donuts
Store-bought mini donuts work perfectly. Entenmann’s or bakery section options are ideal.
Plain mini donuts provide blank canvas. You control all the decorations.
Powdered sugar donuts add extra sweetness. They look elegant without effort.
Chocolate mini donuts create rich base. Great for chocolate lovers.
Have you noticed how mini donuts just look cuter? Size matters for presentation. :/
Skewer Selection Matters
Use wooden skewers 6-8 inches long. Bamboo skewers work too.
Avoid metal skewers for kids’ parties. Wooden is safer.
Decorative skewers with colored ends add flair. Check party supply stores.
Soak wooden skewers in water first. This prevents splintering.
Fresh Fruit Options
Strawberries add color and freshness. Hull them and cut into chunks.
Grapes provide pops of color. Red and green create contrast.
Blueberries are perfect size. They slide on easily.
Banana slices work but brown quickly. Add them last minute.
Kiwi adds bright green. Peel and slice into rounds.
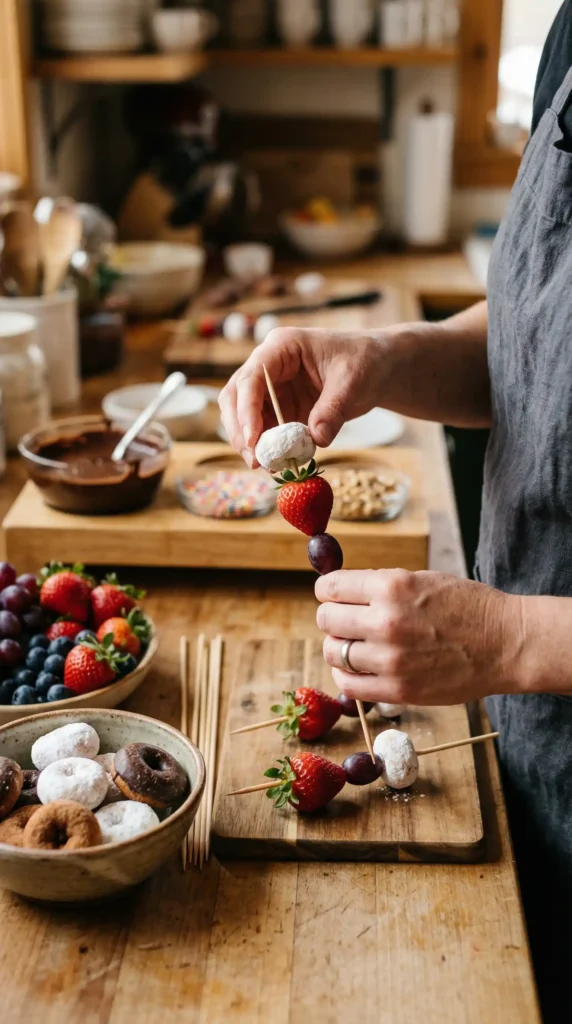
Making the Mini Donut Skewers
Preparing Your Workspace
Set up an assembly station. Cover your work surface with parchment paper.
Arrange all components in separate bowls. Organization makes assembly faster.
Melt chocolate in microwave-safe bowl. Heat in 30-second intervals, stirring between.
Prepare dipping stations with sprinkles and toppings. Shallow bowls work best.
Have a tray ready for finished skewers. Line it with parchment paper.
Threading the Skewers
Start with a strawberry or marshmallow at the bottom. This anchors everything.
Thread your first mini donut onto the skewer. Push it down gently.
Add a grape or blueberry next. Alternate colors for visual interest.
Add another mini donut. Push it snugly against the fruit.
Continue alternating donuts and fruit. Aim for 2-3 donuts per skewer.
Leave 2 inches at the top. This gives people something to hold.
The pattern is crucial. Plan it before you start threading.
Dipping in Chocolate
Hold skewer by the top end. Dip the bottom donut into melted chocolate.
Let excess chocolate drip back into bowl. Tap gently against the side.
Immediately dip in sprinkles or toppings. Work quickly before chocolate sets.
Rotate to coat evenly. Make sure all sides get covered.
Place on prepared tray to set. Don’t let skewers touch.
Repeat with remaining skewers. Work in batches if needed.
The chocolate sets in about 10 minutes. Room temperature is fine.
Adding Drizzles
Melt white chocolate in separate bowl. Add food coloring if desired.
Transfer to piping bag or ziplock with corner cut. This creates control.
Drizzle over the chocolate-dipped donuts. Zigzag patterns look professional.
Let drizzle set completely before moving. Give it 5-10 minutes.
You can drizzle caramel sauce too. Creates different flavor profile.
Final Decoration Touches
Sprinkle extra toppings while chocolate is still wet. They stick better.
Add edible glitter for sparkle. Kids especially love this.
Dust with powdered sugar. Creates elegant, snow-covered look.
Insert into styrofoam block for display. Stands them upright beautifully.
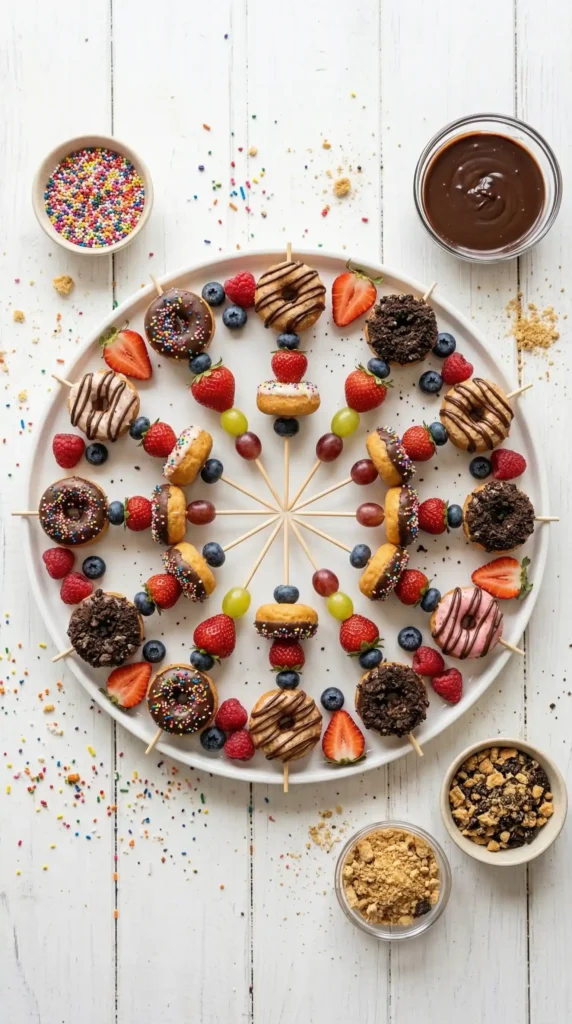
Presentation Ideas
Arrange skewers in a tall vase. Creates stunning centerpiece.
Stick them in a decorated flower pot. Fill with rice or beans for stability.
Lay them on a decorative platter. Surround with fresh flowers.
Create a rainbow pattern. Arrange by color for visual impact.
Stack them in a tower. Use styrofoam rounds for structure.
FYI, presentation is half the appeal. Make them look as good as they taste.
Theme Variations
Birthday party version uses rainbow sprinkles. Match to party colors.
Valentine’s Day features pink and red. Heart-shaped strawberries on top.
Halloween uses orange and black. Add candy corn for spooky vibes.
Christmas skewers feature red and green. Dust with powdered sugar for snow.
Baby shower uses pastels. Top with tiny fondant decorations.
Make-Ahead Strategy
Thread skewers up to 4 hours ahead. Store covered at room temperature.
Don’t add chocolate until closer to serving. It can get sticky.
Prep all toppings the night before. Store in separate containers.
The fruit stays fresh for several hours. Don’t cut it too far ahead.
IMO, 2 hours before party is perfect timing. Fresh but not rushed.
Storage Guidelines
Store finished skewers in single layer. Don’t stack or they’ll stick.
Keep at room temperature for 24 hours. Don’t refrigerate chocolate-covered ones.
If using fresh fruit, eat within 6 hours. Fruit releases moisture over time.
Transport carefully in shallow containers. Lay flat to prevent tipping.
Kid-Friendly Assembly
Let kids help thread fruit. They love hands-on activities.
Pre-dip the donuts for younger children. They can add sprinkles.
Use plastic skewers for safety. Blunt ends prevent accidents.
Set up a decorating station. Kids customize their own.
Supervise the chocolate dipping. Hot melted chocolate needs adult help.
Budget-Friendly Tips
Buy mini donuts in bulk. Warehouse stores have great deals.
Use seasonal fruit on sale. Berries cost less in summer.
Make your own chocolate coating. Melting chips is cheaper than candy melts.
Skip fancy decorations. Plain sprinkles work perfectly fine.
This dessert costs maybe $15 total. Makes 12 skewers for $1.25 each.
Common Mistakes to Avoid
Threading too many items makes skewers unstable. Keep it to 5-7 pieces.
Using warm donuts makes them fall apart. Let them cool completely.
Overfilling skewers leaves no handle. People need something to hold.
Not securing the bottom makes everything slide. Start with something stable.
Adding wet fruit to chocolate creates mess. Pat fruit dry first.
Why These Beat Regular Donuts
Regular donuts are boring at parties. These feel special and fun.
The skewers make portion control easy. One skewer per person.
Kids eat the fruit too. They’re distracted by the presentation.
They photograph beautifully. Instagram-worthy without trying.
Perfect for Every Occasion
Serve at birthday parties. Kids request these constantly.
Make for brunch gatherings. Fancy but not too sweet.
Bring to bake sales. They always sell out first.
Create for dessert bars. Adds height and visual interest.
Make for movie nights. Fun finger food alternative.
Dietary Modifications
Make gluten-free using GF mini donuts. They exist in most stores.
Vegan version uses vegan donuts and chocolate. Check labels carefully.
Nut-free skips the nut toppings. Use seeds instead for crunch.
Sugar-free donuts work for diabetics. Just watch the chocolate.
Final Thoughts on Skewer Perfection
These mini donut skewers prove party food doesn’t need complexity. Simple assembly creates impressive results.
The combination of donuts, fruit, and chocolate delivers complete satisfaction. Every component works together beautifully.
Once you make these, you’ll find excuses to make them again. They’re too cute and too easy.
So grab those mini donuts and start skewering. Your most Instagrammable dessert is about to happen.
FAQs
Can I make these the day before? You can thread the skewers 4-6 hours ahead, but wait to add chocolate until closer to serving. The chocolate can get sticky and the fruit releases moisture overnight.
What if I can’t find mini donuts? Cut regular donuts into quarters. They work just as well. You can also use donut holes, which are actually easier to thread onto skewers.
How do I keep the chocolate from getting too thick? Add 1 tablespoon coconut oil or shortening to melted chocolate. This thins it perfectly. Reheat in microwave if it starts to set while working.
Can I use fresh strawberries? Yes! Pat them completely dry before adding to skewers. Wet berries make chocolate seize up and create a mess. Hull them and cut into bite-sized pieces.
How do I transport these to a party? Lay them flat in a shallow container lined with parchment. Don’t stack. Cover loosely with plastic wrap. Keep them cool but not refrigerated.

Mini Donut Skewers
Ingredients
Method
- Set up an assembly station and cover your work surface with parchment paper.
- Arrange all components in separate bowls for faster assembly.
- Melt chocolate in a microwave-safe bowl, heating in 30-second intervals, stirring in between.
- Prepare dipping stations with sprinkles and toppings.
- Have a tray ready for finished skewers lined with parchment paper.
- Start with a strawberry or marshmallow at the bottom to anchor the skewer.
- Thread your first mini donut onto the skewer, pushing it down gently.
- Add a grape or blueberry next and continue alternating colors for visual interest.
- Aim for 2-3 donuts per skewer and leave 2 inches at the top for holding.
- Plan your pattern before you start threading.
- Hold the skewer by the top end and dip the bottom donut into melted chocolate.
- Let excess chocolate drip back into the bowl and tap gently against the side.
- Immediately dip in sprinkles or toppings before the chocolate sets.
- Place on the prepared tray and let the chocolate set for about 10 minutes.
- Melt white chocolate in a separate bowl and add food coloring if desired.
- Transfer to a piping bag or ziplock with the corner cut for better control.
- Drizzle over the chocolate-dipped donuts in zigzag patterns.
- Allow drizzle to set completely for 5-10 minutes before moving.
- Sprinkle extra toppings while the chocolate is still wet to help them stick.
- Consider adding edible glitter for sparkle and a dusting of powdered sugar.
- Insert skewers into a styrofoam block for display.