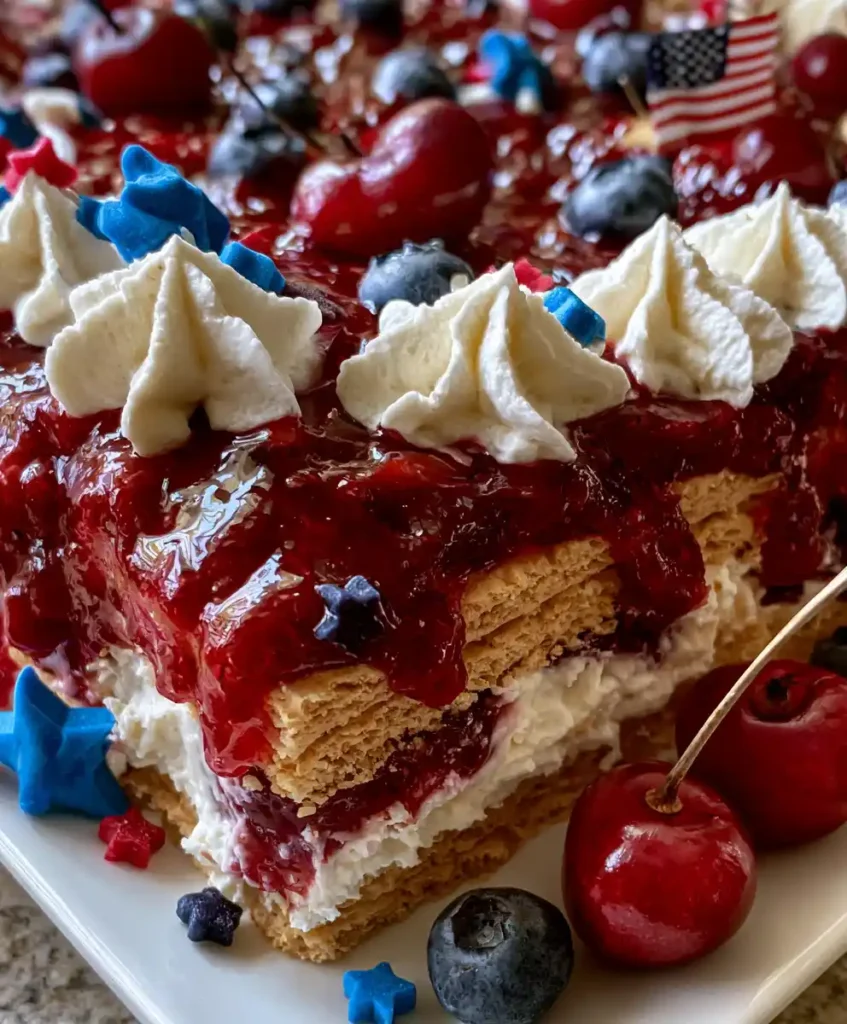
Nobody wants to turn on the oven when it’s already 95 degrees outside. This 4th of July Cherry Cheesecake Icebox Cake solves that problem completely, no baking required, just layers of creamy filling, crunchy graham crackers, and cherries.
I started making icebox cakes years ago during a brutal summer heatwave, and I never looked back. This one’s become my go-to for every backyard cookout since. Ready to keep your kitchen cool and your dessert table stunning?
Prep Time: 30 minutes Chill Time: 8 hours (overnight recommended) Servings: 12 generous slices
Why This Icebox Cake Belongs on Your Dessert Table
Have you ever noticed how the no-bake desserts disappear first at a summer party? There’s something about a cold, creamy slice that just hits different in July heat. This cake delivers that exact experience every single time.
The layers of tangy cheesecake filling, soft graham crackers, and sweet cherry topping create a texture combo that’s hard to beat. IMO, it tastes even better the longer it sits in the fridge.
Best of all, this recipe requires zero baking skills. If you can layer ingredients in a dish and operate a mixer, you’re already halfway to dessert glory.
Ingredients for 4th of July Cherry Cheesecake Icebox Cake
This recipe breaks into three simple parts: the cheesecake filling, the whipped topping, and the layers themselves. Here’s the full ingredient breakdown.
For the Cheesecake Filling
- Cream cheese, full-fat block style: 16 ounces, softened
- Powdered sugar: 1 cup
- Vanilla extract: 1 teaspoon
- Almond extract: 1/4 teaspoon, optional
- Heavy whipping cream: 1 1/2 cups
For the Whipped Topping
- Heavy whipping cream: 1 cup
- Powdered sugar: 2 tablespoons
Now For the Layers
- Honey graham crackers: 2 sleeves (about 18 crackers)
- Cherry pie filling: 2 cans (21 ounces each)
Now For Garnish
- Fresh cherries: 1/2 cup
- Fresh blueberries: 1/2 cup
- Blue star sprinkles: 2 tablespoons
That’s a fairly short list for a dessert that looks this impressive. Every ingredient earns its spot, nothing filler, nothing wasted.
A Quick Note on Ingredients
Use full-fat cream cheese here, not the reduced-fat kind. Reduced-fat versions carry more water, which can leave your filling looser than you want it to be.
Canned cherry pie filling saves serious time and delivers consistent sweetness every time. Feel free to make your own from scratch if you’re feeling ambitious, but canned works perfectly fine.
How to Make 4th of July Cherry Cheesecake Icebox Cake
This process breaks into four manageable stages: making the filling, whipping the cream, layering everything, and letting it chill. None of it is complicated, just a little time-dependent.
Step 1: Beat the Cream Cheese Until Smooth
Add your softened cream cheese to a large mixing bowl. Using an electric mixer on medium speed, beat it for about two minutes until it turns completely smooth with zero lumps remaining.
Don’t skip this step or rush through it. Any lumps that survive here will show up in your final slices, and nobody wants gritty pockets in an otherwise silky cheesecake filling.
Step 2: Add Sugar and Extracts
Add the powdered sugar, vanilla extract, and almond extract if you’re using it. Beat everything together on medium speed until the mixture looks fluffy and well combined.
The almond extract is optional, but it adds a subtle depth that pairs beautifully with the cherries. Skip it if you’re not a fan, the cake still tastes fantastic without it.
Step 3: Whip the Heavy Cream Separately
In a separate, clean bowl, add 1 1/2 cups of heavy whipping cream. Whip it on high speed using an electric mixer until stiff peaks form, which usually takes about three to four minutes.
Chilling your mixing bowl and beaters in the freezer for 10 minutes beforehand helps the cream whip up faster and fluffier. Small trick, big payoff.
Step 4: Fold the Whipped Cream Into the Filling
Gently fold the whipped cream into your cream cheese mixture using a rubber spatula. Work in slow, sweeping motions, scraping from the bottom of the bowl up and over.
Overmixing at this stage deflates all that airy volume you just worked to create. Stop folding as soon as no white streaks remain visible, and you’re left with a light, cloud-like filling.
Step 5: Prepare Your Baking Dish
Grab a 9×13-inch glass baking dish. Glass works best here since it lets you see those gorgeous layers from the side, which honestly makes the whole cake look more impressive.
Spread a thin layer of cheesecake filling across the bottom of the dish first. This keeps the first layer of graham crackers from sliding around while you build everything on top.
Step 6: Layer the Graham Crackers
Arrange a single layer of honey graham crackers over the thin filling base. Break the crackers as needed to fill in any gaps along the edges of the dish.
Don’t worry about making it look perfect at this stage. Once everything chills and softens together, small gaps and broken pieces disappear completely into the final structure.
Step 7: Add Filling and Cherry Layers
Spread about one-third of the remaining cheesecake filling over the graham crackers, smoothing it out with your spatula. Spoon one-third of the cherry pie filling on top, spreading it gently to the edges.
Repeat this entire layering sequence two more times, graham crackers, cheesecake filling, then cherry filling. You should end with three full layers of each component stacked neatly.
Step 8: Finish the Top Layer
For the final top layer, spoon the remaining cherry pie filling generously across the surface. Let it spread naturally toward the edges for that beautiful cascading look everyone loves in photos.
This top layer is what people see first, so take an extra minute to spread it evenly. A little effort here goes a long way toward presentation.
Step 9: Refrigerate for at Least 8 Hours
Cover the dish tightly with plastic wrap and place it in the refrigerator. Let it chill for a minimum of 8 hours, though overnight delivers the best texture and flavor.
This chilling time does the heavy lifting here. The graham crackers soften into a cake-like texture while the filling firms up into sliceable, structured layers.
Step 10: Whip Cream for Decoration
Right before serving, whip the remaining 1 cup of heavy cream with 2 tablespoons of powdered sugar until stiff peaks form. Transfer it into a piping bag fitted with a star tip.
Pipe small dollops around the border of the cake for a polished, bakery-style finish. No piping bag? A spoon and a little swirl motion work just fine too.
Step 11: Garnish and Serve
Top the whipped cream dollops with fresh cherries, blueberries, and blue star sprinkles. This final touch turns a simple icebox cake into a genuinely festive centerpiece.
Slice with a sharp knife, wiping the blade clean between cuts. This keeps those beautiful layers looking crisp and photo-ready on every single plate.
Tips for Success
A few small habits separate a good icebox cake from a great one. Keep these in mind as you work through the recipe.
- Fully soften the cream cheese before mixing to avoid lumps
- Chill your bowl and beaters before whipping cream for maximum fluffiness
- Fold whipped cream gently to keep the filling light and airy
- Let the cake chill overnight for the best texture and flavor
- Wipe your knife between slices for clean, defined layers
Fun Variations to Try
Once you’ve made this recipe once, feel free to experiment with the formula. This icebox cake adapts easily to different flavors and occasions.
- Berry Delight: Swap cherry pie filling for mixed berries like strawberries and blueberries
- Chocolate Version: Use chocolate wafer cookies instead of graham crackers for a richer base
- Nutty Crunch: Fold chopped pecans or walnuts into the cheesecake filling for texture
- Gluten-Free Option: Substitute gluten-free graham crackers for the same great layered effect
Serving Suggestions
This icebox cake tastes fantastic on its own, but a few pairings take it even further. Serve alongside a scoop of vanilla ice cream to double down on that creamy factor.
A glass of cold lemonade or iced tea rounds out the meal nicely. For presentation, serve on colorful plates to match that festive red, white, and blue theme.
Frequently Asked Questions
Can I make this icebox cake ahead of time?
Yes, and honestly, you should. Making it a full day in advance gives the graham crackers time to soften properly and lets the flavors meld together beautifully.
How long does this cake stay fresh in the fridge?
Stored tightly covered in the refrigerator, this cake stays fresh for up to 4 days. The texture actually holds up remarkably well over that time.
Can I freeze this cherry cheesecake icebox cake?
Freezing isn’t recommended, since the graham cracker layers and whipped topping don’t thaw back to their original texture very well. This cake is best enjoyed fresh from the fridge.
Can I use a different fruit topping?
Absolutely. Swap the cherry pie filling for blueberry, strawberry, or even a mixed berry filling depending on your preference or what’s in season.
Is this recipe suitable for gluten-free diets?
Yes, simply substitute gluten-free graham crackers or cookies for the regular version. Everything else in the recipe remains naturally gluten-free.
Why did my layers turn out soggy?
Soggy layers usually mean the cake didn’t chill long enough, or too much moisture came from the cherry filling touching the crackers directly. Stick to the full 8-hour chill time for the best results.
Final Thoughts
This 4th of July Cherry Cheesecake Icebox Cake proves that a showstopping dessert doesn’t require an oven or hours of effort. Layers of creamy filling, soft graham crackers, and sweet cherries come together into something that looks far more complicated than it actually is.
Make this one the night before your next celebration and let the fridge do the hard work. Your only real job left is slicing it and accepting the compliments



