Prep: 20 min Chill: 30 min Dip: 10 min Total: ~60 min Servings: 24 balls Difficulty: Easy
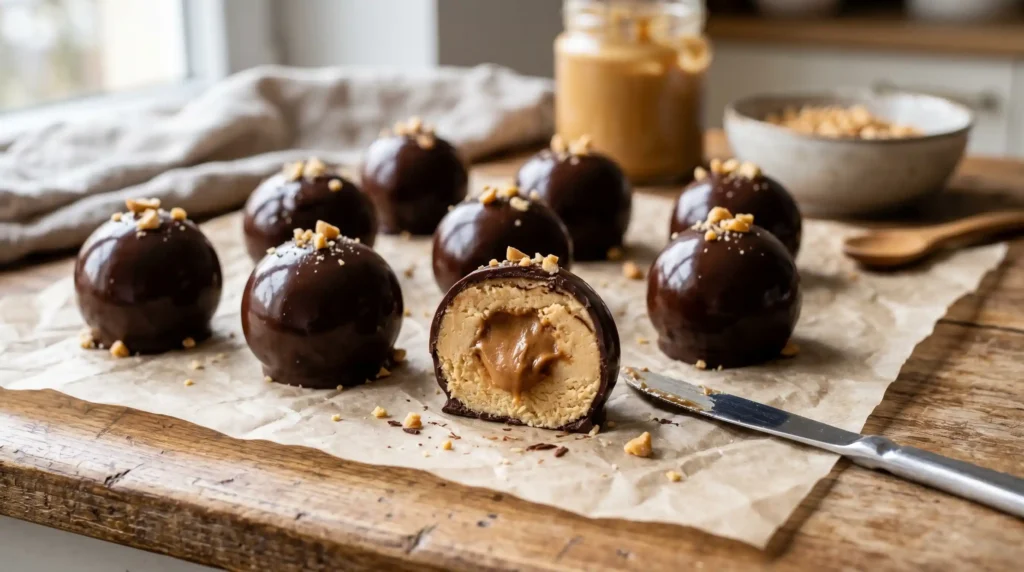
Some recipes exist purely to make life better. Peanut Butter Cheesecake Balls are exactly that. They taste like someone took the best part of a peanut butter cheesecake — the creamy, rich, slightly tangy filling — rolled it into a perfect sphere, and dipped it in chocolate. No oven. No fuss. Maximum payoff.
I first made these for a holiday dessert tray when I needed something impressive that I could prep the night before. They disappeared faster than anything else on the table, including the things I actually baked. I have made them at least a dozen times since, each time receiving the same response: “Can I have the recipe?”
Have you ever wanted a dessert that looks like it took real effort but actually comes together in under an hour? This is that recipe. And once you make it, you will understand why it stays in permanent rotation.
Why Peanut Butter Cheesecake Balls Hit So Differently
The combination of cream cheese and peanut butter is genuinely one of the best flavour pairings in dessert. Cream cheese brings tang and creaminess. Peanut butter brings richness, depth, and that unmistakable roasted nuttiness. Together, they create a filling that tastes complex and indulgent without requiring any cooking or complicated technique whatsoever.
The chocolate coating does more than add flavour — it provides structure. A cold, set chocolate shell keeps the soft creamy centre intact, making these easy to pick up, bite into cleanly, and serve without mess. The contrast between the snapping chocolate exterior and the soft, yielding centre is exactly what makes these so satisfying to eat.
IMO, these also make one of the most practical desserts for entertaining. They keep refrigerated for up to a week, they travel well, they require no plates or cutlery, and they look genuinely impressive arranged on a board or in a gift box. Maximum result, minimal stress. That is the ideal combination in any recipe.
What You Need to Make Them
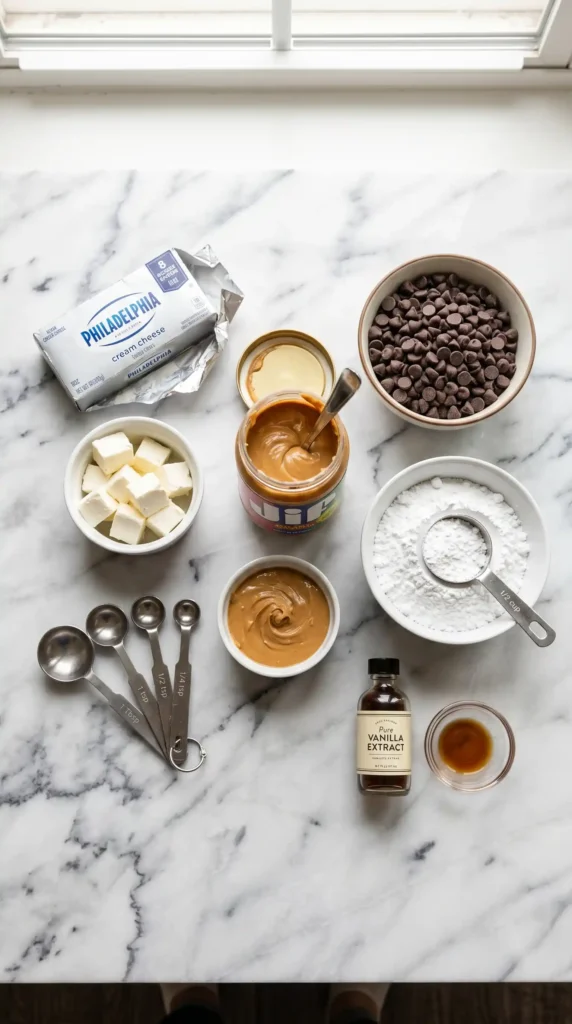
Five core ingredients for the filling, two for the coating. Everything comes from a standard grocery store. Use full-fat cream cheese — not light or fat-free, which have higher water content, do not set as firmly, and produce a filling that never quite achieves the rich, dense texture this recipe needs.
For the Peanut Butter Cheesecake Filling
- 225g (8oz) full-fat cream cheese, softened to room temperature
- 1 cup (260g) smooth peanut butter — commercial brands like Jif or Skippy work best (natural peanut butter is too oily and makes the filling soft)
- 1 and 1/2 cups (180g) powdered sugar, sifted
- 2 teaspoons pure vanilla extract
- 1/4 teaspoon salt
- Optional mix-ins: 1/2 cup (85g) mini chocolate chips or crushed graham cracker crumbs stirred into the filling
For the Chocolate Coating
- 2 cups (340g) semi-sweet or dark chocolate chips
- 2 teaspoons neutral oil (vegetable, canola, or coconut oil) to thin the chocolate for smooth dipping
Optional Finishing Touches
- Flaky sea salt for sprinkling on top immediately after dipping
- Crushed peanuts or mini chocolate chips for rolling or sprinkling
- White chocolate, melted separately, for a contrasting drizzle
Why Commercial Peanut Butter Works Better HereNatural peanut butter contains separated oil that makes the filling too soft and sticky to roll into clean balls. Commercial smooth peanut butter — Jif, Skippy, or equivalent — has an emulsified, thick consistency that incorporates into the cream cheese evenly and produces a filling that holds its shape properly after chilling. FYI, this is one of the rare cases where the commercial option genuinely outperforms the natural one.
How to Make Peanut Butter Cheesecake Balls Step by Step
Three stages: make the filling, chill and roll, then dip. The filling takes under 5 minutes to mix. The chilling does all the real work. The dipping is quick once the chocolate is melted and ready. Have a parchment-lined tray in your freezer or fridge before you start so the rolled balls have somewhere to go immediately.
Step 1: Make the Peanut Butter Cheesecake Filling
Place the softened cream cheese in a large mixing bowl. Beat it with a hand mixer on medium speed for about 90 seconds until it looks completely smooth and slightly fluffy with absolutely no lumps. Cold cream cheese produces a grainy, lumpy filling that no amount of mixing with the other ingredients will fully smooth out. Room temperature cream cheese is non-negotiable — pull it from the fridge at least an hour before starting.
Add the peanut butter to the beaten cream cheese and continue beating on medium speed for another 60 seconds until the two are fully combined and the mixture looks uniform in colour and texture. There should be no visible streaks of cream cheese or peanut butter remaining. Scrape down the sides of the bowl with a rubber spatula halfway through to catch any mixture that has climbed the sides.
Add the sifted powdered sugar one cup at a time, mixing on low speed after each addition. Starting on high speed sends a cloud of powdered sugar across your kitchen, which is genuinely not worth it. Once both cups of powdered sugar are incorporated, add the vanilla extract and salt. Increase to medium speed and beat for a final 30 seconds until the mixture looks smooth, cohesive, and slightly stiffer than regular frosting. Taste it. It should be sweet, distinctly peanut-buttery, and creamy with a gentle tang from the cream cheese. Adjust vanilla or salt to preference.
If you want to add optional mix-ins, fold in the mini chocolate chips or crushed graham cracker crumbs now using a rubber spatula. These additions change the texture of each bite — chocolate chips add small pockets of richness, while graham cracker crumbs add a dry, slightly sandy texture that genuinely evokes a cheesecake crust. Both work well and both are optional.
Step 2: Chill the Filling
Cover the bowl of filling with cling film pressed directly against the surface of the mixture — pressing it flat against the filling rather than leaving an air gap prevents a dry skin from forming on the surface. Refrigerate for a minimum of 30 minutes. One hour is better. The filling needs to firm up significantly before rolling — warm, fresh filling sticks to your hands, loses its shape immediately, and produces misshapen blobs rather than neat balls.
You can also chill the filling overnight, which makes this an excellent make-ahead recipe. The longer the filling chills, the easier and faster the rolling step becomes. A thoroughly chilled filling rolls in seconds per ball, stays perfectly round, and requires almost no pressure to shape cleanly.
Step 3: Roll the Balls
Line a large baking tray with parchment paper and place it in the fridge to keep cold while you work. Remove the chilled filling from the refrigerator. Using a cookie scoop or a tablespoon, portion the filling into equal amounts — aim for about 1 to 1.5 tablespoons of filling per ball, which produces a finished size roughly equivalent to a large grape or a small truffle. Consistency in size matters for two reasons: uniform balls chill at the same rate, and they look far more professional on a serving board.
Roll each portion quickly between your palms using a firm, circular motion. Work fast — the warmth from your hands begins softening the filling almost immediately. If the filling starts sticking to your hands or losing its shape, return the bowl to the fridge for 10 minutes before continuing. Place each rolled ball onto the chilled parchment tray immediately. Once all 24 balls are rolled, place the tray back in the fridge or freezer for at least 20 minutes before dipping. Firm, cold balls hold their shape during dipping and allow the chocolate to set quickly and evenly around the surface.
Step 4: Melt the Chocolate
Place the chocolate chips and neutral oil together in a microwave-safe bowl. Microwave in 30-second intervals, stirring thoroughly between each, until the chocolate is completely smooth and fluid with no remaining lumps. The oil thins the chocolate enough that it coats the balls in a thin, even layer rather than pooling thickly at the bottom. Thin chocolate coating means faster setting, cleaner bites, and better-looking finished balls overall.
Alternatively, melt the chocolate in a double boiler over simmering water, stirring until smooth. The double boiler method gives you more control over the temperature and reduces the risk of burning the chocolate, which happens quickly in a microwave if you go over 30-second intervals without stirring. Either method works well — use whichever feels more comfortable to you.
Let the melted chocolate cool for 2–3 minutes before dipping. Chocolate that is too hot melts the surface of the chilled ball on contact, causing the filling to soften and the ball to lose its shape inside the coating. Slightly cooled chocolate still dips smoothly and sets faster once it hits the cold ball.
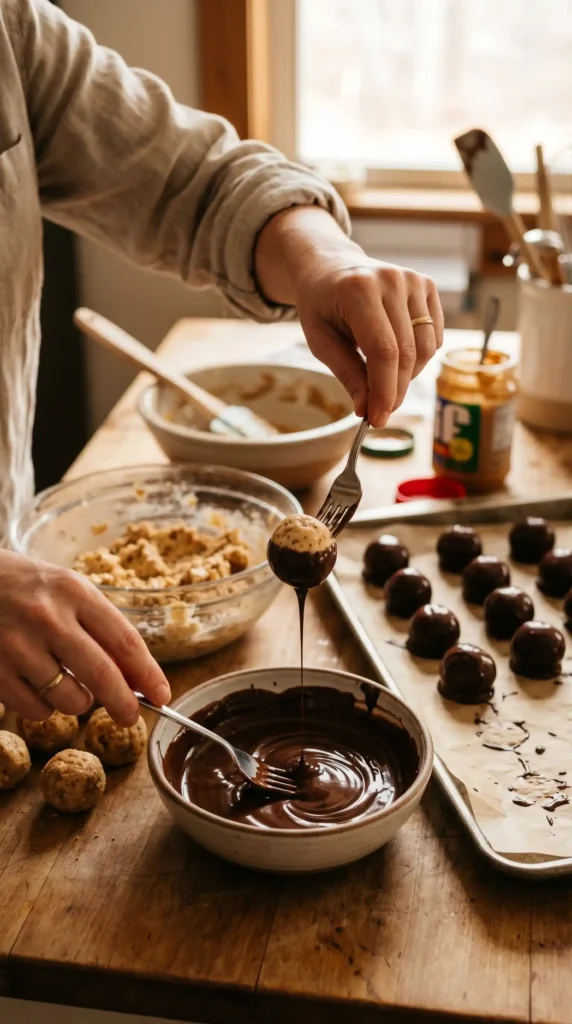
Step 5: Dip the Balls
Remove the chilled balls from the fridge one tray at a time. Working with one ball at a time, drop it into the melted chocolate and use a fork to roll it gently until fully coated. Lift it out with the fork, allowing the excess chocolate to drip off for 3–4 seconds over the bowl, then slide it off the fork onto the parchment-lined tray using a second fork or toothpick. The fork tines allow chocolate to drain cleanly rather than pooling underneath the ball into an uneven disc.
If you plan to add any toppings — flaky salt, crushed peanuts, or a white chocolate drizzle — add them immediately while the coating is still wet. Salt and crushed peanuts go on while the chocolate is soft; the white chocolate drizzle can go on after the main coating has set. Work through all 24 balls efficiently. Place the finished tray in the fridge for 15–20 minutes until the chocolate sets completely firm.
Fixing a Thick Chocolate CoatingIf your melted chocolate looks too thick and coats the balls in a heavy shell rather than a thin, smooth layer, add another half teaspoon of neutral oil and stir well. Add oil sparingly — too much makes the chocolate greasy and prevents it from setting firm. The ideal dipping chocolate flows freely from a spoon in a thin, steady ribbon.
Variations That Work Brilliantly
White Chocolate Peanut Butter Cheesecake Balls
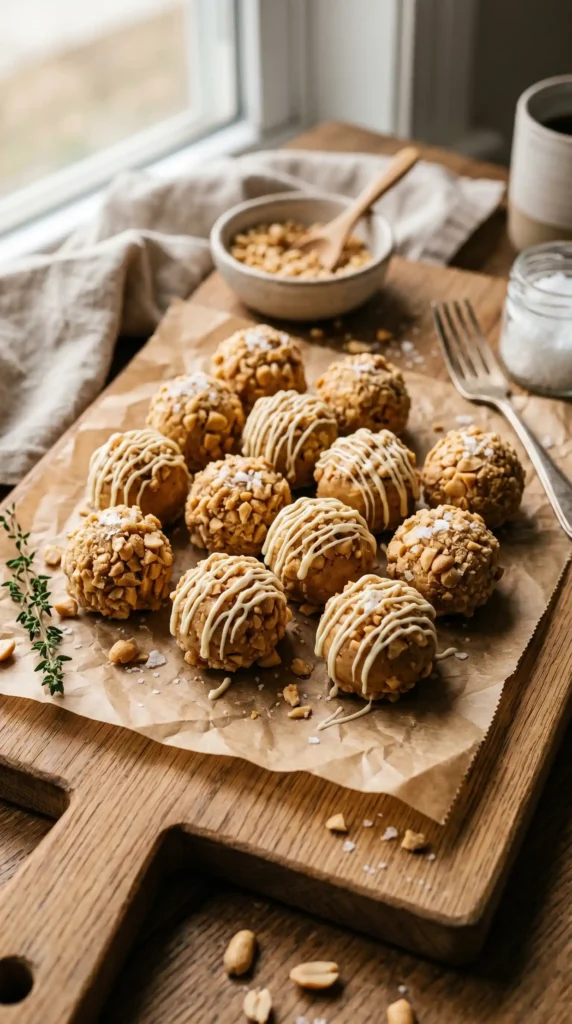
Swap the semi-sweet chocolate coating for melted white chocolate. White chocolate is sweeter and richer and creates a dramatically different visual — pale ivory against the golden peanut butter filling rather than dark brown. Press a single peanut or a sprinkle of crushed graham crackers onto the top of each ball immediately after dipping for a decorative finish that signals the flavour inside. 🙂
Oreo Peanut Butter Cheesecake Balls
Crush 8 Oreo cookies into fine crumbs and fold them into the cheesecake filling before chilling. The Oreo crumbs add a distinct cookies-and-cream note that plays beautifully against the peanut butter. Use a dark chocolate or white chocolate coating. Press an Oreo crumb fragment into the top of each dipped ball while the chocolate is still wet for an immediately recognisable finish.
Pretzel Peanut Butter Cheesecake Balls
Fold 1/3 cup of crushed pretzels into the filling for a salty, crunchy contrast throughout every bite. Use semi-sweet or dark chocolate coating, and press a small pretzel piece onto the top of each ball after dipping. The salt from the pretzel crumbs inside the filling enhances the peanut butter flavour dramatically and creates the sweet-salty combination that makes this variation genuinely irresistible.
Storage and Make-Ahead Tips
Store finished Peanut Butter Cheesecake Balls in an airtight container in the fridge for up to one week. Place a sheet of parchment between layers to prevent them sticking together. The chocolate coating keeps the filling from drying out, so the texture stays consistently creamy and smooth throughout the entire storage period. Bring them to room temperature for 5–10 minutes before serving for the best texture and flavour.
These freeze exceptionally well. Place the fully dipped and set balls in a single layer on a parchment tray, freeze until solid, then transfer to a zip-lock bag. Freeze for up to 2 months. Thaw in the fridge overnight or at room temperature for 20 minutes before serving. The chocolate coating protects the filling completely during freezing, and the texture after thawing is essentially identical to fresh.
Frequently Asked Questions
Can I use natural peanut butter instead of commercial?
Natural peanut butter is not recommended for this recipe. Its separated oil content makes the filling too soft and sticky to roll into clean balls — even after chilling, the filling made with natural peanut butter tends to stay tacky and difficult to handle. Commercial smooth peanut butter has a thick, stable emulsified consistency that produces a firm, rollable filling after chilling. If natural peanut butter is all you have, stir it very thoroughly to recombine the oil before using and increase the chill time to at least 2 hours.
Why is my chocolate coating cracking after it sets?
Cracking usually happens because the balls were too cold when dipped — a very cold filling causes the chocolate to contract and crack as the temperature equalises. Let the chilled balls sit at room temperature for 3–5 minutes before dipping rather than dipping them straight from the freezer. Also ensure your chocolate is fully melted and smooth with no lumps — partially melted chocolate sets unevenly and develops cracks more readily than properly tempered, smooth coating.
Can I make these without a hand mixer?
Yes, but the cream cheese must be genuinely soft — almost spreadable — before you start. Beat the softened cream cheese vigorously with a sturdy wooden spoon or balloon whisk for at least 2–3 minutes until completely lump-free before adding the peanut butter. Lumps at the cream cheese stage will not smooth out once the peanut butter goes in. The peanut butter and powdered sugar both incorporate fairly easily by hand once the cream cheese base is properly smooth.
How do I get perfectly round balls that do not flatten?
Two things produce round, uniform balls: thoroughly chilled filling and speed during rolling. If the filling is cold enough, it resists warming and holds its shape naturally as you roll. If it warms up during rolling, the ball flattens under its own weight on the tray. Roll quickly, work in small batches, and return the filling bowl to the fridge between batches if it begins softening. A lightly greased cookie scoop produces more uniform sizes than eyeballing portions by hand.
Can I make Peanut Butter Cheesecake Balls ahead for a party?
These are one of the best make-ahead desserts you can prepare for a party. Make and dip them up to 3 days in advance, store in an airtight container in the fridge, and they taste just as good as fresh. The chocolate coating keeps them looking presentable and prevents the filling from absorbing refrigerator odours. Remove them from the fridge 10 minutes before serving so the chocolate softens slightly for the best bite experience.
Final Thoughts
These Peanut Butter Cheesecake Balls are the kind of recipe that earns you a reputation. People remember them. They ask about them at the next gathering. They text you days later to say they are still thinking about them. All of that from a recipe that requires no oven, no special equipment, and under an hour of your time.
The peanut butter cheesecake filling is creamy, rich, and deeply flavourful. The chocolate coating adds structure and contrast. Together they create something that punches well above the effort required to make it — which is the true mark of a great recipe.
Make a batch this weekend. Keep half for yourself and bring the other half somewhere. Watch what happens. You will not be surprised when the container comes back empty.

Peanut Butter Cheesecake Balls
Ingredients
Method
- Beat the softened cream cheese in a large bowl until smooth and fluffy.
- Add the peanut butter and mix until fully combined.
- Incorporate the sifted powdered sugar one cup at a time while mixing.
- Add vanilla extract and salt, beat until smooth.
- Optionally mix in mini chocolate chips or crushed graham crackers.
- Cover the bowl with cling film and refrigerate for 30 to 60 minutes.
- Scoop portions of the chilled filling, roll into balls and place on a parchment-lined tray.
- Refrigerate the rolled balls for at least 20 minutes.
- Melt chocolate chips and neutral oil in a microwave-safe bowl.
- Let cool for 2-3 minutes before dipping.
- Dip each ball into the melted chocolate until fully coated.
- Let excess chocolate drip off and place back on the tray.
- Sprinkle optional toppings before the chocolate sets.
- Chill in the fridge for 15-20 minutes until the chocolate is firm.


