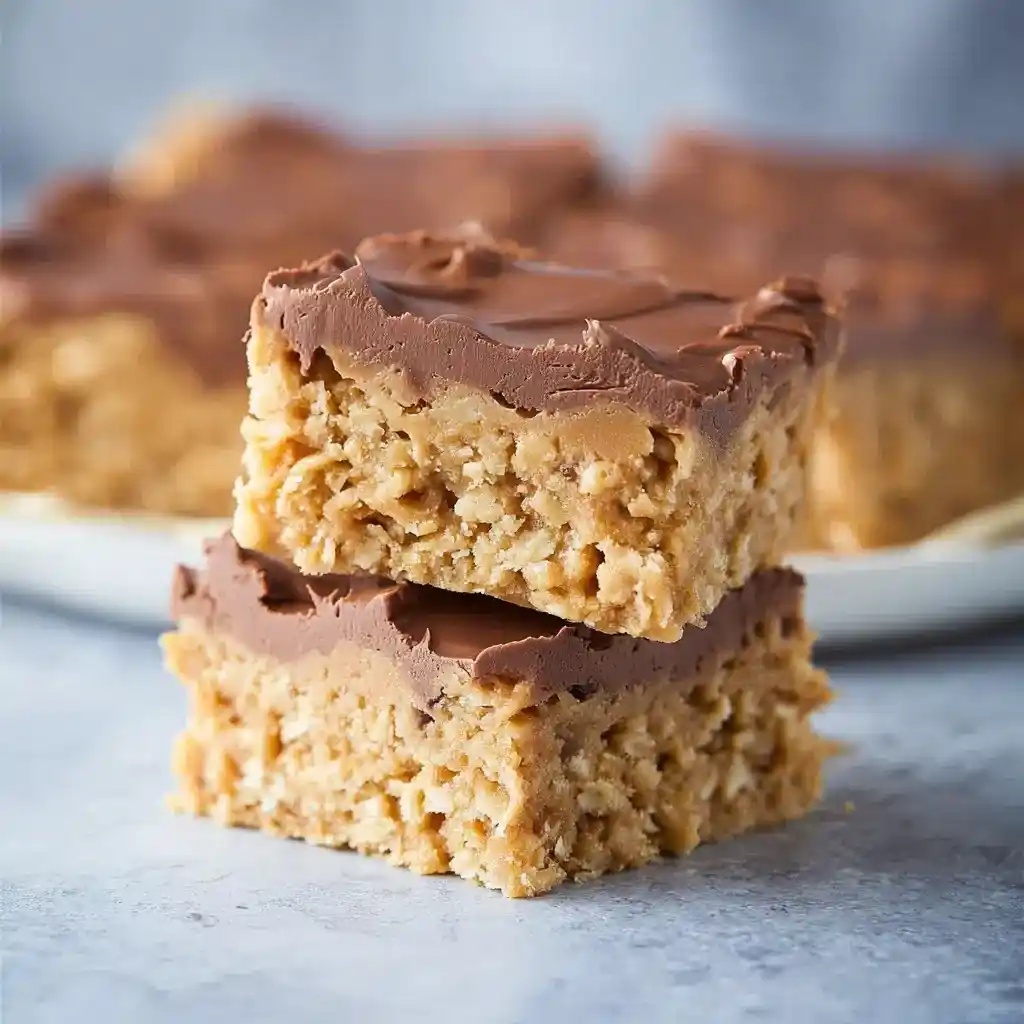
Okay, real talk: peanut butter and oatmeal are basically a power couple. Put them in bar form with a chocolate topping, and you’ve got a dessert that disappears faster than my willpower around a cookie jar.
I’ve made these Peanut Butter Oatmeal Bars more times than I can count, and every single time, someone asks for the recipe before the pan’s even cool. That’s the real test, right?
Servings: 24 bars Prep time: 15 minutes Cook time: 25 minutes Total time: about 40 minutes, plus cooling
Why These Peanut Butter Oatmeal Bars Deserve a Spot in Your Recipe Box
Have you ever needed a dessert that looks impressive but takes zero fancy skills? That’s exactly what this is.
These bars hit that sweet spot between a cookie and a brownie. They’re chewy, nutty, and topped with a peanut butter chocolate layer that honestly could be eaten with a spoon on its own. IMO, that topping alone justifies the whole recipe.
What You’ll Need
I like keeping my baking simple, and this recipe doesn’t ask for anything weird. You probably have most of this in your pantry right now.
For the bars:
- Butter, room temperature
- Light brown sugar
- Granulated sugar
- Creamy peanut butter
- Eggs
- Vanilla extract
- All-purpose flour
- Old fashioned oats
- Baking powder
- Salt
For the topping:
- Milk chocolate chips
- Creamy peanut butter
Full measurements are listed at the bottom, so scroll down when you’re ready to actually bake instead of just drooling at your screen.
A Quick Note on Ingredients
Room temperature butter matters more than people think. Cold butter refuses to cream properly, and you’ll end up with a lumpy mess instead of that light, fluffy base every good bar recipe needs.
Old fashioned oats give these bars their signature chew. Quick oats work in a pinch, but the texture turns out softer and a little less satisfying, at least to me.
Let’s Actually Make These Peanut Butter Oatmeal Bars
Here’s where I walk you through it step by step, because rushed instructions lead to sad, dry bars. Nobody wants that.
Step 1: Preheat and Prep
Turn your oven to 350°F and let it fully heat before the pan goes in. Grab a 13×9 inch baking pan and either grease it well or line it with parchment paper, leaving a little overhang on the sides.
That overhang trick? Total game changer. It lets you lift the whole slab of bars out later without wrestling pieces free with a spatula.
Step 2: Cream the Butter, Sugars, and Peanut Butter
Using an electric mixer, beat the butter, brown sugar, granulated sugar, and peanut butter together. Keep mixing until the mixture turns pale and fluffy, which usually takes a solid two to three minutes.
Don’t rush this part. Proper creaming traps air into the mixture, and that air is what gives your bars a soft, tender bite instead of a dense, heavy one.
Step 3: Add the Eggs and Vanilla
Crack in the eggs one at a time, mixing well after each addition. Pour in the vanilla extract and mix again until everything looks smooth and fully combined.
The batter should look glossy at this point. If it looks curdled or separated, don’t panic, keep mixing and it’ll come back together once the dry ingredients join the party.
Step 4: Bring in the Dry Ingredients
In a separate bowl, whisk together the flour, oats, baking powder, and salt. Gradually add this dry mixture into your wet ingredients, stirring just until combined.
Overmixing at this stage builds up gluten, which makes bars tough instead of tender. Stop as soon as you stop seeing streaks of flour. Trust the process here.
Step 5: Press Into the Pan
Transfer the thick dough into your prepared pan. Use your fingers, the back of a spoon, or even a flat measuring cup to press it into an even layer across the whole pan.
Take your time pressing corners flat. Uneven thickness means uneven baking, and nobody wants a burnt edge sitting next to a raw center.
Step 6: Bake to Golden Perfection
Slide the pan into your preheated oven and bake for 20 to 25 minutes. You’re looking for golden edges and a center that’s set but still slightly soft to the touch.
Every oven runs a little different, so start checking around the 18-minute mark. Overbaking is the fastest route to dry, crumbly bars, and we’re avoiding that at all costs.
Step 7: Cool Before Topping
Pull the pan out and let it rest for about 10 to 15 minutes. This cooling window matters because a warm base will melt your chocolate topping right into the bars instead of sitting nicely on top.
Patience is hard when it smells this good, I know. But trust me, the wait pays off.
Step 8: Make the Chocolate Peanut Butter Topping
Combine the chocolate chips and peanut butter in a microwave-safe bowl. Heat in 30-second bursts, stirring between each one, until everything melts into a smooth, glossy mixture.
This usually takes about 60 seconds total. Stir thoroughly at the end since chocolate can look unmelted on top while it’s actually ready underneath.
Step 9: Spread and Set
Pour the melted topping over your slightly cooled bars and spread it into an even layer using a spatula or the back of a spoon. Let the whole pan sit at room temperature until the chocolate firms up completely.
This typically takes 30 to 60 minutes. Popping the pan in the fridge speeds things up if you’re short on patience, and honestly, who isn’t?
Step 10: Slice and Serve
Once the topping has fully set, lift the bars out using your parchment overhang. Cut into squares or rectangles, whatever size makes portioning easiest for your crowd.
A sharp knife makes cleaner cuts here. Wipe the blade between slices if the chocolate starts sticking, and you’ll get bakery-style edges every time.
Storage and Serving Tips
I always tell people these bars taste best at room temperature, where the chocolate softens just enough to melt in your mouth. Here’s how to keep them fresh:
- Room temperature: Store in an airtight container for up to 3 days
- Refrigerator: Keeps well for up to a week
- Freezer: Wrap tightly and freeze for up to 2 months
Thaw frozen bars at room temperature for about an hour before serving. They taste nearly identical to fresh, which honestly feels like cheating the system.
Fun Ways to Switch Up Your Peanut Butter Oatmeal Bars
Once you’ve nailed the base recipe, feel free to play around. I’ve tried a bunch of these variations myself, and they all work beautifully.
- Add nuts: Chopped walnuts or pecans bring extra crunch
- Double the chocolate: Mix mini chocolate chips into the batter itself
- Go dark: Swap milk chocolate for dark chocolate chips
- Salty-sweet combo: Sprinkle sea salt over the finished topping
- Crunchy peanut butter: Use it instead of creamy for more texture
Have you ever tried adding crushed pretzels on top? Do it once and you’ll understand why salty-sweet desserts have such a cult following.
Common Mistakes to Avoid
I’ve made plenty of these mistakes myself, so learn from my trial and error instead of repeating it. A few things trip people up more than anything else.
Overbaking tops the list by a mile. Bars continue cooking slightly from residual heat after leaving the oven, so pull them when the center still looks just barely underdone.
Skipping the cooling step before adding the topping is another classic error. Warm bars melt chocolate into a greasy mess instead of a clean, set layer.
Frequently Asked Questions
Can I use quick oats instead of old fashioned oats? Yes, though the texture turns out softer and less chewy overall.
Can I make these gluten-free? Swap the all-purpose flour for a gluten-free blend, and they’ll turn out great.
How do I keep the bars from turning out dry? Avoid overbaking, and make sure your butter is properly softened before mixing.
Can I double this recipe? Absolutely, just use a larger pan or bake in two batches.
Can I use natural peanut butter instead of regular? You can, though the texture ends up slightly less creamy and smooth.
How long does the chocolate topping need to set? Roughly 30 to 60 minutes at room temperature, less if refrigerated.
Can I freeze these bars? Yes, wrap tightly in plastic and freeze for up to 2 months.
Wrapping It Up
These Peanut Butter Oatmeal Bars check every box: easy to make, endlessly customizable, and guaranteed to vanish from the plate within minutes. Chewy oats, rich peanut butter, and that glossy chocolate topping make a combination that’s hard to beat.
So preheat that oven, grab your mixer, and give these a try this weekend 🙂 Once you taste that first warm bite, you’ll understand why I keep coming back to this recipe again and again.