
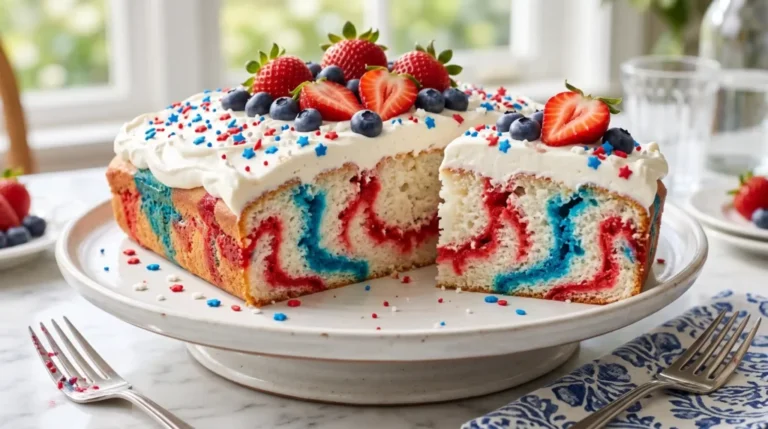
Every summer party needs a dessert that actually stops people mid-conversation. Not a quiet little side dish — a centerpiece. The Red White Blue Poke Cake is exactly that. Vibrant color streaks running through every slice, a creamy whipped topping, and flavors that taste like summer itself.
I first made this cake for a Fourth of July cookout three summers ago. I thought it was a fun experiment. My aunt then requested it at every family gathering for the next two years straight. That’s basically a Michelin star in our household.
What makes this cake different from a regular sheet cake? The poke technique.** Holes punched through the baked cake let Jello sink down into every bite, turning an ordinary white cake into something layered with flavor and color. It’s one of those ideas that sounds almost too simple, but the results completely justify the hype.
Why the Red White Blue Poke Cake Always Wins the Table
Poke cakes have been around for decades, and they keep showing up because the concept genuinely works. The Jello seeps into the cake and creates flavor pockets in every single slice. You get a different combination of cherry and blue raspberry in each bite, which keeps the eating experience interesting from first slice to last.
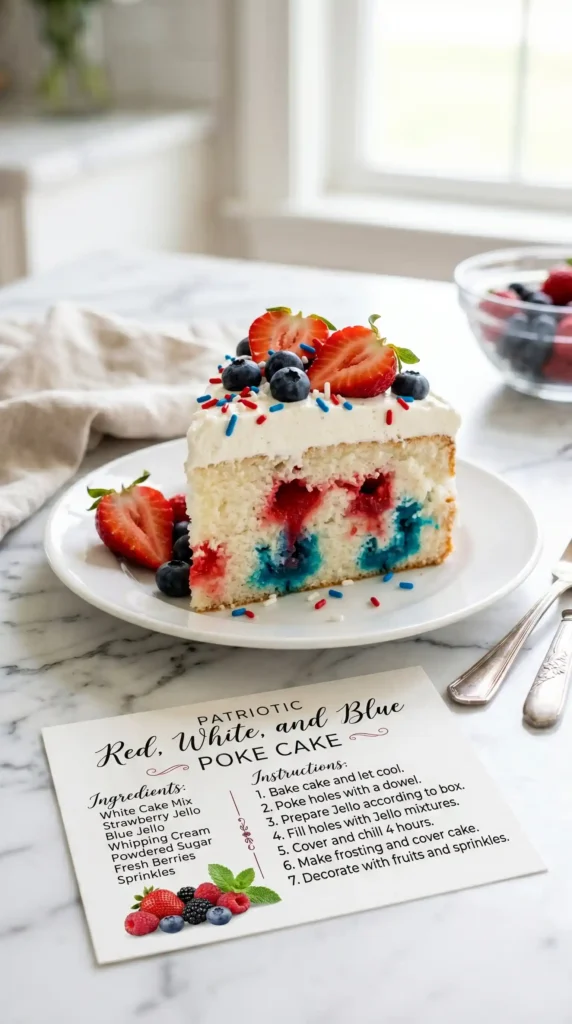
Have you ever noticed how a dessert that looks festive immediately feels more special, even before anyone takes a bite? This cake leans hard into that. The cross-section of red, white, and blue running through each slice makes it genuinely beautiful to serve.
IMO, this also ranks as one of the more forgiving baking projects out there. You start with a box mix, you use store-bought Jello, and the whipped topping comes ready to spread. The technique does all the heavy lifting, not the ingredients.
Ingredients for Red White Blue Poke Cake
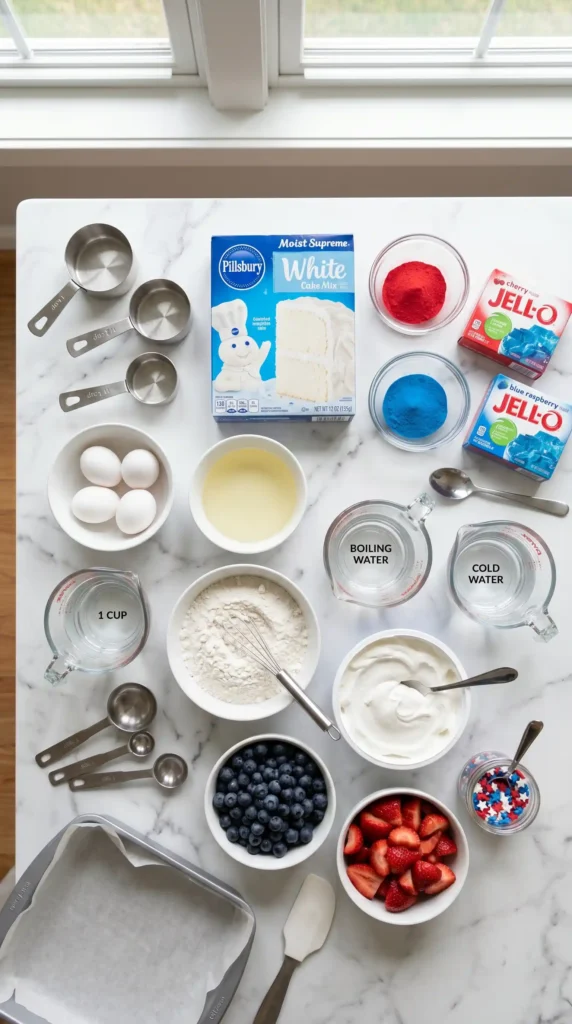
Everything you need divides neatly into three categories — the cake base, the Jello layers, and the topping. Exact quantities below for 15 generous slices from a 9×13-inch pan.
The Red Layer
- 1 package (3 oz) cherry Jello
- 1/2 cup boiling water (to dissolve)
- 1/2 cup cold water (to dilute)
The Blue Layer
- 1 package (3 oz) blue raspberry Jello
- 1/2 cup boiling water (to dissolve)
- 1/2 cup cold water (to dilute)
The Cake Base and Topping
- 1 box white cake mix (plus eggs, oil, and water per box instructions)
- 2 cups whipped topping such as Cool Whip, thawed
- Red, white, and blue sprinkles for garnish
- Fresh strawberries and blueberries for topping (optional but highly recommended)
FYI — always use room temperature eggs when making the cake batter. Cold eggs straight from the fridge create an uneven batter and a denser crumb. Room temp eggs mix more smoothly and give you a fluffier result.
Equipment You Need
- 9×13-inch baking pan — The standard size for this recipe. Glass or metal both work; metal bakes slightly faster.
- Two medium mixing bowls — One for each Jello color. Keep them separate throughout.
- Wooden spoon or chopstick — For poking the holes. The handle of a wooden spoon gives you the right diameter.
- Whisk or electric hand mixer — For the cake batter. A hand mixer produces a fluffier result than a whisk alone.
- Offset spatula or large spoon — For spreading the whipped topping evenly across the surface.
How to Make a Red White Blue Poke Cake — Step by Step
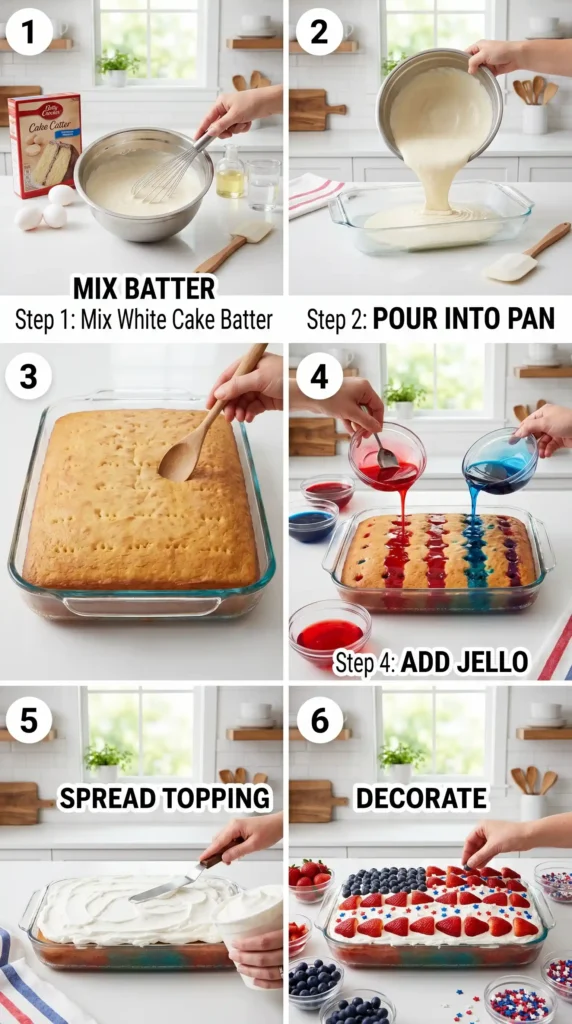
Five steps, and each one matters. Follow the sequence carefully and you’ll end up with a cake that looks as good as it tastes. Let’s go through every part in detail.
Bake the Cake
Preheat your oven according to the temperature listed on your white cake mix box — usually 350 degrees Fahrenheit. Grease your 9×13-inch pan thoroughly. Use butter or non-stick baking spray and make sure you coat the corners and sides, not just the bottom.
Prepare the cake batter exactly as the box directs, using room temperature eggs. Mix on medium speed for about 2 minutes until the batter looks smooth and slightly airy. Don’t overmix — once the dry streaks disappear, stop. Overmixing develops gluten and makes the cake tough instead of soft.
Pour the batter into your prepared pan and spread it into an even layer. Tap the pan gently on the counter twice to release any air bubbles trapped in the batter. Bake for the time listed on the box, typically 28 to 32 minutes. Check doneness by inserting a toothpick into the center. It should come out clean with no wet batter attached.
Remove the cake from the oven and set it on a wire cooling rack. Let it cool completely before moving to the next step. This is the non-negotiable part of the whole process. A warm cake will crumble when you poke it, and the Jello will melt the structure instead of setting into it. Give it at least 45 minutes at room temperature.
Prepare Both Jello Mixtures
While the cake cools, make your two Jello mixtures. Take two separate medium bowls and work on them one at a time. Pour the cherry Jello powder into the first bowl. Add 1/2 cup of boiling water and stir continuously for about 2 minutes, until every grain of powder dissolves completely. No undissolved crystals should remain — they’ll create grainy texture inside the cake.
Add 1/2 cup of cold water to the dissolved cherry Jello and stir to combine. This dilutes the mixture slightly, which actually helps it flow into the poke holes more smoothly rather than sitting as a thick layer on top. Set this bowl aside.
Repeat the same exact process for the blue raspberry Jello in your second bowl. Let both mixtures cool to room temperature — not cold, just room temperature. You want them liquid and pourable, but not steaming hot. Hot Jello poured into a cooled cake can slightly melt the crumb structure and make the layers less defined.
Poke the Hole
Once the cake reaches room temperature, poke holes across the entire surface using the handle of a wooden spoon. Space the holes about an inch apart in rows, working systematically from one end of the pan to the other. Consistent spacing means consistent flavor distribution in every slice.
Push the handle down about two-thirds of the way through the cake — not all the way to the bottom. You want the Jello to fill the holes and stay contained inside the cake, not pool underneath it. If you push through to the pan, the Jello will run out below and the color layers won’t appear when you slice.
Stand back and look at your hole pattern from above. You want roughly even coverage across the whole surface. If any section looks sparse, add a few extra holes. More holes mean more Jello in each bite, which is never a bad thing with this recipe.
Pour the Jello Into the Holes
Here’s where the magic actually happens. Decide which area of the cake you want each color to dominate. For the most visually dramatic slices, pour the cherry Jello over one half of the cake and the blue raspberry Jello over the other half. This creates a clean color separation when you cut slices.
Pour slowly and deliberately, using a spoon or small pitcher to guide the Jello into the holes. Don’t rush. If you dump it all in at once, it spreads unevenly across the surface and misses half the holes. Pour a little, watch it sink into the holes, then pour more over the same area.
Some Jello will pool on the surface of the cake. That’s perfectly fine — it will soak in as the cake chills. Use a spoon to gently push any surface pooling toward nearby holes rather than letting it sit in large puddles. You want most of the Jello inside the cake, not just sitting on top of it.
Once both colors are in, resist the urge to spread or mix them. Let gravity do the work. The Jello will settle downward naturally over the next few minutes. Cover the pan loosely with plastic wrap and move the whole thing to the refrigerator
Chill, Top, and Decorate
Refrigerate the cake for at least 30 minutes. This chilling period allows the Jello to set firmly inside the cake structure. After 30 minutes, the Jello should feel firm to a light touch on the surface and the cake will hold its shape cleanly when sliced.
Once fully chilled, remove the cake from the fridge and spread the whipped topping evenly across the entire surface. Use an offset spatula to work from the center outward in smooth strokes. The topping should cover everything in a clean, even white layer. This white layer is what completes the red, white, and blue theme and gives the cake its finished look.
Now decorate. Scatter red, white, and blue sprinkles generously across the whipped topping. If you’re using fresh strawberries and blueberries, arrange them in a pattern across the top — alternating rows of red and blue fruit against the white topping looks genuinely stunning and takes about 90 seconds to do.
Return the cake to the refrigerator until you’re ready to serve. Slice with a sharp knife, wiping the blade clean between cuts for the cleanest presentation. Each slice should reveal streaks of red and blue running through the white interior.
Tips for a Perfect Result Every Time
- Cool the cake completely before poking holes. A warm cake crumbles under the spoon handle and loses its structure.
- Let the Jello reach room temperature before pouring. Hot Jello softens the cake crumb; cold Jello thickens too fast and clogs the holes.
- Keep the two Jello colors separate when pouring. Mixing them creates a murky purple-grey, which is significantly less appealing than clean red and blue sections.
- For cleaner slices, refrigerate the decorated cake for at least 2 hours before serving rather than the minimum 30 minutes.
- Use a clean sharp knife and wipe between cuts. This keeps the whipped topping from dragging and the Jello from smearing across the white interior of each slice.
Variations Worth Experimenting With
Once you’ve made this once, the variations become genuinely fun to try. Have you ever thought about how different Jello flavors could completely change the character of this cake?
- Strawberry and grape: Swap cherry for strawberry Jello and blue raspberry for grape for a slightly different flavor profile that still hits the red and purple spectrum.
- Gluten-free version: Use a gluten-free white cake mix — the technique and all other ingredients stay identical.
- Cream cheese topping: Beat 4 oz of softened cream cheese with the whipped topping before spreading for a tangier, more substantial topping layer.
- Lemon base cake: Use lemon cake mix instead of white for a citrusy contrast that balances beautifully against the sweet Jello layers.
Frequently Asked Questions
Can I make Red White Blue Poke Cake a day ahead?
Yes, and it actually tastes better the next day. The Jello has more time to fully set inside the cake, and the whipped topping firms up nicely. Make it the night before, cover loosely with plastic wrap, and refrigerate overnight. Add any fresh fruit garnishes right before serving so they don’t weep.
How do I store leftovers?
Cover the pan with plastic wrap or transfer slices to an airtight container. Keep in the refrigerator for up to 4 days. The whipped topping may soften slightly over time, but the flavor and Jello layers hold up well through day three. Don’t freeze this cake — the Jello texture turns grainy after freezing and thawing.
Can I use sugar-free Jello?
Absolutely. Sugar-free Jello works identically in this recipe. The dissolving and setting process is the same, and the color intensity is nearly identical. Use the same 3-ounce package quantity and follow the same water ratios listed in this recipe.
What if I can’t find blue raspberry Jello?
Berry Blue Jello, grape Jello, or any dark blue or purple Jello flavor works as a substitute. The color is what matters most for the visual effect. Blackberry Jello also gives a deep blue-purple that reads beautifully in slices against the red and white layers.
My Jello pooled on top instead of soaking in. What went wrong?
Two likely causes. Either the holes weren’t deep enough to hold the liquid, or the Jello was still too hot and slightly sealed the cake surface before sinking in. Let the Jello cool closer to room temperature next time, poke holes a little deeper, and pour more slowly so the liquid has time to funnel downward.
Can I substitute homemade whipped cream for Cool Whip?
Yes. Whip 1 cup of heavy cream with 2 tablespoons of powdered sugar and 1 teaspoon of vanilla extract until stiff peaks form. Homemade whipped cream tastes noticeably better than store-bought topping, though it doesn’t hold as long in the fridge, so serve the same day you add it.
Final Thoughts
The Red White Blue Poke Cake earns its place at every summer table it appears on. It looks impressive, it tastes better than it has any right to for a box-mix cake, and it requires skills that anyone who can boil water and use an oven already has.
The poke technique is what separates this from a plain sheet cake. Those Jello-filled pockets in every slice deliver something genuinely different — a bite that’s moist, bright, and layered with flavor rather than just sweet and cakey throughout.
Make this for your next summer gathering and watch it disappear. Then make it again for the next one :/. Some recipes just become traditions, and this one has a way of doing exactly that.
Red White Blue Poke Cake
Ingredients
Method
- Preheat your oven according to the temperature listed on your white cake mix box — usually 350 degrees Fahrenheit.
- Grease your 9×13-inch pan thoroughly. Use butter or non-stick baking spray.
- Prepare the cake batter exactly as the box directs, using room temperature eggs.
- Mix on medium speed for about 2 minutes until the batter looks smooth and slightly airy.
- Pour the batter into your prepared pan and spread it into an even layer.
- Bake for the time listed on the box, typically 28 to 32 minutes.
- Remove the cake from the oven and let it cool completely before moving to the next step.
- While the cake cools, make your two Jello mixtures. Take two separate medium bowls.
- For cherry Jello, pour the powder into the first bowl, add boiling water, stir until dissolved, then add cold water.
- Repeat the same process for the blue raspberry Jello in the second bowl. Let both mixtures cool to room temperature.
- Once the cake reaches room temperature, poke holes across the entire surface using the handle of a wooden spoon, about an inch apart.
- Push the handle down about two-thirds of the way through the cake.
- Pour the cherry Jello over one half of the cake and the blue raspberry Jello over the other half.
- Use a spoon to guide the Jello into the holes. Let gravity work, and avoid mixing.
- Refrigerate the cake for at least 30 minutes.
- Spread the whipped topping evenly across the surface.
- Decorate with sprinkles and fresh fruit if desired.


