
Reese’s Peanut Butter Cup Earthquake Cake I made this for the first time on a whim after finding a bag of Reese’s minis in the back of my pantry and a box of chocolate cake mix on the counter. The result genuinely shocked me. The cake comes out looking almost broken — cracked, sunken in places, swirled with cream cheese filling — and it tastes absolutely unreal.
This isn’t a cake you cut into neat, uniform slices. It’s the kind you spoon out in messy, generous scoops and serve with zero apologies. If that sounds like your kind of dessert, let’s get moving.
Everything You Need: The Ingredients
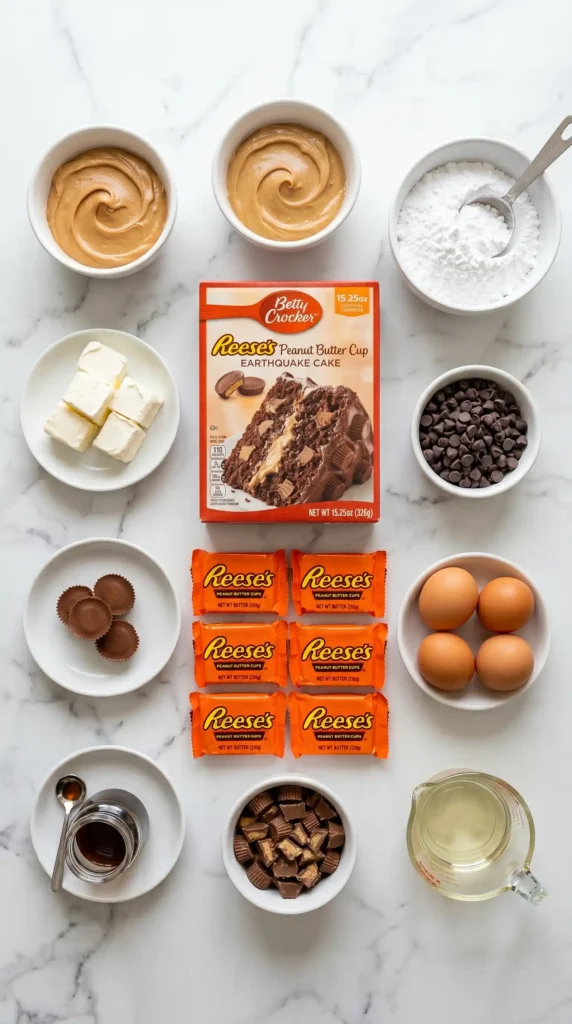
The beauty of this recipe is that most of these ingredients are pantry staples or easy finds at any grocery store. Here’s the full list for one 9×13-inch pan serving 12 to 15 people:
For the Cake Base
- 1 box (15.25 oz) chocolate fudge cake mix
- 3 large eggs
- 1/2 cup vegetable oil
- 1 cup water
- 1 cup semi-sweet chocolate chips
- 1 cup Reese’s Peanut Butter Cups, roughly chopped (about 12 mini cups)
For the Cream Cheese Swirl
- 8 oz cream cheese, softened to room temperature
- 1/2 cup creamy peanut butter
- 1/2 cup (1 stick) unsalted butter, melted
- 2 cups powdered sugar, sifted
- 1 teaspoon vanilla extract
For the Topping
- 1 cup Reese’s Peanut Butter Cups, halved or quartered (about 12–15 mini cups)
- 1/2 cup semi-sweet chocolate chips
- 2 tablespoons peanut butter, warmed (for drizzling)
IMO, the cream cheese swirl is what separates this from every other peanut butter chocolate cake you’ve had. It melts into the batter during baking and creates those signature craters and fissures that give the Reese’s Peanut Butter Cup Earthquake Cake its name and its incredible texture.
Why This Cake Has “Earthquake” in the Name
Have you ever wondered why earthquake cakes look so dramatically chaotic? It’s not a mistake — it’s the whole point. The dense cream cheese and peanut butter swirl drops into the batter and sinks unevenly during baking, creating a cracked, swirled, gloriously messy surface.
The result looks like something seismic happened inside your oven, which, in a flavor sense, it absolutely did. Every bite hits differently — sometimes you get a pocket of gooey cream cheese, sometimes a melted Reese’s cup, sometimes a dense hit of fudgy chocolate. No two bites are the same.
Key insight: The “earthquake” effect happens because of the density difference between the cake batter and the cream cheese mixture. The heavier swirl sinks and shifts as the lighter batter rises around it. You don’t control it — and that’s what makes it beautiful.
How to Make Reese’s Peanut Butter Cup Earthquake Cake
This recipe has three simple components: a chocolate cake base, a peanut butter cream cheese swirl, and a loaded topping. None of them require advanced baking skills. Follow each step and you’ll pull something spectacular out of your oven.
Step 1 : Get Your Pan and Oven Ready
Preheat your oven to 350°F (175°C). Place the rack in the center position — center rack baking gives you the most even heat distribution from both the top and bottom elements, which matters for a cake this dense.
Grease a 9×13-inch baking pan thoroughly with butter or non-stick cooking spray. Get into the corners and up the sides. An under-greased pan will cause the cream cheese layer to stick and tear when you try to serve it.
Set the greased pan aside and move on to the batter. Getting the prep done before you start mixing saves time and keeps things from getting chaotic (more chaotic than this cake already intentionally is).
Step 2 : Make the Chocolate Cake Batter
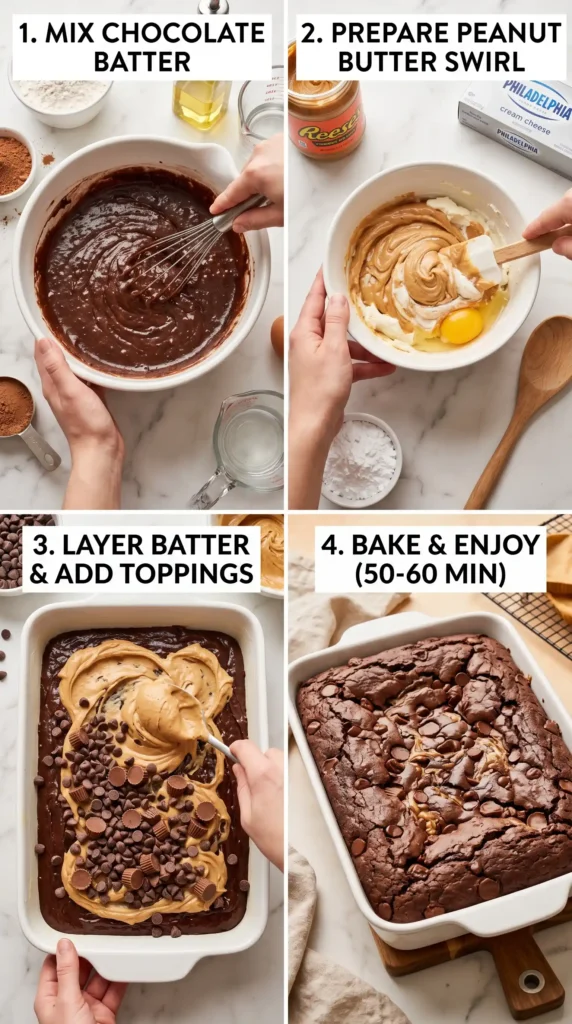
In a large mixing bowl, combine the chocolate fudge cake mix, 3 large eggs, 1/2 cup vegetable oil, and 1 cup water. Use a hand mixer or a sturdy whisk and mix for about 2 minutes until the batter is smooth and no dry streaks remain.
Fold in the 1 cup of semi-sweet chocolate chips using a spatula. Stir gently — you want them distributed through the batter, not pulverized by overmixing. The chips will melt into fudgy pockets as the cake bakes.
Pour the batter into your prepared 9×13 pan and spread it out evenly with a spatula. You don’t need to be obsessively precise here since the cream cheese layer is going on top and will disrupt the surface anyway.
Scatter the roughly chopped Reese’s Peanut Butter Cups evenly over the raw batter. Press them in very slightly — just enough so they don’t all roll to one side. They’ll melt and create pockets of peanut butter and chocolate throughout the baked cake.
Step 3 : Make the Peanut Butter Cream Cheese Swirl
In a separate medium bowl, beat the 8 oz of room-temperature cream cheese and 1/2 cup of creamy peanut butter together until completely smooth. This step only works properly if the cream cheese is fully softened — cold cream cheese will leave lumps that don’t bake out. Pull it from the fridge at least 45 minutes before you start.
Pour in the 1/2 cup of melted butter and mix until combined. The butter loosens the cream cheese mixture and gives it the right consistency to sink into the batter as it bakes.
Add the 2 cups of sifted powdered sugar and 1 teaspoon of vanilla extract. Mix on low speed first to avoid a powdered sugar cloud, then increase to medium and beat until the mixture is smooth, glossy, and fully blended.
Taste the cream cheese mixture at this point. It should be sweet, rich, and intensely peanut-buttery. If you want a stronger peanut butter flavor, add one more tablespoon of peanut butter and mix again. This is the element that makes theearthquake caketruly addictive, so get it right.
Step 4 : Assemble the Cake
Drop large spoonfuls of the peanut butter cream cheese mixture across the top of the chocolate batter. You want roughly 10 to 12 large dollops distributed fairly evenly across the surface. Don’t try to spread it — let it sit in drops. The batter will work with it during baking.
Use a butter knife or a skewer to swirl the cream cheese mixture into the batter very loosely. Drag the knife in wide, lazy S-shapes across the pan just 4 or 5 times. You want a swirled effect, not a fully blended one. Over-swirling kills the earthquake texture and blends everything into a muddy, uniform color.
Scatter the halved or quartered Reese’s cups across the top of the assembled cake. Press them in lightly — they’re your topping layer and you want them to sit proud on the surface so they stay visible and recognizable after baking.
Finish with a scatter of the remaining 1/2 cup of chocolate chips across the surface. These will melt partially in the oven, creating small pools of chocolate that look incredible once the cake is done.
Step 5 : Bake and Finish
Slide the pan into the preheated oven and bake for 40 to 47 minutes. Start checking at 40 minutes. The cake is done when the edges look set and the center looks slightly underdone — almost like a very thick brownie rather than fully firm cake. That’s intentional. It firms up as it cools.
Don’t use the clean toothpick test you’d use for a regular cake. With earthquake cake, the toothpick will hit cream cheese pockets and come out looking wet even when the cake is perfectly done. Look at the edges — set, slightly pulling from the sides — as your actual indicator.
Remove the cake from the oven and place it on a wire rack. Immediately drizzle the 2 tablespoons of warmed peanut butter across the surface in thin lines. The heat from the cake keeps the peanut butter fluid long enough to settle into the cracks.
Let the cake cool in the pan for at least 30 minutes before serving. The cream cheese filling needs time to firm back up. If you serve it straight from the oven, it will be soup-adjacent — delicious soup, but still. Give it time.
Don’t overbake this cake. The biggest mistake people make with earthquake cakes is treating them like a standard layer cake and waiting for a clean toothpick. Pull it when the center still has a slight wobble. It will finish setting during the cooling period and the texture will be perfectly fudgy.
Tips for Getting the Best Results
FYI — a few small habits make a real difference with this particular recipe. Here’s what I’ve learned from making it more than a handful of times:
- Room-temperature cream cheese is non-negotiable. Cold cream cheese creates lumps that never fully smooth out, even with a mixer. Pull it from the fridge well ahead of time.
- Don’t over-swirl the batter. Four or five lazy passes with a knife are plenty. More than that blends the layers together and you lose the dramatic texture and color contrast.
- Chop the Reese’s cups unevenly. Rough, irregular pieces melt and distribute more interestingly than uniform chunks. Some become pockets, some become thin streaks — the variety is the point.
- Use a metal pan, not glass. Metal heats more evenly and the edges set faster, which helps the cream cheese swirl behave more predictably during baking.
- Let it cool before cutting. The cream cheese filling behaves like molten lava straight from the oven. A 30-minute rest is the minimum. An hour is better.
Fun Variations on This Recipe
The base recipe is already over the top in the best way, but the earthquake cake format is also extremely flexible. Have you considered what your own twist might look like?
Dark Chocolate Version
Swap the chocolate fudge cake mix for a dark chocolate variety and use bittersweet chocolate chips instead of semi-sweet. The result is more intense and slightly less sweet — a good move if you prefer your desserts on the less sugary side.
Crunchy Peanut Butter Version
Replace the creamy peanut butter in the cream cheese swirl with crunchy peanut butter. The peanut pieces create small textural surprises throughout the gooey cream cheese layer. It adds a satisfying contrast that the smooth version doesn’t have.
Salted Caramel Addition
Drizzle 3 tablespoons of thick caramel sauce over the top of the assembled, uncooked cake alongside the cream cheese swirl. The caramel sinks into the batter and mingles with the peanut butter during baking in a way that is, frankly, difficult to describe without using dramatic language.
Frequently Asked Questions
Why does earthquake cake look so messy and cracked on top?
That’s by design. The dense cream cheese and peanut butter mixture is heavier than the chocolate cake batter. As the lighter batter rises in the oven, the heavier cream cheese swirl sinks unevenly, creating the cracked, crater-like surface the recipe is named for. It’s supposed to look that way.
Can I use homemade chocolate cake batter instead of a box mix?
Absolutely. Any reliable homemade chocolate cake recipe that produces enough batter for a 9×13 pan works perfectly. Box mix is the shortcut that most people use and it works really well here since the cream cheese swirl does so much of the flavor heavy lifting. But homemade is a completely legitimate upgrade if you prefer it.
How do I store Reese’s Peanut Butter Cup Earthquake Cake?
Cover the pan tightly with plastic wrap or foil and store it at room temperature for up to 2 days, or refrigerate it for up to 5 days. Because of the cream cheese filling, refrigeration is the safer long-term option. Let cold slices sit at room temperature for 15 to 20 minutes before eating — the texture is much better when it’s not straight from the fridge.
Can I freeze earthquake cake?
Yes. Cut the cooled cake into individual portions, wrap each piece tightly in plastic wrap, then place them in a freezer bag. Freeze for up to 2 months. Thaw individual pieces in the refrigerator overnight or at room temperature for an hour. The texture holds up surprisingly well after freezing.
Can I make Reese’s Peanut Butter Cup Earthquake Cake ahead of time?
Yes and it actually gets better with time. Making it the day before serving gives the cream cheese swirl time to fully set and the flavors time to meld. Cover and refrigerate overnight, then bring it to room temperature for 30 minutes before serving. Day-two earthquake cake is genuinely better than day-one in almost every way.
What can I serve with this cake?
Vanilla ice cream is the classic pairing and it works brilliantly — the cold, neutral ice cream balances the rich, intense flavors of the cake. Whipped cream also works well. If you want to lean further into the peanut butter theme, a scoop of peanut butter ice cream alongside this cake is genuinely a transcendent combination.
Final Thoughts
The Reese’s Peanut Butter Cup Earthquake Cake is one of those recipes that looks far more complicated than it actually is. The dramatic, cracked surface and gooey interior look like hours of work. The reality is that it comes together in about 15 minutes of hands-on prep and then the oven does everything else.
If you love chocolate and peanut butter together — and really, who doesn’t — this cake delivers that combination in the most satisfying, indulgent way possible. It’s rich without being cloying, sweet without being one-dimensional, and texturally interesting in a way most cakes simply aren’t.
Make it for your next gathering, your next birthday, or your next Tuesday evening when you just need something spectacular. People will ask you for the recipe before they finish their first slice — consider yourself warned

Reese’s Peanut Butter Cup Earthquake Cake
Ingredients
Method
- Preheat your oven to 350°F (175°C) and grease a 9x13-inch baking pan with butter or non-stick cooking spray.
- In a large mixing bowl, combine the chocolate fudge cake mix, eggs, vegetable oil, and water. Mix for about 2 minutes until smooth.
- Fold in the chocolate chips and pour the batter into the prepared pan. Spread evenly.
- Scatter the chopped Reese’s Peanut Butter Cups evenly over the batter and press them in slightly.
- In another bowl, beat the cream cheese and peanut butter until smooth. Add the melted butter and mix until combined.
- Add sifted powdered sugar and vanilla extract. Mix until fully blended and glossy.
- Drop spoonfuls of the cream cheese mixture over the chocolate batter.
- Swirl it into the batter using a knife in wide, lazy S-shapes.
- Top with halved Reese's cups and remaining chocolate chips.
- Bake for 40 to 47 minutes, checking at 40 minutes until the edges are set and the center is slightly underdone.
- Remove from the oven and drizzle with warmed peanut butter. Let cool for at least 30 minutes before serving.


