
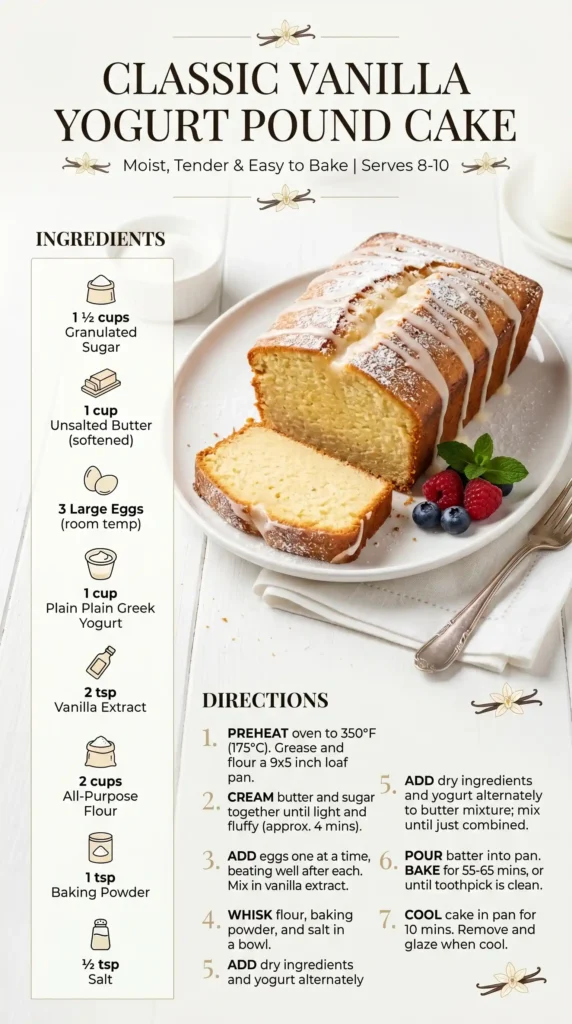
Classic Vanilla Yogurt Pound Cake-Pound cake is one of those recipes that has survived centuries because it is genuinely, reliably, consistently good. Classic Vanilla Yogurt Pound Cake takes the traditional formula and improves it with the addition of full-fat Greek yogurt — a substitution that makes the crumb noticeably more moist, adds a very subtle tang that deepens the vanilla flavour, and keeps the loaf staying fresh for several days longer than the traditional all-butter version.
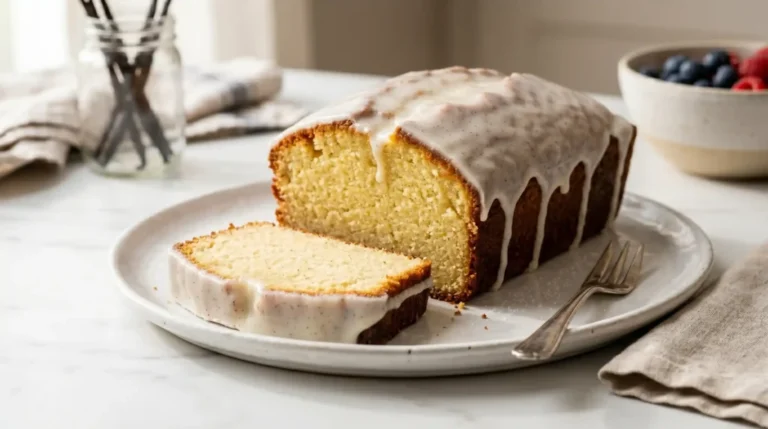
I made this recipe for the first time when I had a container of Greek yogurt in the fridge that needed using and a strong desire for something baked but not complicated. The result was a loaf that looked bakery-quality — that gorgeous crack along the top, that deep golden crust — and tasted even better than it looked. I have made it repeatedly since and it has never once disappointed. That kind of reliability is rare.
Have you ever wanted a baking recipe that produced consistently impressive results without requiring any advanced technique? This is precisely that recipe. Let us make it step by step.
What Makes Yogurt Pound Cake Different From Traditional Pound Cake
Classic Vanilla Yogurt Pound Cake-Traditional pound cake uses a pound each of flour, butter, eggs, and sugar — hence the name. The original formula produces a very rich, dense, buttery cake with a long shelf life. The yogurt version keeps all that richness but adds a new layer of texture and flavour. The yogurt’s moisture extends the crumb’s softness significantly, while its mild acidity reacts with the baking powder to create a slightly lighter, more tender crumb than the traditional version.
The tang from the yogurt is subtle — you would not identify it as yogurt if you tasted the cake blind. What you notice instead is that the vanilla flavour seems brighter and more developed than in a standard pound cake, and that the crumb has a quality of richness that butter alone does not produce. The yogurt essentially amplifies every other flavour in the recipe while adding its own structural contribution.
The crack on top of the finished loaf is not an accident or a flaw — it is a feature. A well-made pound cake cracks along the centre as the loaf rises in the oven and the outer crust sets before the inner batter finishes rising. That crack exposes a paler, denser interior crumb beneath the golden crust that looks genuinely beautiful in every slice. IMO, a pound cake without a crack is a pound cake that did not rise as well as it should have.
What You Need
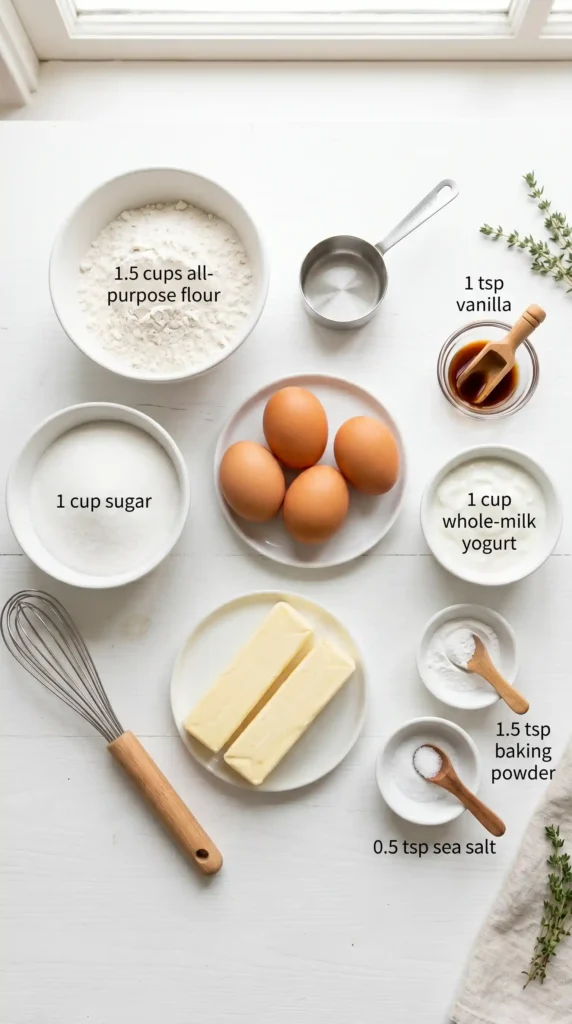
Nine simple ingredients. The full-fat Greek yogurt is the star and the most important choice — do not substitute low-fat or non-fat yogurt. Lower-fat yogurt contains more water and less fat, producing a wetter batter that bakes up with a less consistent texture and a slightly rubbery crumb. Full-fat Greek yogurt is thick, rich, and fat-forward in a way that produces the moist, tender crumb this cake is known for.
For the Cake
- 1 and 1/2 cups (190g) all-purpose flour
- 2 teaspoons baking powder
- 1/4 teaspoon salt
- 1/2 cup (113g) unsalted butter, softened to room temperature
- 1 cup (200g) granulated white sugar
- 3 large eggs, room temperature
- 1 and 1/2 teaspoons pure vanilla extract — use the best quality you can access, it is the primary flavour of this cake
- 1 teaspoon vanilla bean paste (optional but excellent — adds visible vanilla seeds and deeper flavour)
- 1 cup (240g) full-fat plain Greek yogurt, room temperature
Optional Glaze
- 1 cup (120g) powdered sugar, sifted
- 2–3 tablespoons whole milk or cream
- 1/2 teaspoon vanilla extract
Room Temperature Ingredients — Non-Negotiable for Pound CakeCold butter cannot cream properly — it stays in hard lumps that do not incorporate air into the sugar, resulting in a dense, flat loaf rather than a light, well-structured one. Cold eggs cause the creamed butter to seize and curdle when added. Cold yogurt does the same. Pull butter, eggs, and yogurt from the fridge at least 90 minutes before baking. FYI — this is the single step that most home bakers skip and the primary reason pound cakes turn out denser than expected.
How to Make Classic Vanilla Yogurt Pound Cake Step by Step
One bowl, one loaf tin, and about 15 minutes of active work before the oven takes over. The process is methodical rather than complicated — each step builds on the last, and understanding why each one matters will help you get a consistently excellent result every time. Read through the steps once before starting.
Step 1: Prepare the Loaf Tin and Preheat
Preheat your oven to 175°C (350°F). Grease a 23x13cm (9×5-inch) loaf tin generously with butter, covering every surface including the corners. Line the base and long sides with a strip of parchment paper, leaving an overhang on each long side — these overhangs act as handles for lifting the finished loaf out cleanly without damage. Grease the parchment lightly as well. Set the prepared tin aside while you make the batter.
Step 2: Mix the Dry Ingredients
In a medium bowl, whisk together the flour, baking powder, and salt until fully combined. Whisking the dry ingredients before adding them to the batter ensures the baking powder and salt are completely and evenly distributed throughout the flour. Uneven distribution means some areas of the batter get more leavening than others, producing irregular rise and an uneven texture throughout the finished loaf.
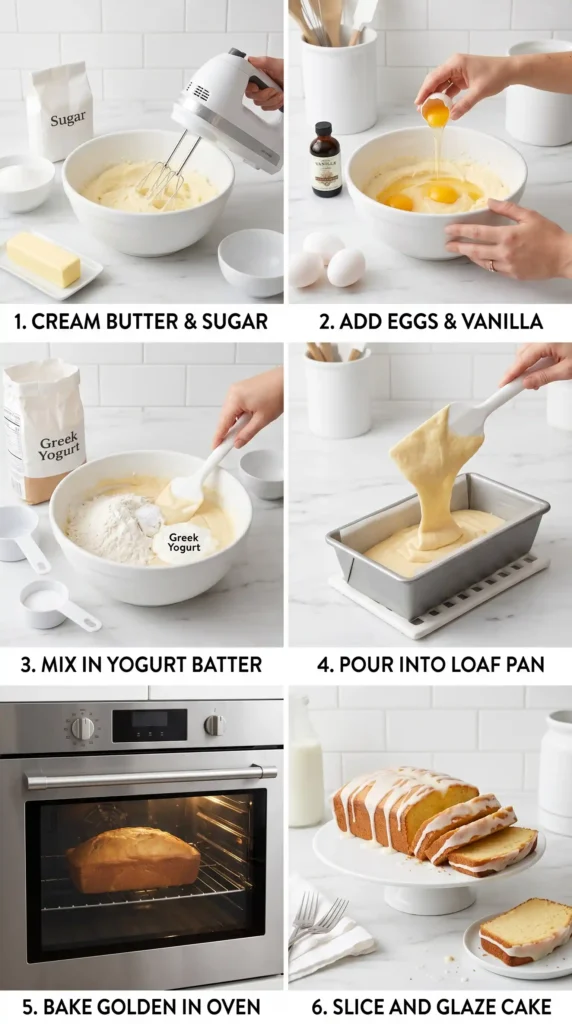
Step 3: Cream the Butter and Sugar
Place the softened butter and granulated sugar in a large mixing bowl. Beat with a hand mixer or stand mixer fitted with the paddle attachment on medium-high speed for 3–4 minutes until the mixture looks very pale, almost white, and feels light and airy. This extended creaming time is critical for pound cake — the air beaten into the butter and sugar during this step forms the primary structure of the cake and directly determines how light and even the crumb will be.
If you press a small amount of the creamed mixture between your fingers, it should feel smooth and almost silky rather than gritty. Visible sugar granules mean the creaming is not complete and the sugar has not fully dissolved into the butter — continue beating until the texture feels genuinely smooth and the colour is pale. Properly creamed butter and sugar at this stage is the foundation of every great pound cake.
Step 4: Add the Eggs and Vanilla
Add the three room-temperature eggs to the creamed butter and sugar one at a time. Beat for approximately 20 seconds on medium speed after each addition before adding the next — this gives the batter time to fully absorb and emulsify each egg rather than having all the eggs overwhelm the mixture at once. All three eggs added simultaneously can break the emulsion and produce a curdled, lumpy batter that bakes into a denser, less even loaf.
After adding all three eggs, add the vanilla extract and vanilla bean paste if using. Beat for another 20 seconds until fully incorporated. At this stage, the batter should look smooth, pale, and slightly fluffy — it has the texture of a thick, well-aerated mixture rather than a dense paste. If the batter looks curdled or grainy, the eggs were too cold and caused the butter to seize. Warm the bowl briefly over a pot of hot water and beat vigorously to try to bring it back together before adding the dry ingredients.
Step 5: Add the Yogurt and Dry Ingredients in Alternating Stages
This is the step that defines the crumb texture of the finished pound cake. Add the dry ingredients and Greek yogurt to the batter in alternating additions — starting and ending with the flour mixture. The sequence: one third flour, mix briefly; half the yogurt, mix briefly; one third flour, mix briefly; remaining yogurt, mix briefly; final flour, mix until just combined.
Use the lowest mixer speed or switch to a rubber spatula from the point that flour enters the batter. Stop mixing the moment no visible dry streaks of flour remain — each stroke after that point develops more gluten in the flour and makes the crumb progressively tougher and denser. The finished batter should look thick, smooth, and slightly ribbon-like when a spatula is lifted and the batter falls back into the bowl. It will look and feel noticeably denser than a standard cake batter — this is correct for pound cake.
Step 6: Transfer and Bake
Pour the batter into the prepared loaf tin and smooth the top with an offset spatula or the back of a spoon, creating a level, even surface. If you want to encourage the characteristic crack to form along the centre of the loaf, use a knife or the tip of a skewer to draw a shallow line along the centre of the batter from one short end to the other — this gives the cake a natural path to crack along as it rises.
Place the loaf tin on the centre rack of the preheated oven. Bake for 55–65 minutes. Check at the 55-minute mark — insert a toothpick or thin skewer into the centre of the loaf. It should come out clean or with just one or two moist crumbs attached. Wet batter on the skewer means the cake needs more time. If the top looks very dark before the centre is cooked through, lay a loose piece of foil over the top for the remaining baking time to prevent overbrowning while the interior finishes.
The finished Classic Vanilla Yogurt Pound Cake will show a deep golden crust, a visible crack along the centre filled with a slightly paler crumb, and will feel firm and spring back very slightly when the top is pressed lightly. Remove from the oven and place the tin on a wire rack. Cool in the tin for 20 minutes — the loaf needs this time to firm up before it can support its own weight when lifted out. After 20 minutes, use the parchment overhangs to lift the loaf out onto the rack and cool completely.
Step 7: Make the Optional Glaze
While the loaf cools, whisk together the sifted powdered sugar, 2 tablespoons of milk, and the vanilla extract in a small bowl until completely smooth. The glaze should be thick but pourable — it should coat the back of a spoon and flow slowly when the bowl is tilted. If too thick, add milk half a teaspoon at a time. If too thin, add a tablespoon of additional powdered sugar.
Pour the glaze over the fully cooled loaf — never over a warm loaf, which causes the glaze to run off completely before it has a chance to set. Pour it slowly along the centre of the loaf and allow it to drip naturally down the sides in irregular streams. Let it set for 10 minutes before slicing. The glaze adds visual elegance and an extra sweet vanilla note that makes the loaf look genuinely professional.
Low and Slow — The Pound Cake Temperature RulePound cakes bake at a lower temperature than most cakes because their dense, fat-rich batter requires more time for heat to penetrate evenly to the centre. A high-temperature bake sets and darkens the outer crust before the interior has cooked through, producing a raw centre under a burnt exterior. At 175°C, the heat moves slowly and evenly through the batter, producing a golden exterior and a fully cooked, moist interior simultaneously.
Variations Worth Making
Lemon Yogurt Pound Cake
Add 2 tablespoons of fresh lemon zest and 2 tablespoons of fresh lemon juice to the batter with the vanilla. Replace the vanilla glaze with a lemon glaze made from powdered sugar and fresh lemon juice. The lemon version is lighter, brighter, and more summery than the vanilla — the citrus cuts through the richness of the butter and yogurt and makes the whole loaf taste considerably fresher and more elegant.
Almond Vanilla Yogurt Pound Cake
Add 1 teaspoon of almond extract alongside the vanilla extract. Replace 1/4 cup of the flour with the same amount of almond flour for extra moisture and a subtly nutty flavour. Press a handful of flaked almonds across the top of the batter before baking — they toast beautifully during baking and create a visual and textural topping that makes the loaf look genuinely elegant without any extra effort.
Blueberry Yogurt Pound Cake
Fold 1 cup of fresh blueberries tossed in a teaspoon of flour into the finished batter just before pouring it into the tin — the flour coating prevents them from sinking to the bottom during baking. The blueberries burst during baking and create pockets of jammy, intensely fruity sweetness throughout the dense vanilla crumb. This version works beautifully as a breakfast cake served with a cup of tea or coffee and no additional glaze.
Storage Tips
Store Classic Vanilla Yogurt Pound Cake loosely wrapped at room temperature for up to 4 days. The yogurt in the batter keeps the crumb noticeably more moist over time than a traditional all-butter pound cake — it actually tastes better on day two when the vanilla flavour has had time to deepen and the crumb has settled to its characteristic dense, moist texture. Wrap individual slices in cling film if the cut end begins to dry out.
This loaf freezes exceptionally well for up to 3 months. Cool completely, slice if desired, wrap tightly in cling film and then foil, and freeze. Individual slices thaw at room temperature in 30–45 minutes — making this one of the most convenient make-ahead bakes for any occasion where you need something impressive without same-day effort. Apply the glaze fresh after thawing for the best visual result.
Frequently Asked Questions
Can I use regular plain yogurt instead of Greek yogurt?
Yes, but the result will differ slightly. Regular plain yogurt is thinner than Greek yogurt because it has not been strained, which means it contains more water and less fat. This produces a slightly looser batter that bakes into a slightly less dense, less moist crumb. To compensate, reduce the regular yogurt to 3/4 cup instead of the full cup and add a tablespoon of sour cream to partially restore the fat content. Full-fat Greek yogurt consistently produces the most reliable and most moist result.
Why did my pound cake sink in the middle?
Sinking almost always indicates one of four causes: the batter was underbaked and the centre had not fully set when removed from the oven; the oven door was opened before the cake had set sufficiently, causing it to deflate; too much leavening was used, creating excessive rise that then collapsed; or the batter was overmixed after the flour was added, developing too much gluten that could not support the risen structure. Always test with a toothpick in the very centre of the loaf before removing from the oven.
Can I make this cake without a stand mixer?
Yes. A hand mixer works equally well and produces an identical result. If you have neither, you can cream the butter and sugar by hand using a wooden spoon and considerable effort — beat for at least 5 minutes, longer than you would with a mixer, until the mixture looks genuinely pale and airy. The key is achieving that pale, fluffy, well-aerated texture in the creamed butter and sugar regardless of the tool you use to get there.
How do I know when my vanilla yogurt pound cake is fully baked?
Insert a toothpick or thin metal skewer into the very centre of the loaf — the deepest, last-to-cook part of the cake. It should come out completely clean or with one or two moist crumbs attached. Wet batter means it needs more time. The top should look deeply golden and spring back very slightly when pressed lightly in the centre. If the edges have pulled slightly from the sides of the tin, that is another reliable sign the cake is done.
Can I add mix-ins like chocolate chips or nuts to this pound cake?
Yes. Fold up to 1 cup of mix-ins into the finished batter just before transferring to the tin. Toss chocolate chips, nuts, dried fruit, or fresh berries in a teaspoon of flour before adding to the batter — the flour coating helps them stay suspended throughout the loaf during baking rather than sinking to the bottom. Do not exceed 1 cup of mix-ins total, as larger quantities add too much weight and interfere with the even rise that makes the crackled top and level crumb characteristic of this cake.
Final Thoughts
This Classic Vanilla Yogurt Pound Cake earns its reputation as the most reliably excellent, most consistently impressive, and most satisfying loaf cake you can make. The yogurt keeps it moist for days, the vanilla flavour runs through every crumb, the golden crackled crust makes it look genuinely beautiful, and the entire process takes 80 minutes from first ingredient to first slice. That is an extraordinary return on a straightforward investment of time.
It works for afternoon tea, for gifting, for brunch, for breakfast, for celebrations that do not require a layer cake, and for any occasion where you want something that looks and tastes like someone who knows what they are doing made it. The yogurt pound cake is that recipe — and the best part is that anyone who follows these steps actually does know what they are doing.
Pull that butter from the fridge now. Set the yogurt out. Preheat the oven. And then make the loaf cake that will become the most requested item in your baking repertoire within the first week of making it. That is not an exaggeration and you will not regret it for a single minute.
Classic Vanilla Yogurt Pound Cake
Ingredients
Method
- Preheat your oven to 175°C (350°F). Grease a 23x13cm (9x5-inch) loaf tin generously with butter and line it with parchment paper.
- In a medium bowl, whisk together the flour, baking powder, and salt until fully combined.
- In a large mixing bowl, cream the softened butter and granulated sugar on medium-high speed for 3-4 minutes until pale and airy.
- Add the eggs one at a time, beating for 20 seconds after each addition. Then add vanilla extract and bean paste if using, and mix until incorporated.
- Add the dry ingredients and Greek yogurt in alternating stages, starting and ending with the flour mixture. Mix until just combined.
- Pour the batter into the prepared loaf tin and smooth the top. Optionally, score a shallow line down the center of the batter.
- Bake for 55-65 minutes, checking for doneness with a toothpick at the 55-minute mark. If it comes out clean, the cake is done.
- Allow the cake to cool in the tin for 20 minutes, then lift it out using the parchment paper.
- Whisk together the sifted powdered sugar, milk, and vanilla extract until smooth. Adjust consistency as needed.
- Pour the glaze over the fully cooled loaf and let it set for 10 minutes before slicing.


