
Prep Time~10 minutes Cook Time~12–15 minutes Total Time~25 minutes Servings~4 servings Yield~20 crisps
So you love spinach dip. Who does not? That creamy, garlicky, cheesy situation that disappears within ten minutes at every single party. Now what if you could skip the bread bowl entirely and turn that whole experience into a crunchy, portable, low-carb snack? That is exactly what Spinach Dip Cheese Crisps are — and they are about to change your snack game completely.
I made these for the first time on a random Tuesday when I had leftover frozen spinach and a bag of shredded cheese doing nothing in the fridge. One test batch later and I was making them again the next day. Sometimes the best recipes come from pure laziness and whatever is in the kitchen.
What Are Spinach Dip Cheese Crisps?
Think of them as bite-sized cheese wafers with a creamy spinach center baked right in. The cheese melts, spreads, bubbles, and sets into a golden, lacy disc. The spinach mixture inside stays soft and flavorful while the cheese shell goes full crunch mode. It is the best of both worlds in one tiny crisp.
These are not your average cheese crisps. The spinach filling adds moisture, richness, and that unmistakable spinach dip flavor you already love. Every bite gives you that creamy-meets-crunchy contrast that makes this snack genuinely hard to stop eating. Consider yourself warned.
Why You Will Love This Recipe
Let me give you a quick rundown of why this recipe earns a permanent spot in your rotation:
- Ready in under 25 minutes from start to finish
- Uses simple, affordable ingredients you likely already have
- Naturally gluten-free and low in carbs
- Great for keto, low-carb, and high-protein diets
- Works as a party snack, lunchbox treat, or solo indulgence
- Completely customizable with different cheeses and add-ins
- Kids and adults both reach for them immediately
IMO, the real beauty of Spinach Dip Cheese Crisps is how approachable they are. You do not need any special equipment, unusual ingredients, or advanced cooking skills. If you can shred cheese and squeeze frozen spinach, you already have all the skills required.
Ingredients You Need
The Core Ingredients
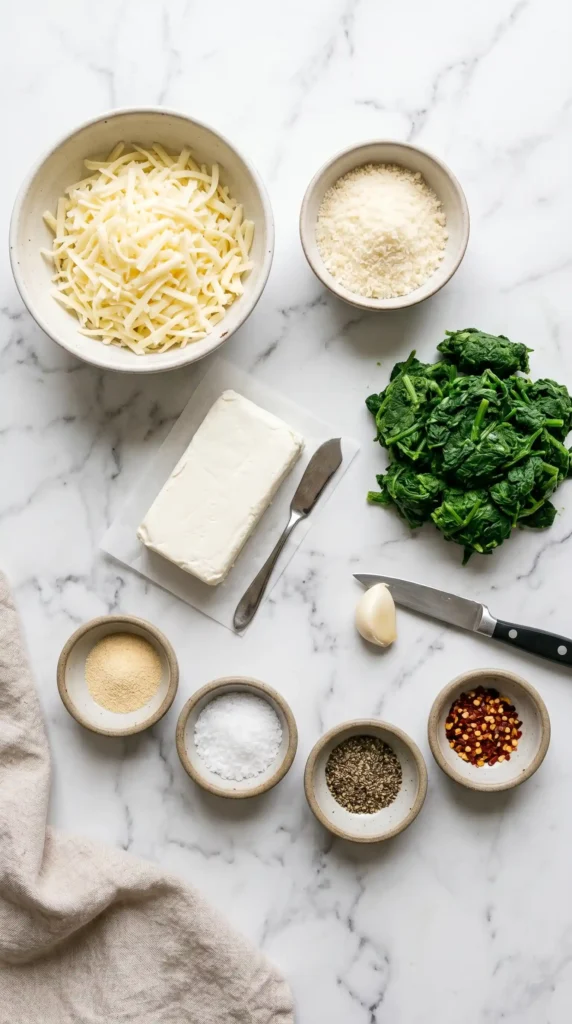
This recipe makes approximately 20 Spinach Dip Cheese Crisps, serving 4 people generously. Here is everything you need:
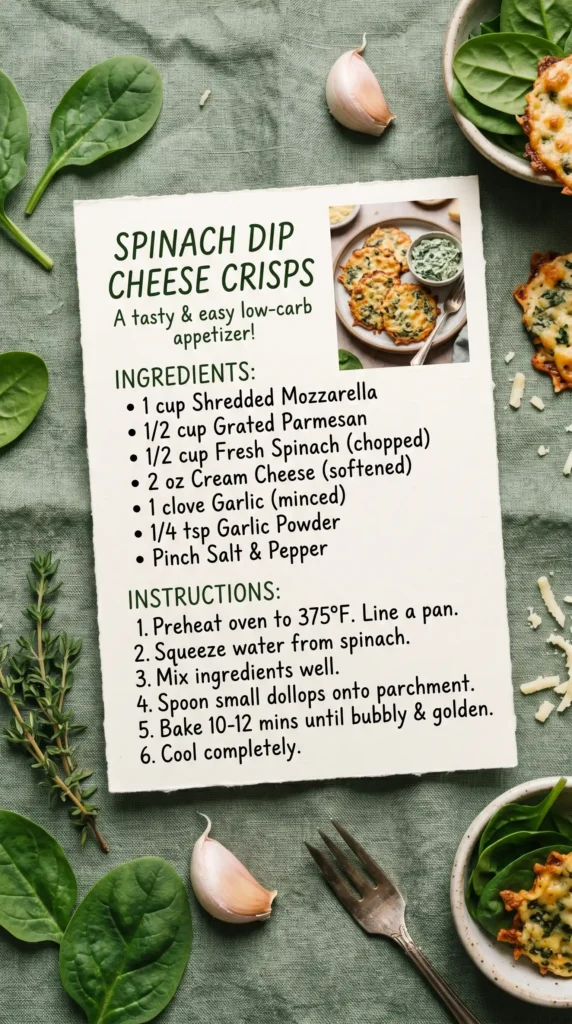
- 1 cup shredded mozzarella cheese (about 4 oz / 115g)
- 1/2 cup shredded Parmesan cheese (about 2 oz / 55g)
- 1/2 cup frozen spinach, thawed and very thoroughly squeezed dry (about 3 oz before squeezing)
- 3 oz (85g) cream cheese, softened to room temperature
- 1 clove garlic, finely minced (or 1/4 teaspoon garlic powder)
- 1/4 teaspoon onion powder
- 1/4 teaspoon salt
- 1/8 teaspoon black pepper
- Pinch of red pepper flakes (optional)
- Parchment paper or silicone baking mat for lining
Optional Upgrades
Want to take your crisps to the next level? These optional additions add extra depth and character:
- 2 tablespoons finely chopped canned artichoke hearts (for a full spinach artichoke experience)
- 1 tablespoon sour cream (makes the filling extra creamy)
- 1/4 teaspoon smoked paprika (for a subtle smoky note)
- 1 tablespoon fresh chives, finely chopped (for garnish)
- Ranch dressing or sour cream on the side for dipping
FYI — squeezing the spinach completely dry is the single most important step in this entire recipe. Excess moisture from the spinach is the main reason crisps turn out soggy rather than crunchy. Use your hands, a clean kitchen towel, or a fine mesh strainer and press hard until no more liquid comes out.
Equipment You Will Need
- One large baking sheet (or two for a double batch)
- Parchment paper or silicone baking mat
- A small mixing bowl for the spinach filling
- A spoon or small cookie scoop for portioning
- Wire cooling rack (critical for crunchiness)
- Paper towels or clean kitchen towel for squeezing spinach
How to Make Spinach Dip Cheese Crisps (Step by Step)
Here is where the real fun starts. Each step matters and together they produce crisps that are genuinely crunchy, golden, and loaded with flavor. Read through once before you start — it makes the whole process much smoother.
Step 1
Preheat the OvenSet your oven to 400°F (200°C) and let it preheat completely before anything goes in. A fully heated oven ensures the cheese starts crisping immediately when it hits the pan — if the oven is still warming up, the cheese melts slowly, releases grease, and produces a chewy rather than crunchy result. Give it at least 10 to 12 minutes to fully reach temperature. While the oven heats, line your baking sheet with parchment paper. Skip the foil — cheese sticks to foil and you will spend ten minutes peeling crisps off it. Not fun.
Step 2
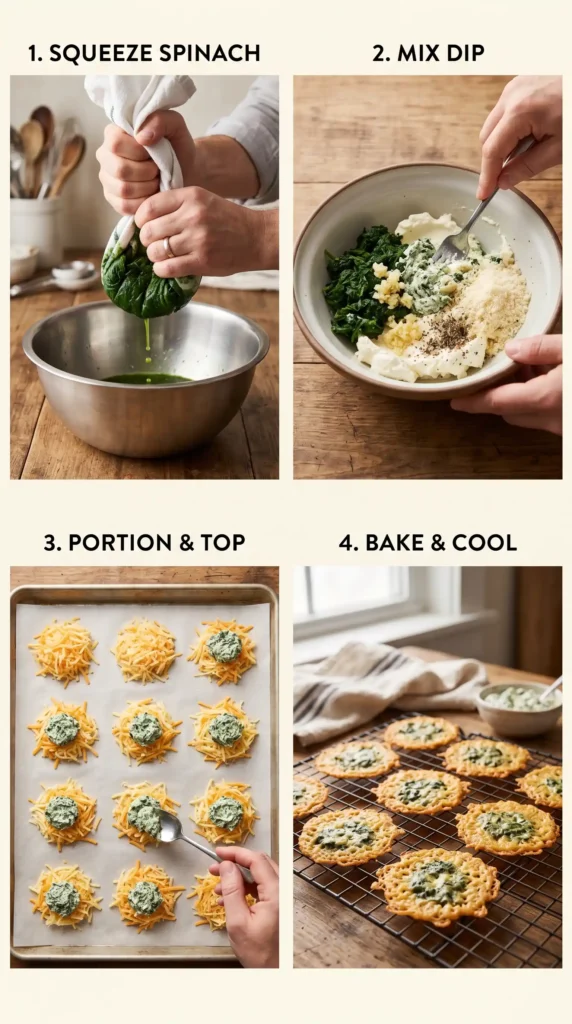
Prepare the Spinach FillingThis step makes or breaks the entire recipe, so take it seriously. Start by thawing your 1/2 cup of frozen spinach completely — you can microwave it for 2 minutes or let it sit at room temperature for 20 minutes. Once thawed, transfer it to a clean kitchen towel or several layers of paper towels. Gather the edges and twist, squeezing firmly and repeatedly until absolutely no more liquid comes out. The spinach should look dry and almost crumbly. Now place the dry spinach in a small mixing bowl with the softened cream cheese, minced garlic, onion powder, salt, pepper, and red pepper flakes if using. Use a fork to mash everything together until fully combined into a uniform, thick paste. Taste it — yes, you should taste it — and adjust salt if needed.
Step 3
Mix the Cheese BaseIn a separate bowl, combine the shredded mozzarella and shredded Parmesan. Toss them together so both cheeses are evenly distributed. This blend matters because mozzarella provides the stretchy, melty base that forms the crisp shell, while Parmesan adds a sharp, nutty flavor and helps the edges turn extra golden and lacy. Using either cheese alone gives you a less interesting result — the combination produces something genuinely special. If you want to experiment, you can swap the Parmesan for shredded Gruyere or sharp cheddar for a different flavor profile.
Step 4
Portion the Cheese onto the Baking SheetUsing a tablespoon or small cookie scoop, drop small mounds of the cheese mixture onto your prepared baking sheet. Each mound should use about 1.5 tablespoons of the cheese blend. Space them at least 2 inches apart because the cheese spreads considerably as it melts — crowding the pan causes the crisps to merge together, which might sound fun until you realize you cannot pick them up individually. Use the back of your spoon to gently flatten each mound into a rough circle about 2.5 inches wide. The flatter and more even the circle, the more uniformly the crisp will bake.
Step 5
Add the Spinach FillingNow take your spinach filling and place a small, compact dollop — roughly 1/2 teaspoon — right in the center of each flattened cheese mound. Do not spread it out or push it to the edges. Keep it centered and compact. As the cheese melts and spreads during baking, it naturally envelops the spinach filling from the sides, partially encasing it in a cheesy shell. If you add too much spinach or spread it too close to the edges, it will interfere with the cheese crisping properly and the filling may ooze out. Less is more here — a focused center dollop gives you the best result.
Step 6
Bake Until GoldenSlide your baking sheet into the preheated oven and bake for 12 to 15 minutes. Start checking at the 11-minute mark. You want the cheese around the outer edges to be deep golden brown and visibly set — not pale yellow. The center of each crisp will look slightly more golden than lacy because the spinach filling slows the drying process there. When the edges look crisp and the entire disc has moved from shiny and wet to matte and set, they are ready to come out. Do not pull them early hoping they will firm up later — they need to reach that golden color in the oven to crisp properly.
Step 7
Transfer to a Cooling RackPull the baking sheet out and immediately use a thin spatula to transfer each crisp to a wire cooling rack. This step is non-negotiable if you want maximum crunch. Leaving the crisps on the hot pan traps steam underneath them, which softens the bottoms within a couple of minutes. The cooling rack allows air to circulate on all sides simultaneously, which drives off residual moisture and firms everything up beautifully. Give the crisps 4 to 5 full minutes on the rack before touching or eating them. They will feel slightly soft right out of the oven and then noticeably firm up as they cool. If they are still soft after 5 minutes, pop them back in the oven for 2 more minutes.
Step 8
Serve and EnjoyOnce fully cooled and crisped, arrange your Spinach Dip Cheese Crisps on a serving board or plate. Garnish with a light sprinkle of fresh chives or a tiny pinch of smoked paprika for color if you like. Set out a small bowl of ranch dressing or sour cream on the side — these crisps are spectacular on their own but absolutely shine with a cool, creamy dip alongside them. Serve immediately for the best texture. These are always best enjoyed within 20 to 30 minutes of coming out of the oven.
Air Fryer Option: Arrange topped cheese mounds in a single layer in your air fryer basket. Cook at 370°F (188°C) for 7 to 9 minutes, checking at 7 minutes. The circulating air produces an incredibly even, deep golden crisp. Rest on a cooling rack for 3 minutes before serving.
The Golden Rule: Squeeze That Spinach
Let me repeat this one more time because it truly matters this much. Wet spinach is the enemy of crispy crisps. Even spinach that looks dry after squeezing once usually has more moisture hiding in it. Squeeze it, wait 30 seconds, then squeeze again. You want the spinach to look almost fibrous and dry to the touch before it goes into the filling.
If you skip this or under-squeeze, the moisture steams out during baking and creates soggy, chewy patches in your crisps rather than golden crunch. Treat the squeezing step like it is the most important thing in the recipe — because honestly, it is. :/
Tips for Perfect Crisps Every Time
Use the Right Cheese Combination
The mozzarella and Parmesan pairing is not random. Mozzarella melts smoothly and forms the stretchy, cohesive base. Parmesan is much drier and higher in fat, which helps the edges turn golden and crunchy rather than chewy. Avoid using fresh mozzarella — its high moisture content prevents proper crisping. Always use pre-shredded low-moisture mozzarella for the best results.
Do Not Overfill with Spinach
The spinach filling should stay as a small, tight dollop in the center of each cheese round. Spreading it out, piling it high, or using more than 1/2 teaspoon per crisp causes uneven baking and often results in soft spots where the cheese cannot fully crisp. When in doubt, use slightly less filling rather than more.
Space Them Properly
Cheese spreads more than you expect in the oven. Leave a full 2 inches of space between each mound. If you crowd the pan, neighboring crisps merge into a single sheet, and pulling them apart breaks them. Use two baking sheets if you are making a larger batch. It is worth the extra pan to wash.
Variations to Try
- Spinach Artichoke:Add 2 tablespoons finely chopped canned artichoke hearts to the spinach filling
- Spicy Jalapeño Spinach:Mix 1 tablespoon diced pickled jalapeño into the filling
- Sun-Dried Tomato:Stir 1 tablespoon finely chopped sun-dried tomatoes into the filling
- Everything Bagel:Sprinkle everything bagel seasoning over the cheese before baking
- Cheddar Base:Replace mozzarella with sharp cheddar for a bolder, more pungent crisp
How to Store Spinach Dip Cheese Crisps
These are absolutely best eaten fresh and warm. If you have leftovers, store them in an airtight container at room temperature for up to 2 days. Do not refrigerate them — the fridge introduces moisture that softens the crisps quickly. To restore crunch to day-old crisps, pop them in a 350°F oven or air fryer for 2 to 3 minutes.
The spinach filling means these crisps are slightly more delicate than plain cheese crisps when it comes to storage. Make them fresh when possible, especially if you are serving guests.
Nutrition Info (Per Serving of 5 Crisps)
- Calories: approximately 170–200 kcal
- Protein: 11–13g
- Fat: 13–15g
- Total Carbohydrates: 2–3g
- Net Carbs: 1–2g
- Fiber: 0.5g
Frequently Asked Questions
Can I use fresh spinach instead of frozen?
Yes, absolutely. Use about 2 cups of fresh baby spinach, wilted in a dry skillet over medium heat for 2 to 3 minutes, then cooled completely and squeezed as dry as possible. Fresh spinach produces a slightly brighter flavor than frozen. Make sure it is thoroughly cooled before mixing with the cream cheese or the heat will make the filling runny.
Why are my Spinach Dip Cheese Crisps still soft after baking?
The most likely cause is excess moisture from the spinach. Even one squeeze that is not quite thorough enough can result in chewy crisps. Other causes include an oven that was not fully preheated, crisps left on the hot baking sheet instead of transferred to a cooling rack, or too much filling used. Bake for 2 more minutes and make sure the edges are visibly golden before removing from the oven.
Are Spinach Dip Cheese Crisps keto-friendly?
Yes. With 1 to 2 grams of net carbs per serving, these crisps fit comfortably within ketogenic diet guidelines. They are high in protein and fat from the cheese and cream cheese, and the spinach adds fiber and nutrients without adding significant carbohydrates. They make an excellent keto chip replacement for dipping or snacking.
Can I make these ahead of time for a party?
You can bake them up to 3 to 4 hours ahead and store them uncovered at room temperature. Covering them or refrigerating them causes them to soften. For the best party experience, bake them 30 to 45 minutes before guests arrive so they are fresh and crunchy. If they soften slightly, a 2-minute blast in a 350°F oven restores the crunch perfectly.
Can I use a different cheese instead of Parmesan?
Yes. Gruyere, Romano, Asiago, or aged cheddar all work well as a Parmesan substitute in this recipe. The key is using a dry, hard cheese with lower moisture content that helps the crisps turn golden rather than staying chewy. Avoid soft cheeses like ricotta, brie, or fresh goat cheese as they contain too much moisture.
Can I freeze Spinach Dip Cheese Crisps?
Freezing is not recommended for this recipe. The cream cheese filling does not freeze and thaw well — it separates and becomes grainy, affecting both texture and flavor. These crisps are best made fresh or stored at room temperature for up to 2 days. Make smaller batches more frequently rather than trying to freeze a large batch.
Final Thoughts
Here is the honest truth: Spinach Dip Cheese Crisps are one of those recipes that sounds fancier than it actually is to make. Two types of cheese, a small amount of spinach filling, and about 25 minutes of your time. That is genuinely all it takes to produce something that impresses people and disappears from the plate embarrassingly fast.
Whether you are serving these at a party, packing them for lunch, or eating them straight off the cooling rack before they even make it to a plate — guilty, by the way — this recipe delivers every single time. Go make a batch. Your future snacking self will thank you.

Spinach Dip Cheese Crisps
Ingredients
Method
- Preheat the oven to 400°F (200°C) and let it preheat completely.
- Prepare the spinach filling: Thaw the frozen spinach completely and squeeze it dry.
- In a small mixing bowl, combine the dry spinach with cream cheese, minced garlic, onion powder, salt, pepper, and red pepper flakes until fully combined.
- In a separate bowl, mix the shredded mozzarella and Parmesan cheese together evenly.
- Drop small mounds of the cheese mixture onto the prepared baking sheet and flatten each mound.
- Add a small dollop of the spinach filling in the center of each cheese mound.
- Bake for 12 to 15 minutes, checking at 11 minutes for doneness.
- Transfer the crisps to a wire cooling rack immediately after removing from the oven.
- Arrange the Spinach Dip Cheese Crisps on a serving board or plate, garnishing as desired.
- Serve immediately for the best texture.


