
Servings: 12 to 16 roll ups | Prep Time: 25 minutes | Chill Time: 2 hours | Total Time: 2 hours 25 minutes
The Snack That Always Disappears First
You know that one dish at every party that vanishes before anyone even says hello? That is the Gourmet Tortilla Roll Up. Every single time I bring these, the plate is empty within ten minutes. And no, that is not an exaggeration.
I started making these for game nights a few years ago, and they have honestly become my go-to for everything — potlucks, holiday spreads, quick lunches, you name it. The flavors are bold, the textures are layered, and they look impressive without requiring a culinary degree.
What I love most about Gourmet Tortilla Roll Ups is how flexible they are. You can customize every single element to suit your crowd. Vegetarian guests? Easy swap. Someone obsessed with spice? Pile it on. They work for literally everyone.
So let us get into it. Grab your tortillas and let me show you exactly how to make these right.
Why Call Them Gourmet Tortilla Roll Ups?
Fair question. Tortilla roll ups have been around forever, so what makes this version gourmet? The answer is in the details — the quality of the fillings, the layering technique, and the balance of flavors that most basic recipes completely ignore.
Most roll up recipes just slap some cream cheese and deli meat on a tortilla and call it a day. These Gourmet Tortilla Roll Ups go further. We use roasted red peppers, sun-dried tomatoes, fresh herbs, and a seasoned cream cheese spread that makes every bite genuinely memorable.
IMO, the difference between a boring roll up and a gourmet one is intentionality. Every ingredient earns its place. Nothing is random. And that is exactly what this recipe delivers.
Ingredients You Will Need
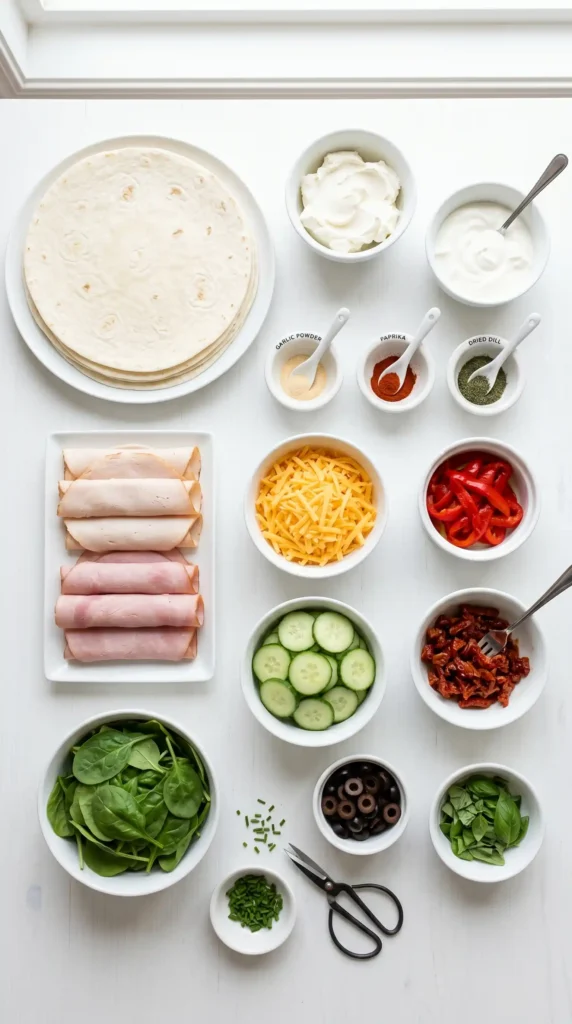
Here is everything you need, with exact quantities. Nothing hard to find — most of this lives in your grocery store’s everyday sections.
For the Seasoned Cream Cheese Spread
- 8 oz cream cheese, softened to room temperature
- 3 tablespoons sour cream
- 1 teaspoon garlic powder
- 1 teaspoon onion powder
- 1/2 teaspoon smoked paprika
- 1/2 teaspoon dried dill
- 1/4 teaspoon black pepper
- 1/2 teaspoon salt
- 2 tablespoons fresh chives, finely chopped
For the Fillings
- 4 large flour tortillas (10-inch size works best)
- 6 oz thinly sliced turkey or ham (or your preferred deli meat)
- 4 oz sharp cheddar cheese, thinly sliced or shredded
- 1/2 cup roasted red peppers, patted dry and sliced into thin strips
- 1/4 cup sun-dried tomatoes (oil-packed), drained and chopped
- 1 cup fresh baby spinach leaves
- 1/2 cup cucumber, peeled and sliced into thin strips
- 1/4 cup kalamata olives, pitted and roughly chopped
- 2 tablespoons fresh basil leaves, torn
Optional Add-Ons
- 2 tablespoons pesto (spread over the cream cheese layer for extra depth)
- Sliced avocado for a creamy twist
- Pickled jalapenos if you want heat
- Crumbled feta cheese for a Mediterranean vibe
FYI — patting the roasted red peppers and sun-dried tomatoes dry is critical. Excess oil or liquid will make your tortillas soggy and your roll ups will fall apart when sliced. A few seconds with a paper towel saves the whole dish.
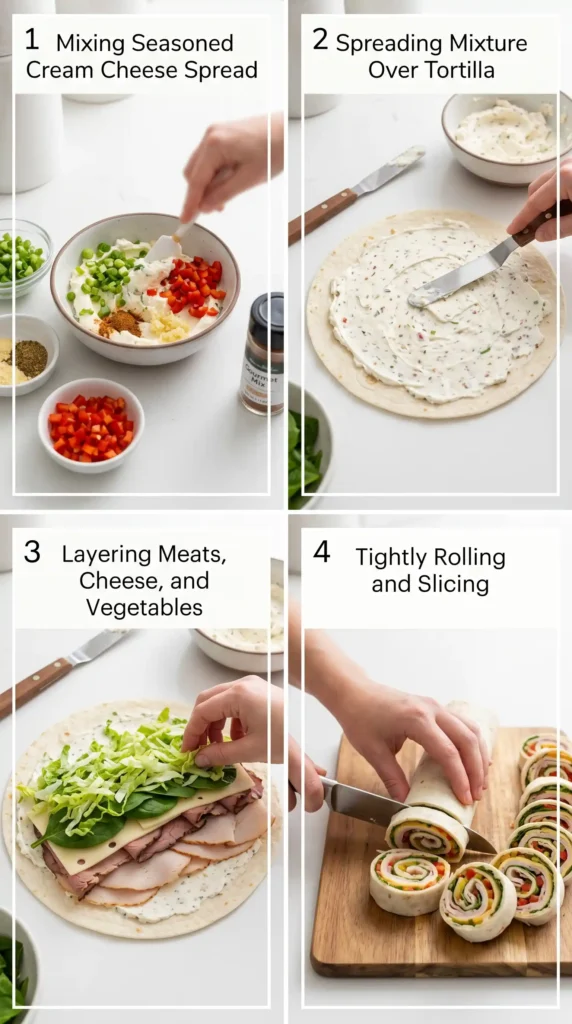
How to Make Gourmet Tortilla Roll Ups Step by Step
This process is straightforward, but paying attention to each step makes a real difference in the final result. Follow along and you will end up with roll ups that look and taste restaurant-worthy.
Step 1 — Make the Seasoned Cream Cheese Spread
Start by placing the softened cream cheese in a medium mixing bowl. If your cream cheese is still cold, microwave it in 10-second intervals until it is soft enough to mix easily without lumps.
Add the sour cream, garlic powder, onion powder, smoked paprika, dried dill, black pepper, and salt into the bowl. Use a hand mixer on medium speed — or just a sturdy rubber spatula — to blend everything together until the mixture is completely smooth and uniform.
Once blended, stir in the fresh chives by hand. The chives add little pops of color and a mild onion flavor that ties the whole spread together beautifully. Taste it and adjust the seasoning if needed. More garlic? More dill? Make it yours.
Set the spread aside at room temperature while you prep the fillings. You want it soft and spreadable, not cold and stiff, when it goes onto the tortilla.
Step 2 — Prep All Your Fillings
Before you start assembling, get every filling ready and within arm’s reach. This makes the whole process faster and ensures you layer everything evenly across each tortilla.
Slice the roasted red peppers into thin, uniform strips and press them between paper towels. Do the same with the sun-dried tomatoes — chop them small and blot them dry. Slice the cucumber into matchstick-thin strips. Tear the basil into small pieces. Roughly chop the olives.
Lay the baby spinach leaves out and give them a quick once-over — remove any wilted or slimy ones. Fresh, crisp spinach gives the roll ups structure and a clean, green flavor that balances the richness of the cream cheese spread.
Having everything prepped before assembly sounds like extra work, but it genuinely saves time and stress. You will move through the tortillas quickly and confidently when everything is right there waiting for you.
Step 3 — Warm the Tortillas
Take each large flour tortilla and warm it briefly in a dry skillet over medium heat for about 20 to 30 seconds per side, or microwave it wrapped in a damp paper towel for 15 seconds. This makes it more flexible and less likely to crack when you roll it.
Do not skip this step. A cold, stiff tortilla tears when you roll it tightly, and a torn tortilla means a sloppy roll up that falls apart when sliced. The warmth also helps the cream cheese spread adhere better to the surface.
Work with one tortilla at a time and keep the others covered with a clean kitchen towel so they stay warm and pliable while you assemble each one.
Step 4 — Spread the Cream Cheese Base
Lay your warm tortilla flat on a clean cutting board or countertop. Scoop about 3 to 4 tablespoons of the seasoned cream cheese spread onto the center of the tortilla and use the back of a spoon or an offset spatula to spread it evenly across the entire surface.
Leave about a half-inch border around the edges — this prevents filling from squeezing out when you roll. The spread should cover the tortilla generously but not so thick that it overwhelms the other flavors. Think of it as the glue that holds everything together.
If you want to use pesto as an optional layer, spread a thin coating of it directly on top of the cream cheese. It adds an herby, garlicky depth that takes the whole thing up another notch.
Step 5 — Layer the Fillings
Now comes the fun part. Start by laying your deli meat slices across the cream cheese in an even layer, slightly overlapping them. This creates a solid base layer that helps the roll hold its shape.
Next, add the cheddar cheese slices or scatter shredded cheddar evenly across the meat. Follow with the roasted red pepper strips, then the sun-dried tomatoes, then the cucumber strips. Place the baby spinach leaves on top, followed by the olives and fresh basil.
Do not overload the tortilla. It is tempting to pile everything on, but too much filling makes rolling difficult and causes the roll to split open. A generous but controlled layer of each ingredient is the sweet spot you are aiming for.
Distribute each ingredient all the way to the left and right edges, but respect that half-inch border at the top and bottom. Even distribution means every slice of roll up tastes exactly as good as the last.
Step 6 — Roll Tightly and Wrap
Starting from the bottom edge of the tortilla, fold it up snugly over the fillings and begin rolling forward. Apply gentle but firm pressure as you roll to keep everything compact and tight.
The key here is consistency — roll with steady, even pressure throughout, not just at the start. If you roll the beginning tightly but loosen up halfway through, the center will hold but the ends will be floppy and messy when sliced.
Once rolled, wrap the entire roll up tightly in plastic wrap, twisting both ends closed like a candy wrapper. This compression is what actually locks the shape in place. Repeat with the remaining tortillas.
Place all the wrapped rolls in the refrigerator and chill for at least 2 hours. Overnight chilling is even better. The chill time lets the cream cheese firm up, the flavors meld together, and the roll hold its shape perfectly when you slice it.
Step 7 — Slice and Serve
When you are ready to serve, unwrap each roll and place it on a cutting board. Use a sharp serrated knife for clean cuts — a dull knife will drag and compress the fillings rather than slicing through them neatly.
Cut each roll into 1 to 1.5-inch slices. You should get about 6 to 8 slices per tortilla, which gives you 24 to 32 pieces total from 4 tortillas. Arrange them cut-side up on a serving platter so the beautiful cross-section of fillings shows.
Serve immediately or cover and refrigerate for up to a day. These roll ups taste best cold, fresh from the fridge, which is a rare win — no reheating required.
Pro Tips for Perfect Gourmet Tortilla Roll Ups
Want consistently great results every time you make these? Keep these tips in mind:
- Always warm the tortillas. Cold tortillas crack. Warm tortillas roll. Simple as that.
- Pat your fillings dry. Moisture from peppers or tomatoes ruins the texture and makes slicing messy.
- Do not skip the chill. Two hours minimum is not optional — it sets the shape and deepens the flavor.
- Use a serrated knife. A sharp serrated blade gives you clean, beautiful slices without crushing.
- Layer from heaviest to lightest. Put denser ingredients first (meat, cheese) and delicate ones (spinach, basil) last.
Flavor Variations Worth Trying

Once you master the classic version, try one of these twists to keep things interesting:
- Southwest Style: Swap in pepper jack cheese, black beans, corn, and chipotle cream cheese.
- Greek Version: Use hummus instead of cream cheese, add feta, cucumber, olives, and roasted tomatoes.
- BLT Roll Up: Bacon, crisp romaine, tomato, and herb mayo spread. Wildly satisfying.
- Veggie-Only: Load up with avocado, roasted zucchini, bell peppers, and goat cheese. Nobody misses the meat.
How to Store and Make Ahead
These roll ups are perfect for making ahead. Keep them wrapped in plastic wrap in the refrigerator for up to 2 days before slicing. Slice just before serving for the cleanest cuts and freshest presentation.
Once sliced, store leftovers in an airtight container in the fridge for up to 24 hours. They are not great for freezing, because the fillings lose their texture when thawed. But honestly, leftovers are rarely an issue — these go fast.
Frequently Asked Questions
1. Can I make these the night before?
Yes, and I actually recommend it. Making these the night before and refrigerating them overnight gives the cream cheese time to fully firm up and the flavors time to meld. Just slice them fresh the next day right before serving.
2. What tortillas work best for roll ups?
Large, 10-inch flour tortillas work best. They are flexible, sturdy, and hold the fillings well. Whole wheat tortillas work too and add a slightly nutty flavor. Avoid corn tortillas — they crack too easily and do not roll up cleanly.
3. How do I stop my roll ups from getting soggy?
The main culprits are wet fillings. Always pat roasted peppers, sun-dried tomatoes, cucumbers, and any other moist ingredients dry before layering. Also, make sure your cream cheese is thick enough — if it is too loose, it will seep into the tortilla and soften it.
4. Can I make a vegetarian version?
Absolutely. Skip the deli meat and double up on the vegetables. Roasted zucchini, hummus, avocado, extra cheese, and a handful of arugula make a filling and delicious vegetarian roll up that nobody will complain about. :/
5. How many roll ups does this recipe make?
Using 4 large tortillas and slicing each into roughly 6 to 8 pieces, you get 24 to 32 individual roll up slices. That easily serves 8 to 12 people as an appetizer, or 4 to 6 people as a light lunch when paired with a side salad.
Final Thoughts
These Gourmet Tortilla Roll Ups check every box — quick to prep, easy to transport, endlessly customizable, and genuinely impressive on a platter. They have earned a permanent spot in my recipe rotation, and I have a feeling they will earn one in yours too.
The best part? Once you get the core technique down, you can reinvent these with whatever you have on hand. Different cheeses, different proteins, different spreads — the framework stays the same and the results are always good. So go make a batch, pile them on a plate, and try not to eat all of them before your guests arrive. (Spoiler: you probably will not succeed. And honestly? No judgment

Gourmet Tortilla Roll Ups
Ingredients
Method
- Make the Seasoned Cream Cheese Spread by blending softened cream cheese, sour cream, garlic powder, onion powder, smoked paprika, dried dill, black pepper, and salt until smooth. Stir in fresh chives.
- Prep all fillings by slicing roasted red peppers, sun-dried tomatoes, cucumber, and tearing basil. Ensure everything is ready to layer.
- Warm tortillas in a skillet or microwave for flexibility.
- Spread a layer of the cream cheese mixture on each tortilla, leaving a half-inch border.
- Layer deli meat, cheddar, roasted red peppers, sun-dried tomatoes, cucumber, baby spinach, olives, and basil on the cream cheese spread.
- Roll the tortilla tightly from the bottom edge, applying gentle pressure.
- Wrap each roll tightly in plastic wrap and chill in the refrigerator for at least 2 hours.
- Slice the roll-ups into 1 to 1.5-inch pieces and arrange on a platter.
- Serve cold, immediately after slicing, or refrigerate for up to a day.