Servings: 16 bars | Prep Time: 15 minutes | Bake Time: 28 to 32 minutes | Cooling Time: 30 minutes | Total Time: About 1 hour 20 minutes
Cinnamon rolls are one of those things that everybody loves but almost nobody makes on a weekday. They take hours. They need yeast. They require patience most of us simply do not have before work. Enter Cinnamon Roll Bliss Bars — same flavors, fraction of the effort.
I stumbled onto this concept during a lazy Sunday when I wanted cinnamon roll flavor but absolutely refused to wait three hours for dough to rise. Cinnamon Roll Bliss Bars give you that sweet, spiced, iced experience in bar form — baked in one pan and ready to slice in under 90 minutes.
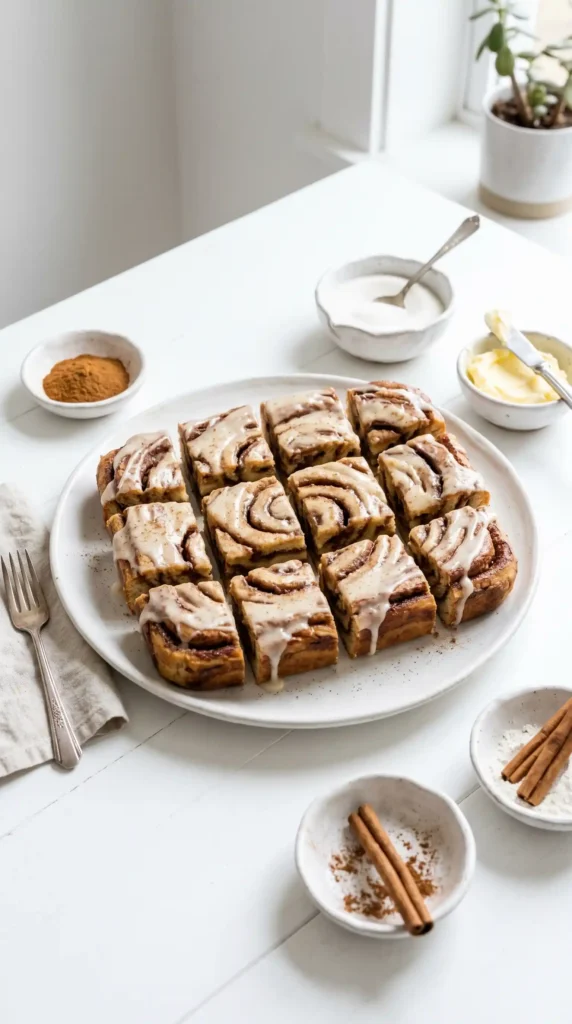
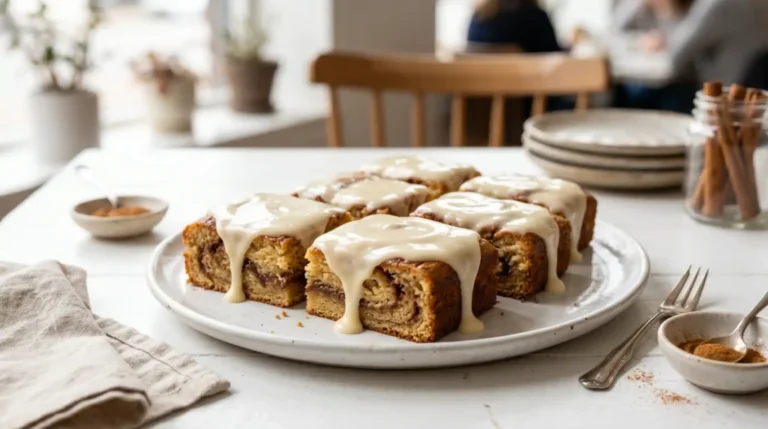
These bars have a soft, chewy base with a swirled cinnamon-brown sugar filling running through every bite, all finished with a thick cream cheese glaze on top. They travel well, store beautifully, and taste genuinely better than they have any right to given how simple they are.
Ready to make the easiest cinnamon roll experience of your life? Let us get into it.
What Makes Cinnamon Roll Bliss Bars So Good?
Regular cinnamon rolls are wonderful but they demand time, yeast knowledge, and multiple rise cycles that most home bakers skip for a reason. Cinnamon Roll Bliss Bars bypass all of that by using a simple bar cookie base instead of yeasted dough.
The result captures every element that makes cinnamon rolls irresistible — the warm cinnamon-sugar swirl, the pillowy soft texture, and that signature cream cheese icing — without any of the waiting. You can make these start to finish before most cinnamon roll recipes even finish their first proof.
IMO, this is the smarter way to get cinnamon roll flavors into your week without treating baking like a full-time job. The texture sits somewhere between a blondie and a soft coffee cake, and the cinnamon filling ribbons through every single layer. You genuinely cannot go wrong here.
Ingredients for Cinnamon Roll Bliss Bars
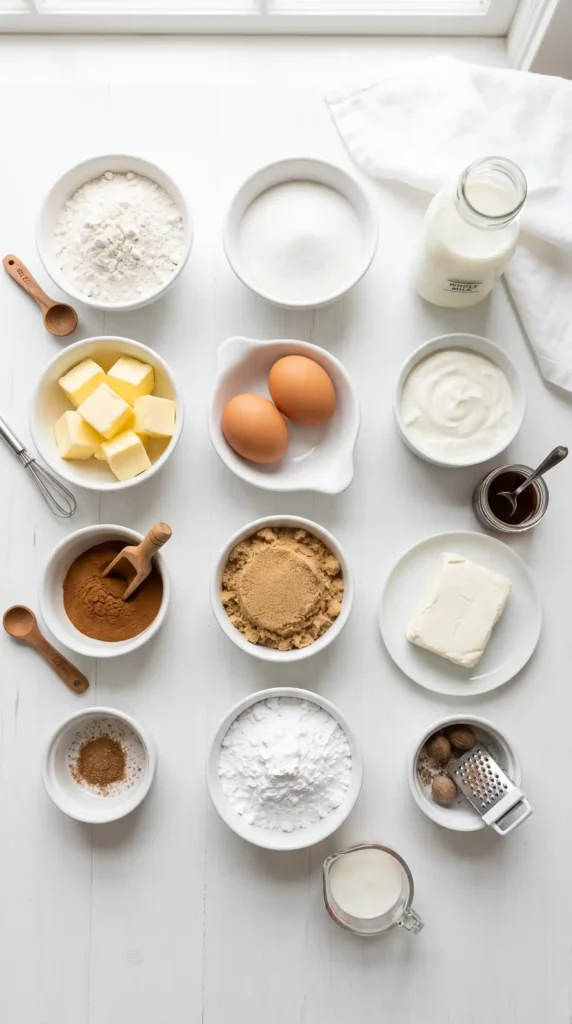
Three simple components make up this recipe — the bar base, the cinnamon swirl filling, and the cream cheese glaze. Nothing exotic, nothing that requires a specialty store.
For the Bar Base
- 2 cups all-purpose flour
- 1 teaspoon baking powder
- 1/2 teaspoon fine salt
- 3/4 cup unsalted butter (1 and 1/2 sticks), melted and slightly cooled
- 1 cup granulated sugar
- 2 large eggs, room temperature
- 2 teaspoons pure vanilla extract
- 1/3 cup sour cream
For the Cinnamon Swirl Filling
- 1/3 cup unsalted butter, melted
- 3/4 cup brown sugar, packed
- 2 tablespoons ground cinnamon
- 1 tablespoon all-purpose flour
- 1/4 teaspoon ground nutmeg (optional but recommended)
For the Cream Cheese Glaze
- 4 ounces cream cheese, softened
- 1 cup powdered sugar
- 3 to 4 tablespoons whole milk
- 1/2 teaspoon pure vanilla extract
- Pinch of salt
How to Make Cinnamon Roll Bliss Bars: Step-by-Step
The process moves quickly once you start, so read through everything once before you begin. Having all your ingredients measured and ready before you turn on the oven makes everything flow smoothly from start to finish.
Step 1: Prepare Your Pan and Preheat
Preheat your oven to 350 degrees Fahrenheit. Line a 9×13-inch baking pan with parchment paper, leaving a few inches of overhang on the long sides. This overhang acts as handles later and makes lifting the entire slab of bars out of the pan clean and easy.
Spray the parchment lightly with non-stick cooking spray. Even parchment benefits from a little insurance when you have a buttery, sugar-heavy batter. This small step prevents any sticking along the edges where the batter meets the pan sides directly.
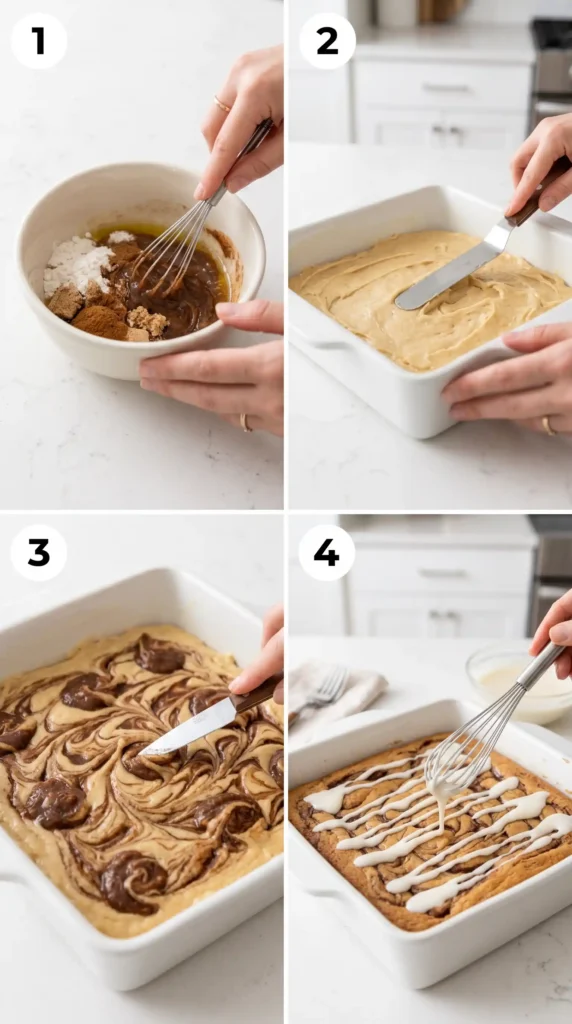
Step 2: Make the Cinnamon Swirl Filling First
Start with the filling because it needs a few minutes to sit and thicken slightly before you use it. Melt 1/3 cup of butter in a small bowl and let it cool for 2 minutes. Add the brown sugar, cinnamon, flour, and nutmeg directly to the melted butter.
Stir everything together until you get a thick, paste-like consistency. The flour in the filling helps it hold its shape during baking instead of sinking straight to the bottom of the pan. Set the filling aside while you build the bar base — it should thicken slightly as it sits.
Step 3: Mix the Bar Base
In a large bowl, whisk together the melted butter and granulated sugar until smooth and combined. Melted butter creates a denser, fudgier base than creamed butter, which is exactly the texture you want in these bars — chewy and rich rather than cakey and dry.
Add both eggs and the vanilla extract to the butter-sugar mixture. Whisk vigorously for about 60 seconds until the mixture looks slightly pale and thickened. This brief whisking incorporates air and helps the bars bake up with a slight lift rather than coming out flat and dense.
Add the sour cream and whisk it in until smooth. Sour cream is the secret to the soft, tender crumb in this recipe. It adds a subtle tang that balances the sweetness and keeps the bars moist for days. Do not skip it or substitute low-fat — full-fat sour cream gives the best result every time.
Add the flour, baking powder, and salt to the wet ingredients. Switch from a whisk to a spatula at this point. Fold the dry ingredients into the wet with slow, deliberate strokes until just combined. Stop folding the moment you see no dry flour streaks — a few extra strokes make the bars tough.
Step 4: Layer the Batter and Swirl
Spread roughly two-thirds of the batter into the prepared pan using an offset spatula or the back of a spoon. Work from the center outward and get it as even as possible. The layer will be thin — that is completely normal and expected at this stage.
Drop spoonfuls of the cinnamon filling across the surface of the batter layer. Use the back of your spoon to spread each spoonful gently and evenly across the batter. You want coverage across the whole surface, but a little unevenness is absolutely fine — it creates natural swirl variation in the finished bars.
Drop the remaining one-third of the batter in small spoonfuls over the cinnamon filling layer. Do not try to spread this top layer perfectly — just distribute it roughly across the surface. During baking, it will spread and merge into the filling layer below, creating that gorgeous marbled effect.
Take a butter knife or a thin skewer and drag it through the layers in slow S-curves or figure-eight motions. Do not over-swirl — six to eight passes is plenty. Too many passes blends the layers together completely and you lose the distinct cinnamon swirl effect that makes these bars visually stunning when sliced.
Step 5: Bake the Bars
Slide the pan into your preheated oven and bake for 28 to 32 minutes. The bars are done when the edges look set and golden, the center no longer jiggles when you shake the pan gently, and a toothpick inserted into the center comes out with just a few moist crumbs — not wet batter.
Check at the 26-minute mark and every 2 minutes after. Ovens vary and these bars can go from perfectly done to slightly over-baked quickly because of the high sugar content. Erring on the side of slightly under-done is better than over-baked — they firm up considerably as they cool.
If the edges brown faster than the center finishes, loosely tent a piece of foil over the pan for the last 5 minutes of baking. The foil slows surface browning without affecting how the center bakes through. Remove the foil for the last minute to let the top dry out slightly.
Step 6: Cool Before Glazing
Remove the pan from the oven and place it on a wire rack. Let the bars cool in the pan for at least 30 minutes before adding the glaze. Glazing warm bars causes the cream cheese glaze to melt completely and run off instead of setting into that beautiful thick layer you want on top.
The bars should feel firm to the touch and the edges should pull slightly away from the pan sides when they are ready for glazing. Patience here pays off visually — a properly cooled bar holds the glaze beautifully and gives you that clean, finished look you see in bakery displays.
Step 7: Make and Apply the Cream Cheese Glaze
Beat the softened cream cheese with a hand mixer or vigorously by hand until completely smooth with no lumps. This step is much easier if your cream cheese genuinely sits at room temperature first. Cold cream cheese fights you every step of the way :/
Add the powdered sugar, vanilla extract, and pinch of salt. Beat on low first to avoid a sugar cloud, then increase speed and beat until smooth. Add milk one tablespoon at a time until the glaze reaches a pourable but thick consistency — think honey, not water.
Pour the glaze over the cooled bars and use an offset spatula or the back of a spoon to spread it evenly all the way to the edges. FYI, a generous glaze layer is not optional here — it is the finishing touch that ties every element together and makes these bars look as good as they taste.
Let the glaze set for 10 minutes before slicing. Use the parchment handles to lift the entire slab out of the pan and onto a cutting board. Slice with a sharp knife in long, confident cuts for the cleanest edges.
Tips for the Best Cinnamon Roll Bliss Bars
These bars are forgiving but a few habits consistently produce better results. Here is what makes the real difference based on repeated experience with this recipe.
- Use room-temperature eggs and sour cream: Cold dairy and eggs do not incorporate as smoothly into melted butter and can cause the batter to look slightly curdled. Set them out 30 minutes before baking.
- Do not overmix the batter: Once the flour goes in, fold gently and stop early. Overmixed batter develops too much gluten and produces tough, dense bars rather than the soft, tender result you want.
- Measure flour correctly: Spoon flour into your measuring cup and level it off with a straight edge. Scooping directly packs in up to 20 percent more flour and dries out the bars significantly.
- Cool completely before slicing: Warm bars compress and smear when cut. A fully cooled bar slices cleanly and holds its shape on the plate.
- Soften cream cheese properly: Thirty minutes at room temperature minimum. Microwave softening often creates uneven hot spots that make the glaze lumpy and difficult to smooth out.
Variations Worth Trying
Once you master the base Cinnamon Roll Bliss Bars recipe, these variations add a fun twist while keeping the core of what makes the recipe great.
- Add 1/2 cup of chopped toasted pecans or walnuts to the cinnamon filling layer for crunch.
- Stir 1 teaspoon of cardamom into the cinnamon filling for a Scandinavian-inspired flavor twist.
- Use a maple glaze instead of cream cheese — replace cream cheese with 2 tablespoons of softened butter and add 1 tablespoon of pure maple syrup.
- Add a layer of raspberry jam between the base batter and cinnamon filling for a fruity contrast.
- Sprinkle flaky sea salt over the finished glaze to balance the sweetness and add visual appeal.
How to Store Cinnamon Roll Bliss Bars
Store cut bars in an airtight container at room temperature for up to 3 days. The cream cheese glaze is stable at room temperature for this window because of its sugar content. Beyond 3 days, refrigerate them and bring to room temperature before serving.
In the refrigerator, these bars keep well for up to 6 days. The texture firms up when cold but softens beautifully after 20 minutes at room temperature. Cold bars right from the fridge taste dense — give them time to come back to life before eating.
These bars also freeze well for up to 2 months. Freeze them unglazed if possible, then add fresh glaze after thawing. If already glazed, wrap individual bars tightly in plastic wrap and freeze in a zip bag. Thaw overnight in the refrigerator.
Frequently Asked Questions
Can I use Greek yogurt instead of sour cream?
Yes, full-fat Greek yogurt works as a direct substitute in equal amounts. The texture and tang are similar enough that most people cannot tell the difference in the finished bar. Avoid low-fat versions of either — the reduced fat content makes the bars noticeably drier and less tender.
Why did my cinnamon filling sink to the bottom?
This happens when the filling is too thin or the batter is too loose. Make sure your filling includes the tablespoon of flour — it acts as a thickener and helps the filling stay suspended during baking. Letting the filling sit for a few minutes before using it also allows it to firm up.
Can I make Cinnamon Roll Bliss Bars in an 8×8 pan?
You can, but the bars will be much thicker and need additional baking time — closer to 38 to 45 minutes. Check with a toothpick starting at the 35-minute mark. The thicker bars are rich and fudgy in a really satisfying way, just different from the thinner 9×13 version.
How do I get clean slices without the glaze smearing?
Let the glaze set for at least 10 minutes before slicing. Use a sharp chef’s knife and wipe the blade clean between every cut with a damp cloth. Cutting in one confident downward motion rather than sawing back and forth gives you dramatically cleaner edges every time.
Can I make the batter the night before?
You can mix and refrigerate the batter overnight, but the baking powder begins to activate when it hits liquid and loses some effectiveness by morning. For best rise, make the batter fresh. However, you can prepare and refrigerate the cinnamon filling a day ahead with no impact on quality.
Final Thoughts
Cinnamon Roll Bliss Bars deliver everything that makes cinnamon rolls worth eating — the warm spice, the sweet filling, the creamy glaze — without the hours of work that most people simply do not have time for on a regular basis.
The recipe is genuinely beginner-friendly and consistently produces impressive results. Every component is straightforward, the baking time is short, and the payoff is a pan of bars that smell like a bakery and taste even better. That is a hard combination to argue with. Make a batch this weekend and share them — or do not share them, honestly. I will not judge. Either way, once you try Cinnamon Roll Bliss Bars, regular cinnamon rolls start to feel like a lot of unnecessary work
Cinnamon Roll Bliss Bars
Ingredients
Method
- Preheat your oven to 350 degrees Fahrenheit. Line a 9x13-inch baking pan with parchment paper, leaving a few inches of overhang on the long sides.
- Spray the parchment lightly with non-stick cooking spray.
- Melt 1/3 cup of butter and let it cool for 2 minutes. Combine the brown sugar, cinnamon, flour, and nutmeg with the melted butter and stir until you get a thick paste-like consistency.
- Set aside while you build the bar base.
- In a large bowl, whisk together the melted butter and granulated sugar until smooth.
- Whisk in the eggs and vanilla extract for about 60 seconds until slightly pale and thickened.
- Fold in the sour cream until smooth.
- Add the flour, baking powder, and salt. Fold until just combined.
- Spread two-thirds of the batter into the prepared pan.
- Drop spoonfuls of the cinnamon filling across the batter, using a spoon to spread it gently.
- Top with the remaining batter in spoonfuls without trying to spread it perfectly.
- Use a butter knife to swirl through the layers.
- Bake for 28 to 32 minutes until the edges are golden and set, checking from 26 minutes.
- If the edges brown faster, tent with foil for the last 5 minutes.
- Remove from the oven and let cool for at least 30 minutes.
- Beat the cream cheese until smooth, then mix in powdered sugar, vanilla, and a pinch of salt.
- Add milk until you reach the desired glaze consistency and pour over the cooled bars.
- Let set for 10 minutes before slicing.