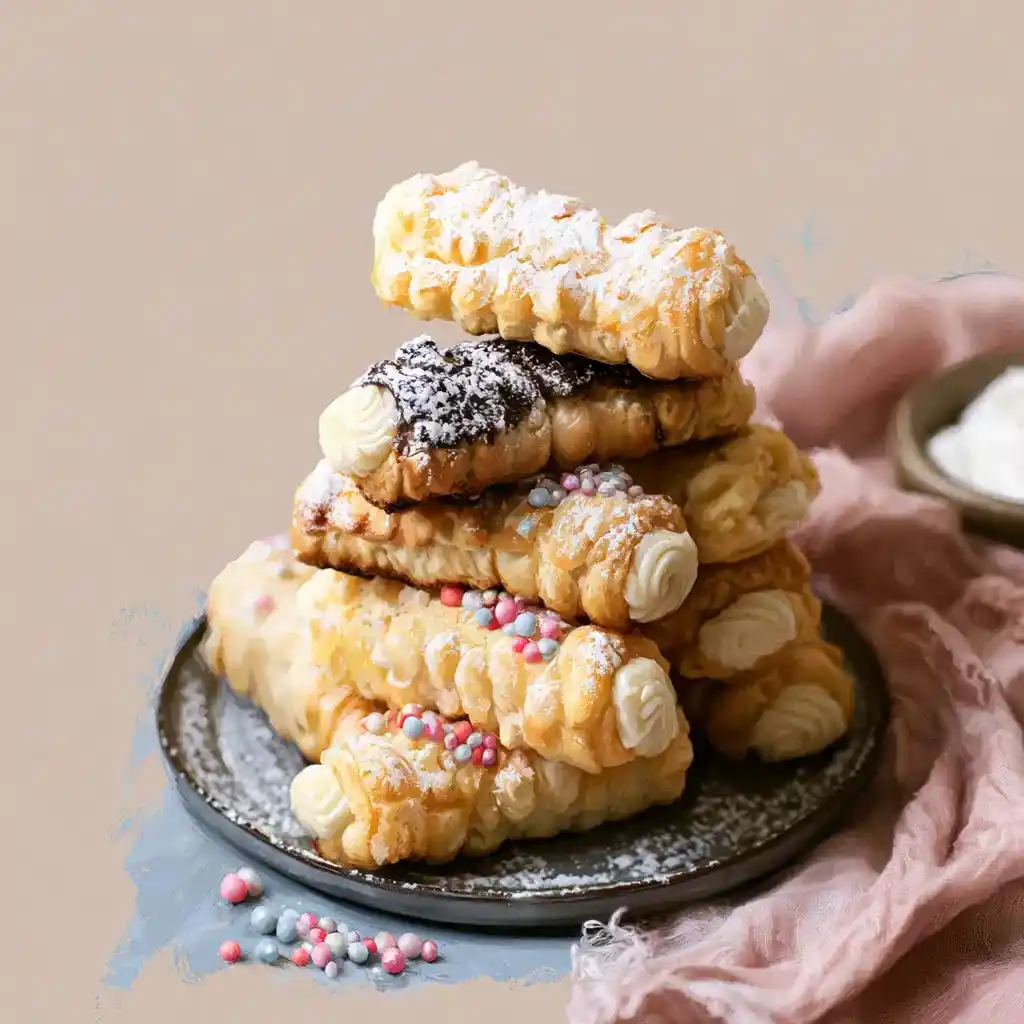
Ever stared at a bakery case, spotted those spiral cream-filled pastries, and assumed they’re impossible to make at home? I get it. This Clothespin Cookies recipe proves that fancy-looking treat is way easier than it looks.
What Exactly Are Clothespin Cookies
Have you ever wondered why they’re called clothespin cookies when there’s no laundry involved? The name comes from the wooden molds bakers once used to shape the dough. These days, foil-wrapped clothespins or dowels do the trick.
Some people call them cream horns, which honestly makes more sense. Either way, you get crisp, flaky pastry shells stuffed with a rich, fluffy filling. I made these for a holiday party once and never brought store-bought desserts again.
Recipe Quick Facts
Before jumping into the process, here’s the rundown you actually need. This recipe takes some patience, but nothing here requires professional pastry skills.
- Prep time: 30 minutes, plus 1 to 2 hours chilling
- Cook time: 18 to 20 minutes
- Total time: Roughly 3 hours, including chill time
- Servings: Makes about 8 to 10 pastry horns
Ingredients for the Cookie Shells
Here’s what you’ll need for those crisp, golden shells. Nothing exotic, just a handful of pantry basics.
- 1/2 cup unsalted butter, chilled
- 2 teaspoons granulated sugar
- 1 egg yolk
- 1 1/4 cups all-purpose flour
- 1 dash salt
- 5 tablespoons water
Ingredients for the Cream Filling
The filling is where the magic really happens. This custard-style cream turns a simple pastry into something genuinely special.
- 3/4 cup granulated sugar
- 1/4 cup all-purpose flour
- 1 cup milk
- 1 cup unsalted butter, room temperature
- 1 teaspoon vanilla extract
- 1 dash salt
How to Make the Cookie Shells, Step by Step
Ready to get started? Here’s exactly how the dough comes together, broken into simple steps so nothing feels overwhelming.
Step 1: Pulse the Base Ingredients
Add your chilled butter, sugar, egg yolk, flour, and salt into a food processor. Pulse everything together until the mixture looks crumbly, similar to coarse sand. Keeping the butter cold here matters more than you’d think, since it’s what creates those flaky layers.
Step 2: Add Water Gradually
Pour in the water a little at a time, pulsing after each addition. Stop as soon as the dough starts clumping together into a ball. Adding too much water at once makes the dough sticky, so go slow.
Step 3: Knead and Rest the Dough
Transfer the dough onto a floured surface and knead gently until it feels slightly tacky but not sticky. Divide it into two equal portions and wrap each in plastic wrap. Refrigerate for 1 to 2 hours, since chilled dough rolls out far more easily.
Step 4: Prep Your Oven and Molds
Once the dough has chilled, preheat your oven to 375°F (190°C). Wrap metal clothespins or similar molds tightly in foil. This foil layer keeps the dough from sticking directly to the metal while baking.
Step 5: Roll and Cut the Dough
On a floured surface, roll one dough portion into a 12×8 inch rectangle. Trim the ragged edges, then slice the dough into 1-inch strips. Precision isn’t critical here, so don’t stress over perfectly even measurements.
Step 6: Wrap the Dough Around the Molds
Take each strip and wrap it around a prepared mold, overlapping slightly with each wind. Place the wrapped molds seam-side down onto a parchment-lined baking sheet. This seam placement keeps the dough from unraveling as it bakes.
Step 7: Bake Until Golden
Bake the wrapped shells for 18 to 20 minutes, watching for a light golden color. Every oven runs a little differently, so start checking around the 16-minute mark. IMO, slightly underbaking is safer than pulling them out too dark.
Step 8: Cool and Remove the Molds
Let the shells cool for 2 to 3 minutes right on the baking sheet. Carefully twist and slide the molds out while the shells are still warm but not hot. Let the empty shells cool completely before filling them with cream.
How to Make the Cream Filling
While your shells cool, it’s time to whip up that filling. This part takes a bit of patience, but the payoff is absolutely worth it.
Step 1: Cook the Base Mixture
In a saucepan over medium heat, whisk together the flour, sugar, and milk. Keep whisking constantly as it cooks, since this mixture can scorch fast if left alone. After about 10 minutes, it should thicken into something resembling pudding.
Step 2: Chill the Cooked Mixture
Transfer the thickened mixture into a bowl and press plastic wrap directly onto its surface. This prevents a skin from forming while it chills. Refrigerate for about 40 minutes until it’s fully cooled.
Step 3: Beat the Butter Until Fluffy
While the mixture chills, beat your softened butter alone for about 8 minutes until it turns pale and fluffy. Have you ever skipped this step to save time? Don’t. It’s what gives the filling its light, whipped texture.
Step 4: Combine Everything Together
Gradually add the cooled pudding mixture into the whipped butter while continuing to mix. Add the vanilla extract and salt, then keep beating for another 10 to 13 minutes until smooth and airy. This long beating time is what separates good filling from great filling.
Step 5: Pipe the Filling Into the Shells
Once your shells are completely cool and your filling looks smooth and fluffy, transfer it into a piping bag. Pipe the cream generously into each cooled shell from both open ends. Don’t rush this part, since a slow, steady pipe fills every pocket without air gaps.
Serving and Storage Tips
Wondering how to store these once they’re filled? Here’s what actually keeps them tasting fresh.
- Serve chilled or at room temperature for the best texture contrast
- Dust with powdered sugar right before serving for extra sweetness
- Store filled cookies in an airtight container in the refrigerator
- Eat filled cookies within 2 to 3 days for peak freshness
- Store unfilled shells at room temperature for up to 5 days
- Avoid freezing filled cookies, since the cream texture tends to separate
Fun Variations Worth Trying
Once you’ve nailed the basic recipe, why not experiment a little? These twists keep things interesting without complicating the process.
- Chocolate Cream Filling: stir in melted chocolate or cocoa for a richer version
- Lemon Cream: add lemon zest and a splash of juice for a bright citrus twist
- Nutella Filling: swirl Nutella through the cream for a hazelnut-chocolate flavor
- Cinnamon Sugar Shells: sprinkle cinnamon sugar on the dough before baking
- Coffee Cream: mix in instant espresso powder for a coffee-flavored filling
Frequently Asked Questions
What exactly are clothespin cookies? They’re flaky pastry tubes filled with sweet cream, sometimes called cream horns depending on where you’re from.
Can I make these without special molds? Yes, you can wrap the dough around foil-covered wooden dowels or cone-shaped molds instead of actual clothespins.
Why does my dough keep turning out sticky? You likely added too much water. Chill the dough longer or work in a touch more flour next time.
Can I prepare the shells ahead of time? Absolutely. Baked shells hold up well for several days before you fill them, which makes party prep much easier.
Do these freeze well? Unfilled shells freeze nicely, but filled cookies don’t hold up in the freezer since the cream separates.
How do I keep the shells crispy? Store them in an airtight container and only fill them right before serving, not hours in advance.
Can I use puff pastry instead of homemade dough? Yes, puff pastry works as a popular shortcut if you’re short on time or patience.
Final Thoughts
Clothespin cookies look like something only a professional bakery could pull off, yet here you are with the full recipe. Between the flaky shells and fluffy cream filling, they’re a genuine crowd-pleaser at any gathering. FYI, they disappear fast, so consider doubling the batch.
Give this recipe a shot next time you want to impress guests without spending all day in the kitchen. Once you master that spiral shell technique, there’s no reason to fear fancy pastries again.