Some desserts require finesse, specialised equipment, and the kind of patience that genuinely tests the limits of your commitment to baking. Coconut Cream Dream Bars require none of that. A graham cracker crust that takes five minutes to press together. A coconut cream filling that requires a bowl and a spoon. A whipped topping layer that you spread with a spatula. Then the refrigerator handles the rest while you go about your afternoon completely unbothered.
I brought these to a potluck when I had less than 40 minutes of available prep time and needed to contribute something that would not embarrass me. The pan came home empty. Three people asked for the recipe before anyone else left. I have made them repeatedly since for the same reason — they consistently earn more enthusiasm than the effort invested in them should logically produce, and that kind of reliable over-delivery is rare in a recipe.
Have you ever made something that looked like significant effort but cost you only thirty minutes of actual work? That is the entire value proposition of these bars. Let us build them properly.
Why These Coconut Cream Dream Bars Work on Every Level
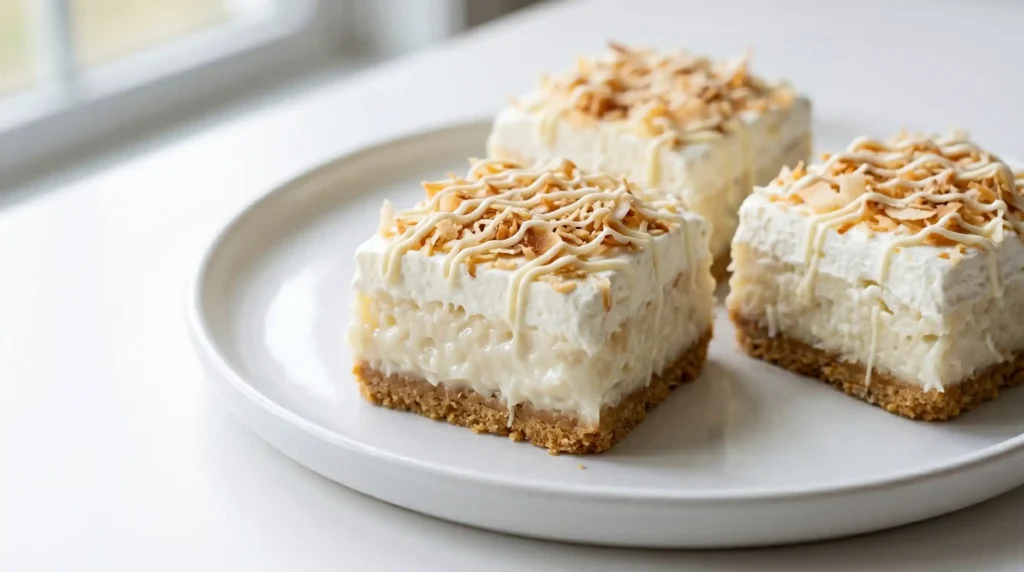
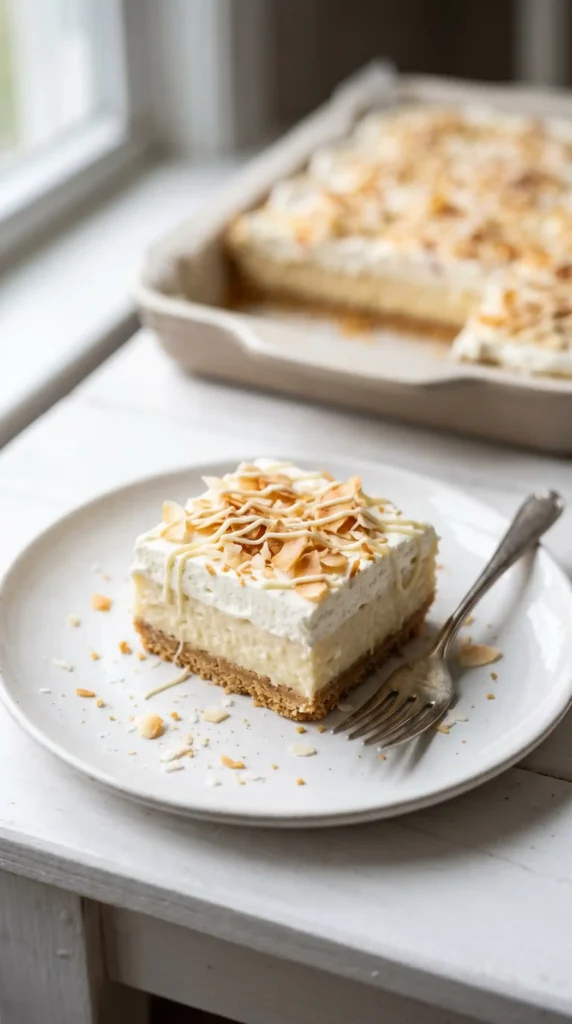
The four-layer structure is the secret to why these bars taste so much more interesting than the ingredient count suggests. Each layer does something distinct — the crust provides buttery, toasty crunch; the filling provides coconut richness and creamy body; the whipped topping provides lightness and contrast; the toasted coconut flakes on top provide aromatic nuttiness and textural interest. Remove any layer and the experience becomes less complete.
The combination of instant pudding mix, cream cheese, and sweetened condensed milk in the filling produces something that is more complex and more satisfying than any single one of those ingredients produces alone. The cream cheese adds tang and structure. The condensed milk adds sweetness and richness. The pudding adds body and a vanilla note that grounds the whole filling. Together, they create a filling that sets firmly enough to slice cleanly but feels creamy and light when eaten.
The toasted coconut on top is the element that most consistently generates the “wait, what is in this?” response. Toasted coconut tastes and smells dramatically more complex than raw shredded coconut — the toasting develops caramelised, nutty compounds that raw coconut entirely lacks. If you make one active upgrade choice in this recipe, let it be toasting the coconut flakes properly. FYI — three minutes in a dry skillet transforms this topping from pleasant to genuinely memorable.
Understanding the Four Layers That Make This Recipe Work
Graham Cracker Crust
Buttery, slightly sweet, and firm enough to hold the filling without crumbling when sliced. Baking for 8 minutes sets it and creates a slight caramelisation that raw pressing alone does not produce.
Coconut Cream Filling
The richest layer — cream cheese, condensed milk, vanilla pudding, coconut extract, and shredded coconut folded together into a firm, sliceable, deeply coconut-flavoured filling that holds its shape after chilling.
Whipped Topping Layer
Airy, light, and visually clean. The whipped topping layer provides the contrast to the dense coconut filling below and creates the visual white surface that makes every piece look polished and intentional.
Toasted Coconut and Drizzle
The golden toasted coconut flakes provide visual contrast and aromatic complexity. The optional white chocolate drizzle adds sweetness and visual elegance that elevates the presentation from home-made to bakery-adjacent.
What You Need
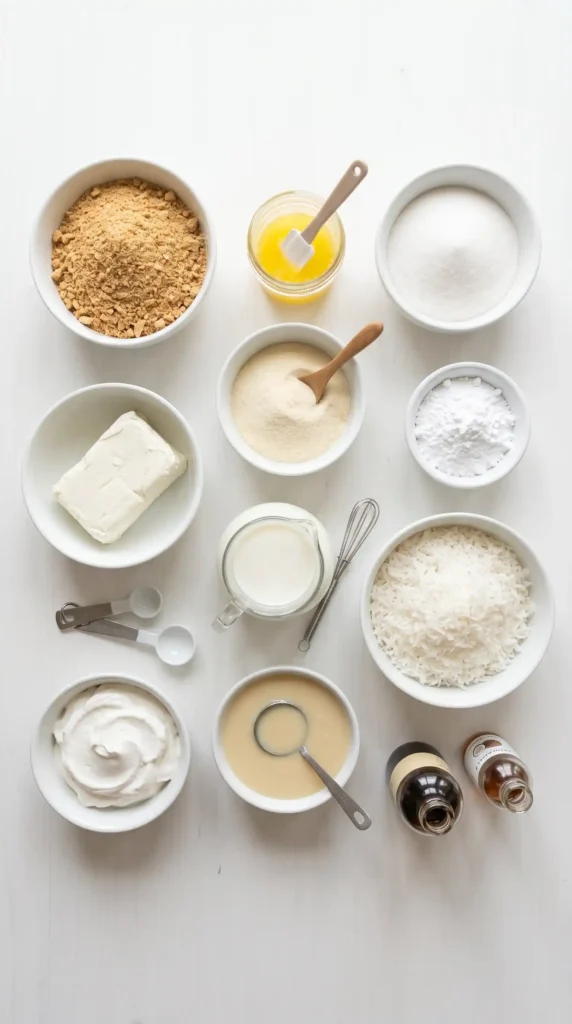
Fourteen ingredients across three components. Everything available at any grocery store. The instant pudding mix must be vanilla — chocolate or other flavours change the colour and flavour profile significantly. The sweetened condensed milk is a full can, not a partial — it provides the primary sweetness and the thick, rich body that binds the cream cheese filling into a cohesive layer.
For the Graham Cracker Crust
- 2 cups (200g) graham cracker crumbs — from about 14–15 full graham cracker sheets, crushed fine
- 1/2 cup (113g) unsalted butter, melted
- 2 tablespoons granulated white sugar
For the Coconut Cream Filling
- 225g (8oz) full-fat cream cheese, softened to room temperature
- 1 can (397g / 14oz) sweetened condensed milk
- 1 package (96g / 3.4oz) instant vanilla pudding mix (dry mix, not prepared)
- 1 and 1/2 cups (360ml) cold whole milk
- 1 teaspoon coconut extract
- 1 and 1/2 cups (120g) sweetened shredded coconut
Now For the Topping
- 1 container (225g / 8oz) whipped topping (Cool Whip or equivalent), fully thawed
- 1/2 cup (40g) sweetened coconut flakes, toasted until golden
- White chocolate for drizzling (optional) — melt 30g of white chocolate chips and drizzle with a fork or piping bag
Toast the Coconut in a Dry Skillet — The Quickest Upgrade AvailableRaw sweetened coconut tastes flat and faintly tropical. Toasted coconut tastes nutty, caramelised, and complex — like a completely different ingredient. Spread the coconut flakes in a single layer in a dry skillet over medium heat. Stir constantly from the moment they hit the pan — they go from pale to golden to burnt with alarming speed after the first colour appears. Remove from heat the moment the majority of flakes look golden. Cool on a plate before scattering over the finished bars. Three minutes of attention produces a dramatically better topping.
How to Make Coconut Cream Dream Bars Step by Step
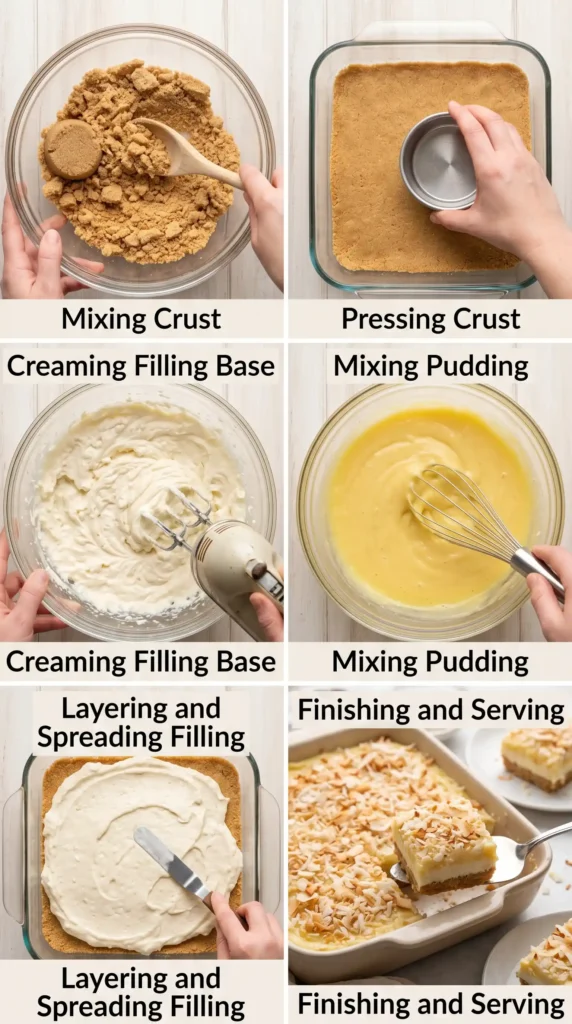
Four stages: bake the crust, make the filling, assemble and chill. The crust needs about 25 minutes to cool completely before the filling goes on — a warm crust melts the cream cheese layer from below and produces a runny, unstable filling rather than the firm, chilled one you want. Plan the crust baking first and use the cooling time to make the filling.
Step 1: Make and Bake the Graham Cracker Crust
Preheat the oven to 175°C (350°F). Combine the graham cracker crumbs, melted butter, and sugar in a medium bowl. Stir vigorously until every crumb is evenly coated in the melted butter — the mixture should look uniformly moist and hold together when pressed between your fingers. Dry pockets of crumb that lack butter will produce a crust that crumbles when the bars are sliced rather than holding together cleanly.
Transfer the crumb mixture to a 9×13-inch (23x33cm) baking dish and spread it across the base in an even layer. Use the flat bottom of a measuring cup or drinking glass to press it down firmly and evenly — work from the centre outward to the edges, ensuring no thin spots or gaps in any area of the base. A firmly pressed crust bakes into a solid, cohesive layer. A loosely pressed one breaks apart when sliced. Take an extra 60 seconds here to ensure even, firm coverage.
Bake on the centre rack for 8–10 minutes until the crust looks lightly golden at the edges and smells of toasted butter and graham cracker. Remove from the oven and allow to cool completely to room temperature before adding any filling — at least 25–30 minutes. Placing filling on a warm crust compromises the structure of every layer above it. Set the timer and move to the filling while you wait.
Step 2: Make the Coconut Cream Filling
In a large bowl, beat the room-temperature cream cheese with a hand mixer on medium speed for about 90 seconds until smooth, light, and completely lump-free. Cold cream cheese will not beat to a smooth consistency — it stays lumpy regardless of mixing time. Pull it from the fridge at least 60 minutes ahead, or microwave in 10-second intervals until fully softened before beginning.
Add the full can of sweetened condensed milk and the coconut extract to the smooth cream cheese. Beat on medium speed for about 60 seconds until the condensed milk is fully incorporated and the mixture looks uniformly pale and glossy. Set this bowl aside.
In a separate bowl, whisk the dry instant vanilla pudding mix and the cold whole milk together for about 2 minutes until the pudding thickens to a soft, set consistency — similar to a loosely set yogurt. Do not let it set fully — if it becomes very firm before folding, it will not incorporate smoothly into the cream cheese mixture. Use it while it is still slightly loose but noticeably thicker than plain milk.
Fold the loosely set pudding into the cream cheese mixture using a rubber spatula — three or four large strokes until the pudding is fully incorporated and the filling looks uniform. Add the 1 and 1/2 cups of sweetened shredded coconut and fold briefly to distribute it evenly throughout the filling. The finished filling should look thick and creamy, hold a gentle peak when scooped with a spoon, and taste richly sweet and distinctly of coconut. Taste it — if it needs more coconut flavour, add an additional 1/4 teaspoon of coconut extract and fold briefly.
Step 3: Assemble the Layers
Spoon the coconut cream filling over the completely cooled crust. Spread it from edge to edge using an offset spatula or the back of a large spoon, creating an even layer of consistent depth across the entire pan. Press the filling gently into the corners and edges to eliminate any gaps between the filling and the crust walls. Refrigerate the filled pan for 20 minutes — this brief chill firms the filling enough that the whipped topping layer can be applied without mixing into it.
After the brief chill, remove the pan and spread the fully thawed whipped topping over the coconut filling in a generous, even layer that covers the entire surface. Use a clean offset spatula to smooth the whipped topping from edge to edge — work with gentle pressure so you spread rather than compress or push the coconut filling below. The whipped topping layer should be approximately 1–1.5cm thick across the entire surface.
Immediately scatter the toasted coconut flakes over the whipped topping surface — they will adhere to the slightly tacky whipped topping surface. If adding the white chocolate drizzle, melt the white chocolate until fluid and drizzle it in slow, thin overlapping lines from one end of the pan to the other using a fork or spoon. Cover the pan loosely with cling film and refrigerate for a minimum of 4 hours before slicing and serving. Overnight chilling produces the firmest, cleanest slices. :/
Step 4: Slice and Serve
Run a sharp knife under hot water and wipe completely dry before each cut. The warm blade glides through the cold layers without dragging the whipped topping or disrupting the filling. Slice into 20–24 even bars depending on how generous you want each portion to be — a 5×4 or 5×5 grid works well for this size pan. Wipe the knife clean between cuts for the cleanest possible edges on each bar. Serve directly from the pan with a flat spatula.
Variations Worth Making
Tropical Pineapple Coconut Dream Bars
Fold 1/2 cup of well-drained crushed pineapple into the coconut cream filling alongside the shredded coconut. The pineapple adds a bright, tart fruitiness that contrasts with the sweetness of the condensed milk and creates a tropical flavour profile that tastes distinctly different from the classic version. Add a tablespoon of rum extract to the filling for a pina colada-inspired variation that always generates discussion at any gathering.
Vanilla Wafer Crust Version
Replace the graham cracker crumbs with an equal quantity of vanilla wafer cookie crumbs — crush about 45–50 vanilla wafers to get 2 cups of crumbs. Vanilla wafer crust is slightly sweeter and more neutral in flavour than graham cracker, which allows the coconut filling to dominate more clearly without the background caramel note of graham crackers. This version suits people who prefer a milder, less complex base.
Freezer Coconut Dream Bars
Follow the recipe exactly as written, but after assembling all layers, freeze the pan overnight instead of refrigerating. The frozen version produces ice-cream-bar-like treats that suit summer outdoor gatherings perfectly. Slice directly from frozen and allow 3–5 minutes at room temperature before eating — the frozen version has a delightfully different texture than the chilled version, with a slightly firm, frosty quality that makes it feel genuinely indulgent.
Storage Tips
Store Coconut Cream Dream Bars covered in the refrigerator for up to 5 days. The whipped topping layer stays stable and the coconut filling maintains its firm, sliceable consistency throughout this period without significant quality loss. Cover the pan tightly with cling film or foil between servings to prevent the whipped topping from absorbing refrigerator odours and developing a slightly stale flavour after the first day of storage.
Individual bars can be frozen for up to 1 month — wrap each bar individually in cling film for best results, or place in a single layer in a freezer bag. Thaw in the refrigerator for 1 hour before serving for a standard chilled texture, or eat directly from frozen for the ice-cream-bar experience described in the variations above. Both are genuinely excellent options depending on the occasion.
Frequently Asked Questions
Can I use homemade whipped cream instead of whipped topping?
Yes. Whip 1 cup of cold heavy cream with 2 tablespoons of powdered sugar and 1/2 teaspoon of vanilla to stiff peaks. Use it in place of the whipped topping in the same quantity. Fresh whipped cream produces a richer, less sweet, more natural-tasting topping layer. However, it is significantly less stable than commercial whipped topping — the bars will need to be consumed within 24–48 hours before the fresh cream begins to weep and lose its structure. Commercial whipped topping is the more practical choice for make-ahead bars served over several days.
Why is my coconut filling runny instead of firm?
A runny filling almost always results from one of two causes: the pudding mix was not given enough time to thicken before folding into the cream cheese, or the cream cheese was too warm and did not provide enough body to the filling. The pudding should look noticeably thickened — similar to a loose yogurt — before you fold it in. Cold whole milk produces a firmer set than low-fat milk. If the filling still looks loose after assembling, return the pan to the refrigerator immediately and allow extra chilling time — 6–8 hours rather than 4.
Can I make these bars without the coconut extract?
Yes, though the coconut flavour will be significantly milder. The shredded coconut in the filling provides some natural flavour, but it is subtle — the coconut extract is what makes these bars distinctly and clearly coconut-flavoured rather than mildly coconut-tinged. If you cannot find coconut extract, a combination of half vanilla extract and half almond extract partially approximates its character. Coconut extract is widely available online and in baking supply stores and is worth sourcing for the full intended flavour experience.
Do I have to bake the crust or can I use it unbaked?
Baking the crust is strongly recommended. An unbaked graham cracker crust lacks the structure to support the weight of three layers above it — it will crumble under the filling and produce bars that fall apart when removed from the pan. The 8–10 minute bake partially melts the butter into the crumbs and caramelises the edges, producing a firm, cohesive base that holds together cleanly when sliced. It adds only 10 minutes to the total time and makes a significant structural difference to the finished bars.
Can I add chopped nuts to these bars?
Yes. Toasted pecans or macadamia nuts work particularly well in these bars. Add 1/2 cup of roughly chopped toasted pecans to the graham cracker crust mixture before pressing — they add crunch and a nutty depth that complements the coconut filling beautifully. Alternatively, scatter chopped macadamia nuts over the whipped topping alongside the toasted coconut flakes for a tropical, textural topping element. Macadamia nuts and coconut together is one of the most natural and complementary pairings available in dessert baking.
Final Thoughts
These Coconut Cream Dream Bars deliver exactly what the name promises — a dreamy, layered, coconut-forward dessert that serves a crowd, requires less than 30 minutes of active preparation, and earns the kind of enthusiastic response that makes you want to make another batch before the first one is finished. The four-layer structure, the properly toasted coconut, and the overnight chill produce a result that looks and tastes considerably more impressive than the effort invested in making it.
Bake that crust until it smells toasted and golden. Soften the cream cheese fully before beating. Toast those coconut flakes rather than using them raw. Chill overnight if time allows. These four decisions produce the best version of this recipe and the best possible dessert bar experience from a genuinely simple set of ingredients.
Make them for your next gathering, potluck, or party. Bring them already sliced in the pan. Accept the requests for the recipe before the evening is over. And consider making a second batch for the host — because these bars have a way of making you instantly popular in a way that IMO no other thirty-minute recipe quite manages.