Prep Time: 25 minutes | Chill Time: 4 hours (overnight preferred) | Total Time: ~4.5 hours | Servings: 8-10 people
What happens when you take the most comforting Southern dessert and smash it together with an Italian classic? You get a Banana Pudding Tiramisu — and honestly, it should not work this well. But it does. Spectacularly.
I made this for a potluck last summer on a total whim. I had bananas going soft on the counter and leftover mascarpone from another recipe. One questionable decision later, I had a dish that people were scraping the pan for.
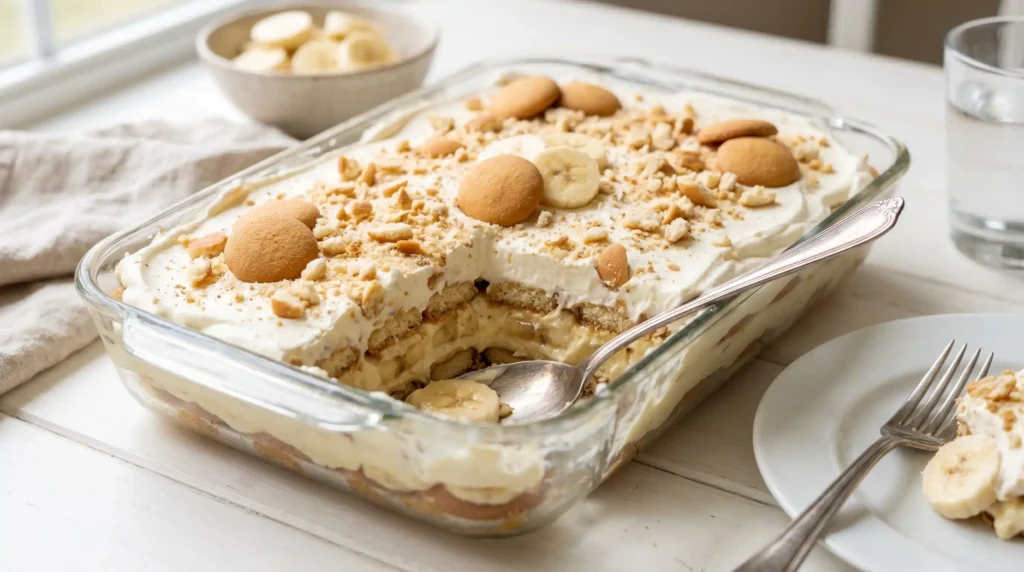
The creamy mascarpone filling meets that nostalgic banana pudding flavor in layers of vanilla wafers and fresh sliced banana. It’s no-bake, it’s make-ahead friendly, and it disappears faster than you’d think possible.
Ready to make the dessert that converts everyone? Let’s get into it.
What Is Banana Pudding Tiramisu, Exactly?
Traditional tiramisu uses ladyfingers soaked in espresso, layered with mascarpone cream and dusted with cocoa. This version takes that same layered concept but replaces the coffee-soaked ladyfingers with vanilla wafers and adds fresh banana slices and banana pudding into the cream layer.
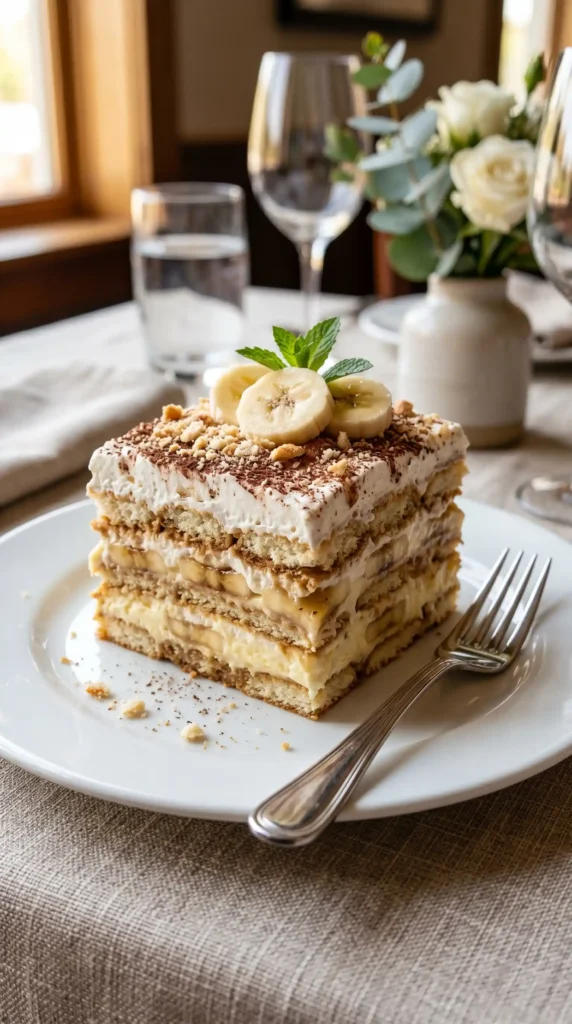
The result tastes like the best banana pudding you’ve ever had, but with this extra richness from the mascarpone that makes it feel more grown-up and indulgent. IMO, it beats both originals separately.
Have you ever had a dessert that people just keep talking about after the meal is long over? This is that dessert.
Ingredients You’ll Need
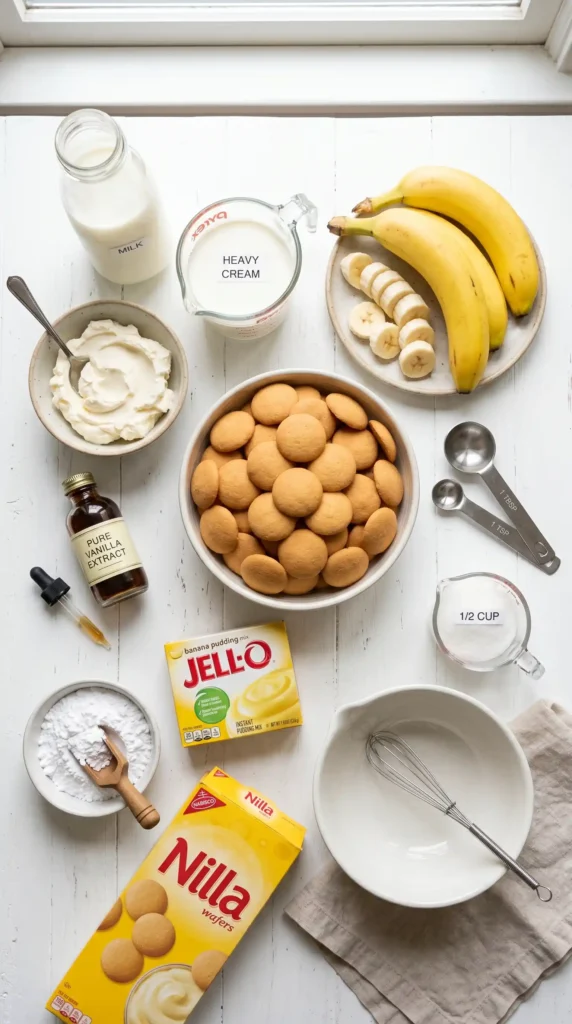
Everything here is easy to find at any grocery store. No specialty items, no hunting around — just straightforward ingredients that come together beautifully.
For the Mascarpone Cream Filling
- 16 oz (450g) mascarpone cheese, softened to room temperature
- 1 cup (240ml) heavy whipping cream, cold
- 1 package (3.4 oz / 96g) instant banana pudding mix
- 1 1/2 cups (360ml) whole milk, cold
- 1/2 cup (60g) powdered sugar
- 1 teaspoon pure vanilla extract
For the Layers
- 1 box (11 oz / 312g) vanilla wafers
- 3-4 ripe bananas, sliced into 1/4-inch rounds
- 1/2 cup (120ml) milk or banana-flavored syrup for dipping the wafers
For the Topping
- 1/2 cup (120ml) heavy whipping cream
- 2 tablespoons powdered sugar
- 1 teaspoon vanilla extract
- Crushed vanilla wafers for garnish
- Banana slices for garnish (add just before serving)
Quick note on the bananas: Use ripe bananas — the ones with a few brown spots. They’re sweeter and have stronger flavor. Under-ripe bananas taste flat here, and that would be a genuine disappointment.
Equipment You’ll Need
Nothing complicated. You likely already have everything:
- 9×13 inch baking dish or a similar deep dish
- Two large mixing bowls
- Electric hand mixer or stand mixer
- Rubber spatula
- Whisk
- Plastic wrap for chilling
- Offset spatula for spreading (helpful but not required)
FYI, you can also make individual servings in glasses or mason jars if you want something more elegant for a dinner party. The layering works beautifully in any container.
How to Make Banana Pudding Tiramisu: Full Step-by-Step
Take your time with each step and this recipe will reward you. The process is genuinely simple — the hardest part is waiting for it to chill.
Step 1: Make the Banana Pudding Base
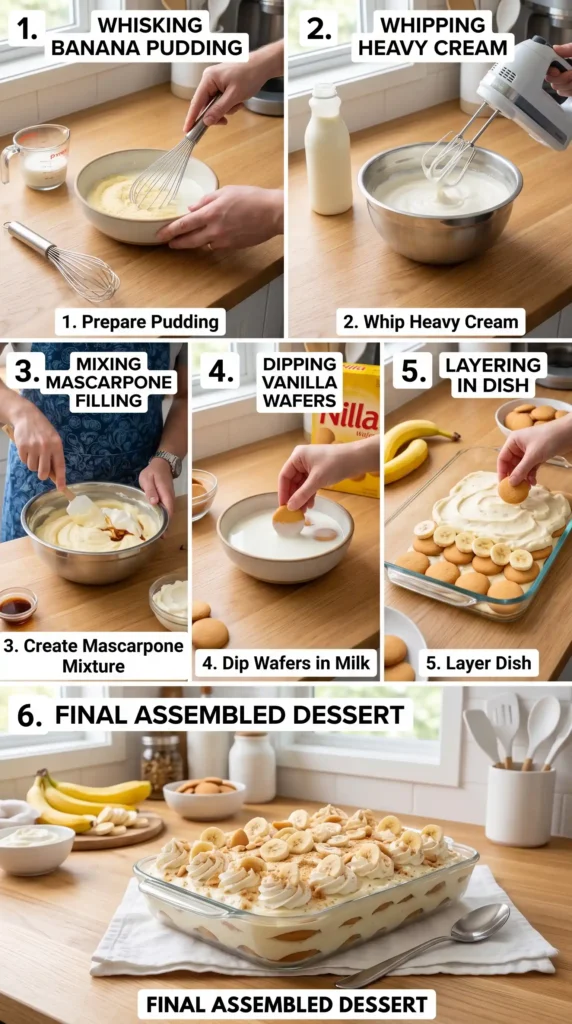
Start by making the pudding component. Pour 1 1/2 cups of cold whole milk into a large mixing bowl. Add the 3.4 oz packet of instant banana pudding mix and whisk vigorously for about 2 minutes.
The mixture will start thick and then loosen slightly as you whisk. Keep going until all the powder is fully dissolved and no lumps remain. Set this bowl aside and let it sit for 5 minutes — it will thicken up to a soft pudding consistency.
This pudding base is what gives the filling that unmistakable banana flavor. Don’t skip the full 2-minute whisking time, because under-mixed pudding will have a grainy texture in the final dessert.
Step 2: Whip the Heavy Cream
In a separate, clean mixing bowl, pour in 1 cup of cold heavy whipping cream. Beat it on medium-high speed using your hand mixer until soft peaks form — this takes about 2-3 minutes. Watch it closely; you want peaks that hold their shape but still look smooth, not grainy.
Once you hit soft peaks, add 1/2 cup of powdered sugar and 1 teaspoon of vanilla extract. Continue beating for another 30-60 seconds until the cream holds firm peaks. Set this bowl aside.
Cold cream whips faster and holds its structure better, so make sure your cream comes straight from the fridge. This detail matters more than people give it credit for.
Step 3: Beat the Mascarpone
In your large mixing bowl, add 16 oz of softened mascarpone cheese. Beat it on medium speed for about 1 minute until it looks smooth and creamy. Mascarpone can clump if it’s too cold, so room temperature is really important here.
Once the mascarpone is smooth, add the banana pudding you made in Step 1. Mix on low speed until the pudding and mascarpone fully combine into one creamy, lightly yellow mixture. Scrape the sides of the bowl as you go.
Now gently fold the whipped cream into the mascarpone-pudding mixture using a rubber spatula. Use a light hand here — fold from the bottom up, rotating the bowl as you go. You want to keep the air in the cream so the filling stays light and fluffy.
This three-part filling — pudding, mascarpone, and whipped cream — is what sets this Banana Pudding Tiramisu apart. It’s rich without being heavy, and the texture is genuinely dreamy.
Step 4: Prep the Vanilla Wafers
Pour your 1/2 cup of milk (or banana syrup if you want extra flavor) into a shallow bowl. Working quickly, dip each vanilla wafer into the milk for about 2-3 seconds per side. You want them lightly moistened, not soggy.
Unlike traditional tiramisu where ladyfingers soak up espresso, vanilla wafers are sturdier and don’t need as long. A quick dip is all it takes to soften them just enough so they become part of the creamy layers without turning mushy.
If you skip the dip entirely, the wafers stay crunchy and the layers don’t meld together the same way. Give them just a quick bath — it makes a real difference in texture after chilling.
Step 5: Build the Layers
Now for the fun part. Spread a thin layer of the mascarpone cream on the bottom of your 9×13 dish — just enough to coat the base and keep the wafers from sliding.
Add a single, tight layer of dipped vanilla wafers across the entire bottom. Pack them in close together, breaking pieces to fill any gaps. Once the wafer layer is complete, spread half of your mascarpone cream filling evenly on top using your spatula.
Next, lay half of your sliced bananas across the cream in a single, even layer. Then repeat: another layer of dipped wafers, the remaining mascarpone cream spread evenly, and the rest of the banana slices on top.
Finish with a final generous layer of cream on top. Smooth it out nicely — this is the face of your dessert, so take a moment to make it look good.
Step 6: Add the Topping and Chill
Whip the remaining 1/2 cup of heavy cream with 2 tablespoons of powdered sugar and 1 teaspoon of vanilla until firm peaks form. Spread or pipe this over the top layer for a lighter, more elegant finish.
Crush a handful of vanilla wafers and sprinkle them generously across the top. Cover the entire dish tightly with plastic wrap and refrigerate for at least 4 hours. Overnight is even better.
The chilling time allows the layers to set, the wafers to soften into something almost cake-like, and the flavors to fully marry together. Cutting it too early means it falls apart when you serve it. Patience here pays off with a stunning slice.
Add fresh banana slices on top just before serving — not before. Bananas brown quickly once sliced and exposed, and nobody wants a brown banana garnish on their beautiful dessert.
Serving Suggestions
This dessert stands completely on its own, but a few additions can take it to the next level:
- A light dusting of crushed vanilla wafers right before serving
- A drizzle of caramel sauce across the top for extra indulgence
- A sprinkle of cinnamon or nutmeg for a warm, spiced note
- Serve cold, straight from the fridge — it firms up beautifully when chilled
Storage Tips
Cover the dish tightly with plastic wrap and store it in the fridge for up to 3 days. The wafers continue to soften over time, which some people actually prefer — they become even more cake-like on day two.
I’d skip freezing this one. The mascarpone cream and banana slices don’t hold up well to freezing and thawing — the texture gets grainy and watery. Stick to fridge-only storage here.
Tips for the Best Banana Pudding Tiramisu
- Use ripe bananas: The riper, the better. Spotted bananas have more natural sugar and stronger banana flavor throughout the layers.
- Don’t over-soak the wafers: A quick 2-3 second dip is all you need. Over-soaked wafers turn into mush and the layers lose their structure.
- Chill overnight if possible: Four hours is the minimum, but overnight chilling produces noticeably better texture and flavor.
- Room temperature mascarpone: Cold mascarpone lumps badly when mixed. Pull it from the fridge 30 minutes before you start.
- Add garnish just before serving: Fresh banana slices and crushed wafers on top look their best when added at the last minute.
Frequently Asked Questions
Can I make Banana Pudding Tiramisu a day ahead?
Absolutely — and honestly, you should. Making it the night before gives the layers time to fully set and the flavors time to blend. Just hold off on adding the fresh banana garnish on top until right before you serve it. Everything else benefits from that extra overnight rest in the fridge.
Can I use homemade banana pudding instead of instant mix?
Yes, you can. If you make a cooked banana pudding from scratch, let it cool completely before mixing it into the mascarpone. The flavor is richer, but you’ll need to make sure it’s thick enough to hold the layers without making the filling runny. Instant pudding works great and saves serious time.
What can I substitute for mascarpone?
Cream cheese is the most common substitute. Use 16 oz of softened full-fat cream cheese in place of the mascarpone. The flavor is slightly tangier and less rich, but the texture is similar. You can also blend equal parts cream cheese and sour cream for something closer to mascarpone’s flavor profile.
How do I prevent the bananas from turning brown?
Toss your banana slices in a teaspoon of lemon juice before layering them inside the dessert. The acid slows the browning process significantly. For the top garnish, just add the banana slices right before serving to keep them looking fresh. Don’t add them the night before.
Can I make this gluten-free?
Yes. Swap the regular vanilla wafers for a gluten-free version — several good options exist at most grocery stores. Also double-check that your instant banana pudding mix is gluten-free certified, as some brands add thickeners that contain gluten. Everything else in the recipe is naturally gluten-free.
Final Thoughts
This Banana Pudding Tiramisu is one of those recipes that surprises people every single time. It looks elegant, tastes deeply familiar, and hits every note — creamy, sweet, soft, and just a little nostalgic.
Whether you make it for a dinner party, a family gathering, or just because you have ripe bananas and zero regrets, this recipe delivers. It’s easy enough for a weeknight but impressive enough for company. Make it once and you’ll understand why people keep coming back for seconds. Go make it this weekend — your future self will thank you.

Banana Pudding Tiramisu
Ingredients
Method
- Start by making the pudding component. Pour 1 1/2 cups of cold whole milk into a large mixing bowl. Add the instant banana pudding mix and whisk vigorously for about 2 minutes until the mixture is thick and no lumps remain. Set aside for 5 minutes to thicken to a pudding consistency.
- In a separate bowl, pour in 1 cup of cold heavy whipping cream and beat on medium-high speed until soft peaks form (about 2-3 minutes). Add 1/2 cup powdered sugar and 1 teaspoon vanilla, continuing to beat until firm peaks form. Set aside.
- In a large mixing bowl, add 16 oz of softened mascarpone cheese and beat on medium speed for about 1 minute until smooth and creamy. Add the banana pudding mixture and blend on low until combined. Gently fold in the whipped cream using a rubber spatula.
- Pour 1/2 cup of milk (or syrup) into a shallow bowl. Dip each vanilla wafer for about 2-3 seconds per side, ensuring they are lightly moistened but not soggy.
- In a 9x13 inch dish, spread a thin layer of mascarpone cream to coat the base. Add a layer of dipped wafers tightly packed, then spread half of the mascarpone filling over the wafers. Lay half of the banana slices evenly on top. Repeat the process with another layer of dipped wafers, remaining mascarpone cream, and the rest of the bananas.
- Whip the remaining 1/2 cup heavy cream with 2 tablespoons of powdered sugar and 1 teaspoon of vanilla until firm peaks form. Spread or pipe this over the top layer then sprinkle with crushed vanilla wafers. Cover tightly with plastic wrap and refrigerate for at least 4 hours, preferably overnight.


