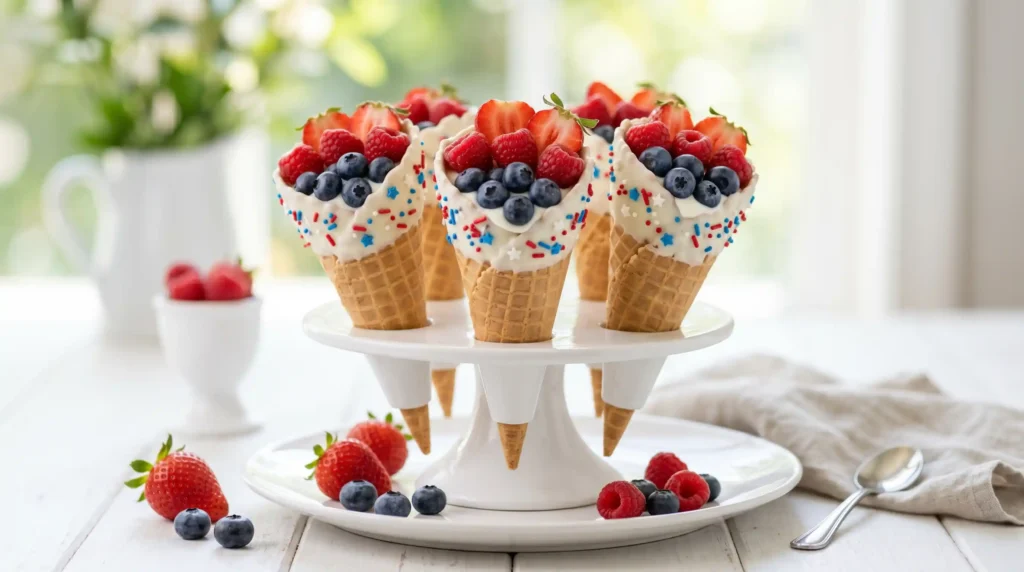
Some recipes just nail the moment perfectly — and Patriotic Fruit Cones are exactly that recipe for every summer cookout, Fourth of July party, or Memorial Day spread. Fresh fruit, creamy yogurt, white chocolate, and a waffle cone. Simple concept. Genuinely impressive result.
I first made these for a backyard cookout where I promised dessert and then completely blanked on what to make with two hours to go. A bag of waffle cones, a pint of berries, and some melting chocolate later — problem solved. And honestly? Everyone thought I’d planned it all along.
No oven. No mixer. No stress. Just a fun, festive treat that looks like you put in way more effort than you actually did. That’s the kind of recipe that earns a permanent bookmark.
Why Patriotic Fruit Cones Work So Well
What makes Patriotic Fruit Cones genuinely clever is the layering concept. The yogurt anchors the fruit, the fruit delivers freshness and color, the cone gives crunch, and the chocolate-and-sprinkle exterior does all the visual work. Every element earns its place.
The red, white, and blue color palette comes naturally — raspberries and strawberries for red, blueberries for blue, white yogurt and white chocolate for the rest. No food coloring needed, no artificial anything. It just works because the fruit itself is the decoration.
Have you ever noticed how the most impressive-looking party foods are often the easiest to make? This one fits that pattern exactly. A little setup, some deliberate layering, and these cones look like something out of a food magazine. Nobody needs to know they took thirty minutes.
Ingredients for Patriotic Fruit Cones
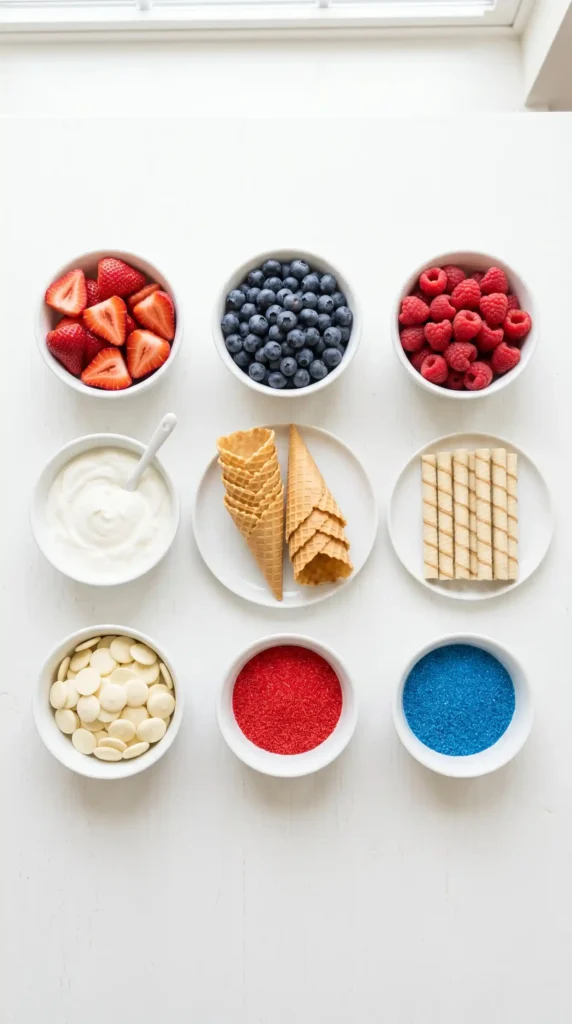
Everything on this list is either already in your kitchen or one quick grocery run away. Here are the full quantities for 8 cones:
Ingredients — Makes 8 Cones
- 1 cup white chocolate melting wafers
- 8 waffle cones
- Red sugar sprinkles, to taste
- Blue sugar sprinkles, to taste
- 8 vanilla pirouette cream-filled wafers
- 2 cups vanilla Greek yogurt
- 1 cup fresh raspberries
- 1 cup fresh blueberries
- 1 cup small strawberries, hulled and halved
A quick note on the yogurt: Greek yogurt works best here because it’s thicker and holds its shape between the fruit layers. Regular yogurt works but can get runny, especially if the fruit releases any juice. Vanilla flavor is ideal — it’s sweet enough to complement the berries without competing with them.
On the pirouette wafers: these go in the bottom of the cone before you add yogurt and fruit. They act as a plug so the yogurt doesn’t immediately drain out, and they add a lovely vanilla crunch when you get to the last bite. IMO, this is the detail that separates a messy cone from a well-executed one.
How to Make Patriotic Fruit Cones — Full Step-by-Step
The whole process takes about 30 minutes including the brief chill time. Read through all the steps before you start — the sequence matters here, especially the chocolate-and-chill section before you fill anything.
Step 1 — Melt the White Chocolate
Low and Slow Wins the Race
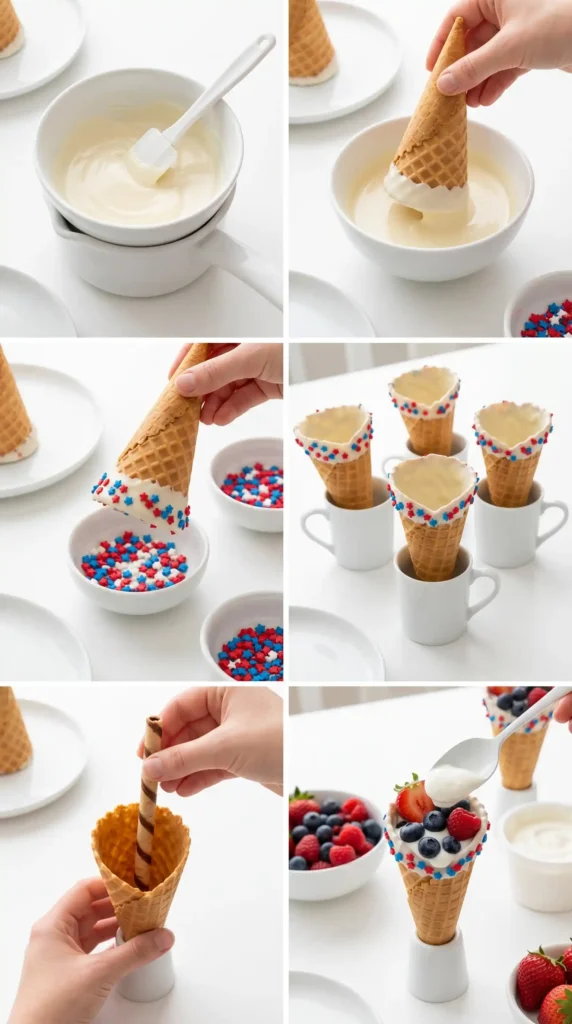
Pour 1 cup of white chocolate melting wafers into a microwave-safe bowl. Microwave in 20-second intervals, stirring thoroughly between each round. White chocolate scorches easily — faster than most people expect — so resist the urge to run it for a full minute.
After two or three rounds of 20 seconds, the wafers should be almost completely melted. At that point, stir continuously for about 30 seconds off the heat. The residual warmth will finish the job without any risk of burning. The finished chocolate should look glossy, smooth, and pourable — not grainy or lumpy.
If you see any seized or grainy sections, add half a teaspoon of coconut oil and stir vigorously. It restores the smooth consistency almost immediately and doesn’t affect the final flavor.
Step 2 — Dip the Waffle Cones
One Inch Is Enough
Hold a waffle cone upside down by the point and dip the wide open rim into the melted white chocolate about one inch deep. Tilt and rotate the cone slightly so the chocolate coats the top edge evenly all the way around. You don’t need a thick coating — a thin, even layer is both easier to manage and better-looking.
After dipping, hold the cone upside down over the bowl for 5 to 10 seconds. Let the excess chocolate drip back in rather than pooling around the rim. This prevents a thick, uneven glob from forming as it hardens. Work quickly — you have a small window while the chocolate is still fluid enough to coat cleanly.
Step 3 — Add the Sprinkles
Work Fast, Catch the Mess
While the chocolate on the cone rim is still wet and tacky, immediately add your red and blue sugar sprinkles. Hold the cone over a clean plate or sheet pan to catch any stray sprinkles — there will be stray sprinkles, FYI. That’s not a flaw in the process, that’s just how sprinkles work.
You can sprinkle them separately in alternating sections for a striped look, or mix both colors together for a more scattered festive effect. Either approach looks great. The key is to get the sprinkles on within 30 seconds of dipping. Once the chocolate starts to set, sprinkles won’t stick properly.
Set each finished cone upright in a heavy mug, a glass, or a cone holder so it stays stable without touching any surface. This preserves the decoration while you work through the rest of the batch.
Step 4 — Chill the Decorated Cones
Ten Minutes Makes All the Difference
Once all eight cones are dipped and sprinkled, place them upright (still in their mugs or holders) in the refrigerator for 10 minutes. This step fully sets the white chocolate so it doesn’t smear when you handle the cones during filling. Skip this step and you’ll end up with smudged chocolate and bare patches where the sprinkles slid off.
Use this 10 minutes productively. Wash and prep your fruit — hull and halve the strawberries, rinse the blueberries and raspberries, and give the yogurt a quick stir if it has separated. Everything should be ready to go the moment the cones come out of the fridge.
Step 5 — Place the Pirouette Wafer
The Unsung Hero of This Recipe
Pull your chilled cones out of the fridge. Drop one vanilla pirouette wafer straight down into each cone. It should sit at the bottom of the cone, acting as a barrier that prevents yogurt from immediately draining out through the tip. This is a small detail that makes a meaningful difference in how well these cones hold together when picked up and eaten.
If you can’t find pirouette wafers, a small piece of broken waffle cone works as a substitute. The goal is just a dry plug at the bottom — something that can absorb a tiny bit of moisture without collapsing immediately.
Step 6 — Layer the Yogurt and Fruit
The Layer That Makes It Beautiful
Add one generous spoonful of Greek yogurt into the bottom of the cone, on top of the pirouette wafer. Use the back of the spoon to press it down lightly and level it out. Then add a small layer of fruit — a few blueberries, a raspberry, or a strawberry half.
Continue alternating between yogurt and fruit layers as you work your way up toward the rim. Keep the layers thin enough so you can fit at least three before the cone is full. More layers mean a more colorful cross-section when someone takes a bite — and it just looks more impressive from the top.
For the top layer, arrange your fruit deliberately and visually. A blueberry, a raspberry, and a strawberry half placed side by side creates that classic red-white-blue flag look. This final arrangement is what gets photographed, so take an extra 10 seconds to make it count.
Step 7 — Serve Immediately or Keep Cold
Timing Is Everything
These cones taste best served immediately after filling. The waffle cone stays crisp, the yogurt is cold, and the fruit is at peak freshness. If you’re serving at a party, fill the cones as close to serving time as possible — not hours ahead.
If you need a short buffer, place the filled cones upright in their mugs and refrigerate for no more than 30 minutes. After that, the moisture from the yogurt begins softening the cone walls and the structural integrity starts going downhill. Serve them up while they’re at their best — your guests will notice.
Tips for the Best Patriotic Fruit Cones
- Prep all fruit before dipping cones. Once the chocolate sets, filling moves quickly and you don’t want to pause mid-assembly while still cutting strawberries.
- Use a piping bag or zip-lock bag for the yogurt. Snip a small corner off and pipe the yogurt in cleanly — no spoon drips, no smearing the inside of the cone.
- Keep cones upright throughout. Lay them on their sides at any point and the sprinkles shift, the chocolate smears, and the yogurt runs. Mugs and glasses are your best friends here.
- Cut strawberries small. Large strawberry halves take up too much space in the cone and crowd out the other layers. Quarters or even smaller pieces layer much more neatly.
- Don’t fill too far in advance. The cones stay crisp for 20–30 minutes after filling. Beyond that, they soften noticeably. Fill close to serve time for the best result.
Variations on This Recipe
Once you’ve nailed the base version, there’s genuine room to make these your own. Here are some variations that actually work:
- Chocolate-Dipped Variation: Use dark or milk chocolate instead of white chocolate for the cone dip. It creates a richer contrast with the sweet fruit and looks dramatic on a platter.
- Dairy-Free Version: Swap in coconut yogurt or almond milk yogurt for a fully dairy-free result. The coconut version pairs especially well with the pineapple if you add tropical fruit.
- Granola Crunch Layer: Add a thin layer of granola between the yogurt and fruit layers. It adds crunch and holds the layers apart more cleanly, giving each bite more texture.
- Mixed Tropical Fruit: Replace strawberries with kiwi slices and add a few chunks of mango. The color scheme shifts but the result is just as striking — and wildly refreshing in summer heat.
- Kids’ Customization Bar: Set out the components separately and let kids build their own cones. They pick their fruit, add their own sprinkles, and eat what they actually want. Zero food waste.
How Long Do Patriotic Fruit Cones Last?
The honest answer is: not long — and that’s fine. Fill and serve within 30 minutes for the best texture. The decorated cones themselves (before filling) can sit in the fridge for up to 24 hours without issue. The chocolate and sprinkles hold perfectly overnight.
So if you’re planning ahead for a party, do all the dipping and decorating the night before, store the cones upright in the fridge, and then fill them with yogurt and fruit right before guests arrive. That’s the smartest workflow for this recipe.
Frequently Asked Questions
Can I make Patriotic Fruit Cones the day before?
You can prep the decorated cones a full day ahead — dip, sprinkle, and chill them overnight. They keep perfectly in the fridge. However, don’t fill them with yogurt and fruit until 20–30 minutes before serving. Once filled, the moisture from the yogurt softens the cone walls quickly, and nobody wants a soggy waffle cone.
What can I substitute for waffle cones?
Sugar cones work well and are slightly sweeter, which some people prefer. Cake cones (the flat-bottomed ones) can technically work but they’re much more fragile and don’t hold the layered presentation as cleanly. Waffle cones are genuinely the best option here — they’re sturdier, they dip better, and the ridged texture grips the chocolate and sprinkles more effectively.
Can I use frozen fruit instead of fresh?
Fresh fruit is strongly recommended for this recipe. Frozen berries release a lot of moisture as they thaw, which makes the yogurt runny and softens the cone much faster than fresh fruit does. If fresh berries aren’t available, pat frozen ones dry with paper towels after thawing and use them quickly. But fresh really is the better choice here.
What if my white chocolate seizes while melting?
Add half a teaspoon of coconut oil or vegetable shortening and stir vigorously for 30 seconds. This usually restores the smooth, glossy texture. The most common cause of seizing is overheating, so next time use shorter microwave intervals — 15 seconds instead of 20 — and stir between each one. Prevention is much easier than fixing seized chocolate.
How do I keep the cones standing upright while they chill?
Heavy mugs or drinking glasses work perfectly — just make sure the mouth is wide enough to fit the cone rim without pinching it. You can also use a block of styrofoam with holes poked into it, which is the classic serving display trick for parties. Even a muffin tin with the cones nestled in the cups works in a pinch.
Can I use flavored yogurt instead of vanilla?
Yes — strawberry, raspberry, or even lemon yogurt all work and add another flavor layer to the cones. Just make sure to use a thick, Greek-style version regardless of flavor. Thin yogurt runs, drips, and softens the cone too quickly. Thickness matters more than the specific flavor you choose.
Final Thoughts on Patriotic Fruit Cones
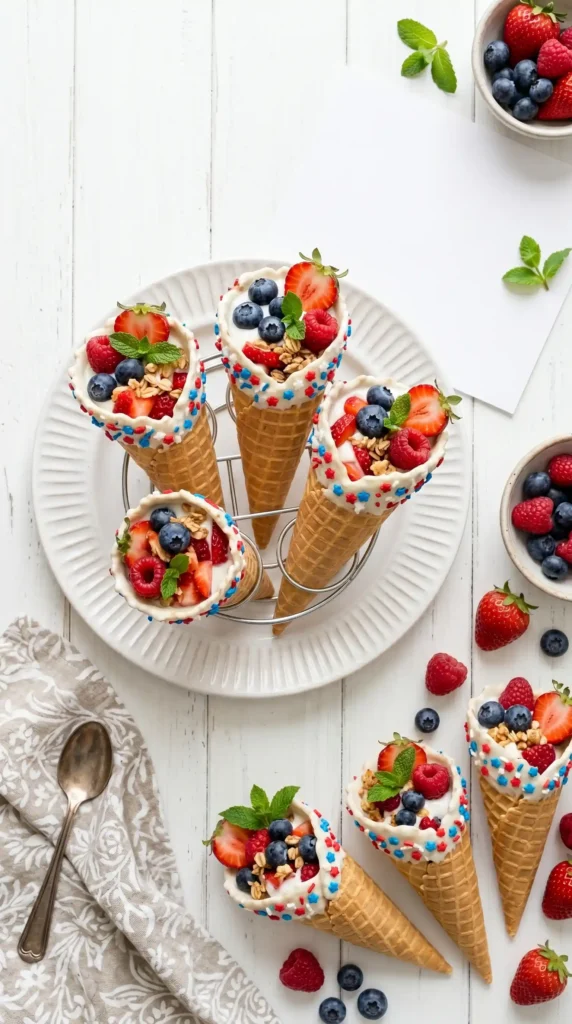
Patriotic Fruit Cones solve a specific problem that comes up at every summer gathering: you need something that looks impressive, tastes fresh, and doesn’t require you to spend the afternoon in a hot kitchen. This recipe checks all three boxes in about 30 minutes.
The combination of crisp waffle cone, smooth yogurt, and bright summer berries delivers on every level — texture, flavor, color, and presentation. These aren’t just a dessert; they’re a conversation piece. Someone at your party will ask how you made them, and you get to decide how much effort you pretend it took.
Make the decorated cones tonight. Fill them right before the party. Stand back and accept the compliments.
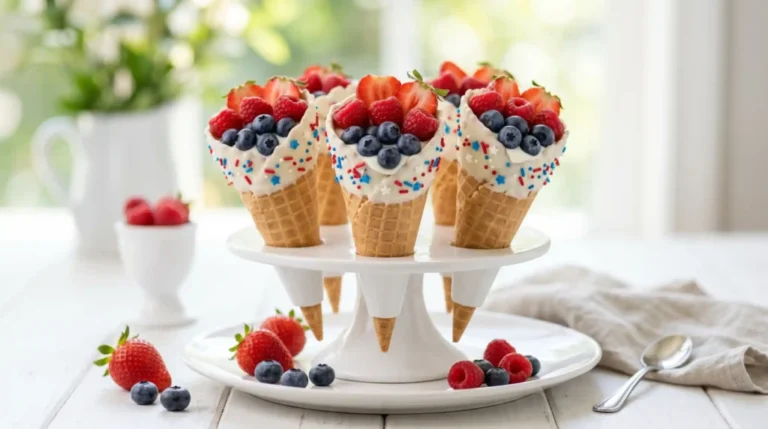
Patriotic Fruit Cones
Ingredients
Method
- Melt white chocolate in a microwave-safe bowl in 20-second intervals, stirring well until completely melted and smooth.
- Dip the rim of each waffle cone into the melted white chocolate to coat the top edge.
- While the chocolate is still wet, sprinkle red and blue sugar sprinkles onto the rim of each cone.
- Chill the decorated cones in the refrigerator for 10 minutes to set the chocolate.
- Place a vanilla pirouette wafer at the bottom of each chilled cone.
- Layer one generous spoonful of Greek yogurt at the bottom of the cone, on top of the pirouette wafer.
- Follow with a small layer of fresh fruit, then alternate yogurt and fruit layers until the cone is filled.
- At the top, arrange the fruit for the classic red-white-blue flag look.
- Serve immediately for the best texture. If making ahead, fill cones no more than 30 minutes before serving.