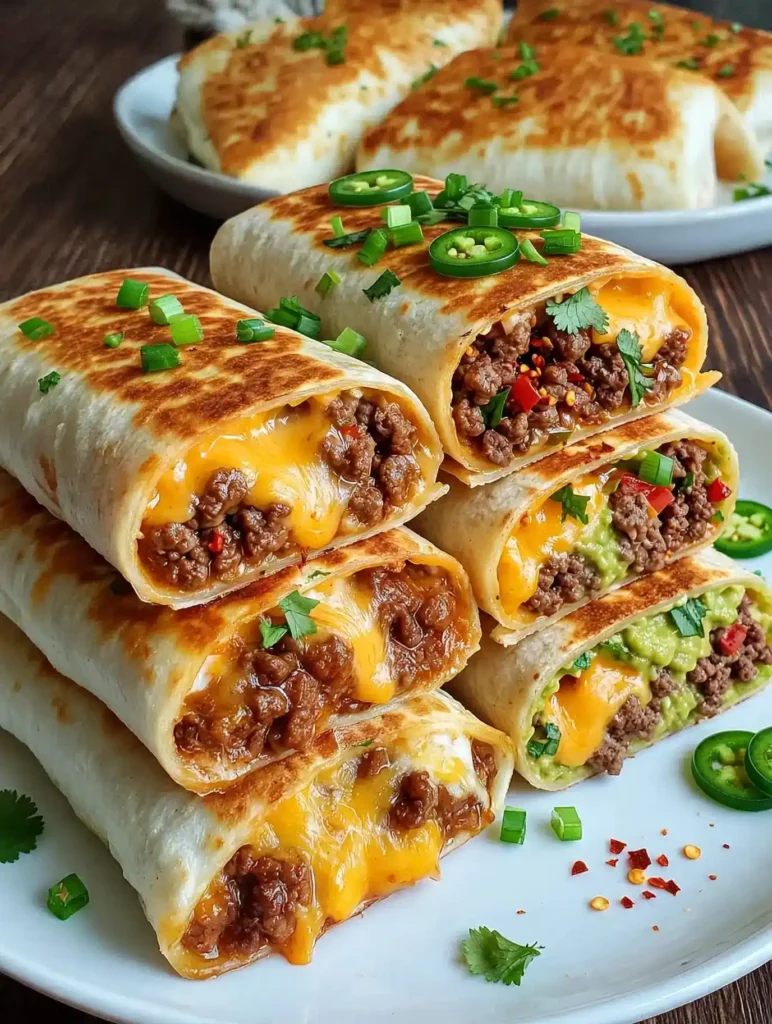
Taco night just got an upgrade, and honestly, it’s about time. Loaded Cheesy Pocket Tacos take everything you already love about tacos and wrap it into a crispy, golden pocket you can eat with one hand.
I first made these on a random Tuesday when I had leftover taco meat and zero motivation to set up a full taco bar. Best “lazy dinner” decision I’ve made in years.
Servings: 12 pocket tacos (feeds about 4-6 people) Prep time: 15 minutes Cook time: 15-20 minutes Total time: roughly 30-35 minutes
What Makes Loaded Cheesy Pocket Tacos So Addictive
Ever wonder why a plain taco feels like it’s missing something? IMO, it’s the cheese. These pockets pack a creamy, tangy filling inside a crispy shell instead of leaving cheese as an afterthought sprinkled on top.
The magic happens when seasoned beef meets a salsa-spiked cream cheese blend. Fold that into a tortilla, bake until golden, and you get a handheld taco that doesn’t fall apart halfway through the bite.
Kids love them. Adults love them. My son’s friends practically inhaled an entire batch and asked if I “sell these somewhere.” No, but maybe I should 🙂
What You’ll Need
Nothing fancy here. You probably already have most of this sitting in your kitchen right now.
- ground beef, 1 pound
- taco seasoning, 1 packet
- salsa, ½ cup
- cream cheese, 8 ounces, softened
- cheddar cheese, shredded, 1 cup
- flour tortillas, 6-inch, 12 total
- melted butter, 2 tablespoons
- optional toppings: sour cream, extra salsa, sliced green onions, shredded lettuce, olives, more cheese
That’s it. No obscure ingredients, no trip to a specialty store, just simple pantry staples doing a lot of heavy lifting.
How to Make Loaded Cheesy Pocket Tacos
Here’s where I slow things down and walk you through each step properly, because rushing this part is how tacos fall apart in the oven.
Step 1: Brown and Season the Beef
Set a large skillet over medium heat and crumble the ground beef straight into the pan. Break it apart with a spatula as it cooks so you avoid big chunky clumps later.
Cook until every bit of pink disappears, which usually takes about 7-8 minutes. Drain off the excess grease so your filling doesn’t turn soggy inside the tortilla.
Stir in the taco seasoning along with the amount of water the packet suggests. Let it simmer for a couple of minutes until the mixture thickens slightly and smells like an actual taco stand.
Step 2: Whip Up the Cheesy Filling
Grab a mixing bowl and add your softened cream cheese. Softened is key here, so don’t skip letting it sit out, or you’ll be wrestling with lumps instead of blending smoothly.
Beat the cream cheese until it turns smooth and fluffy. Then fold in the salsa a little at a time until everything looks evenly combined and slightly pink from the spices.
This mixture is basically the glue and flavor bomb of the whole recipe. Taste it now, because you deserve a sneak preview.
Step 3: Assemble Your Pockets
Lay your tortillas out on a clean counter or cutting board like little canvases waiting for filling. Spoon a small dollop of the cream cheese mixture right into the center of each one.
Add a spoonful of your seasoned beef directly on top of the cheese layer. Sprinkle a bit of shredded cheddar over that beef before you even think about folding anything.
Have you ever overstuffed a burrito and regretted it instantly? Same rule applies here, so keep portions modest to avoid a filling explosion later.
Step 4: Fold, Butter, and Bake
Fold each tortilla over the filling like you’re wrapping a small burrito, tucking the edges in as you go. Press gently to seal the seam so nothing leaks out during baking.
Preheat your oven to 350°F and lightly grease a baking sheet so nothing sticks. Arrange the folded pockets seam-side down so gravity helps keep them closed.
Brush the tops of each pocket with melted butter for that golden, slightly crispy finish everyone fights over. Slide the tray into the oven and bake for 15 minutes, or until the tortillas turn a deep golden brown.
Step 5: Top It Off
Pull the tray out once the pockets look crisp and irresistible. Let them cool for about a minute, because molten cheese has zero mercy on impatient eaters.
Add your favorite toppings now, whether that’s a dollop of sour cream, extra salsa, crunchy lettuce, or a handful of olives. This is the fun part where everyone customizes their own plate.
Tips for Perfect Pocket Tacos Every Time
A few small tweaks separate “good” from “why did I finish the whole tray.”
- Always let cream cheese soften first, since cold cream cheese refuses to blend smoothly.
- Don’t overstuff the tortillas, or sealing them becomes a frustrating puzzle.
- Seal seam-side down on the tray so the pockets stay closed while baking.
- Use fresh, pliable tortillas, since stiff ones crack instead of folding cleanly.
Storage and Reheating (Because Leftovers Happen)
If you somehow have leftovers, let them cool completely before storing. Pop them into an airtight container and refrigerate for up to 3 days without losing much quality.
Want to save some for later? Wrap each cooled pocket individually in foil or plastic wrap, then freeze in a bag for up to 3 months.
Reheat frozen pockets in the oven at 375°F for 15-20 minutes, or in an air fryer at the same temperature for about 8-10 minutes. Skip the microwave here, since it turns your crispy shell into a sad, soggy disappointment.
Fun Variations to Try
Loaded Cheesy Pocket Tacos are basically a blank canvas once you get the base method down. Here are a few spins worth trying when you’re bored of the original:
- Chicken version: swap ground beef for shredded, seasoned chicken for a lighter bite.
- Spicy version: stir chopped jalapeños or hot sauce into the cream cheese mixture.
- Vegetarian version: use black beans, corn, and diced peppers instead of meat.
- BBQ version: replace salsa with BBQ sauce for a smoky, tangy twist.
- Breakfast version: fill with scrambled eggs and cooked sausage for a morning treat.
Why stick to one style when you can rotate through five? Keeps taco night from ever getting boring.
FAQs
Can I use corn tortillas instead of flour? You can, but flour tortillas fold more easily and crack less, so they’re the safer bet for pocket tacos.
Can I make these ahead of time? Yes, assemble them and refrigerate unbaked pockets, then bake fresh right before serving for the best texture.
What’s a good substitute for cream cheese? Sour cream or Greek yogurt both work, though the texture and tang will shift slightly from the original.
Can I air fry these instead of baking? Absolutely. Set your air fryer to 375°F and cook for 8-10 minutes until golden and crispy.
How do I make this gluten-free? Swap in gluten-free tortillas and double-check that your taco seasoning doesn’t contain hidden gluten additives.
Can I freeze these before baking? Yes, assemble and freeze unbaked, then bake straight from frozen at 375°F for about 20 minutes.
Final Thoughts
Loaded Cheesy Pocket Tacos solve the eternal taco problem of messy fillings and floppy shells. You get all the flavor, way less mess, and a crispy bite every single time.
FYI, these disappear fast at gatherings, so maybe double the batch before anyone notices. Give them a try this week and tell me which topping combo becomes your new favorite.