Servings: 8 cheese bombs | Prep Time: 10 minutes | Bake Time: 12 to 15 minutes | Total Time: 25 minutes
Pillsbury Biscuit Garlic Butter Cheese Bombs-Picture this: you need something impressive for a party, a game night, or just Tuesday, and you have exactly 25 minutes. That is where Pillsbury biscuit garlic butter cheese bombs walk in, take over the room, and make everyone ask who brought the incredible snacks. Spoiler: it was you.
I stumbled onto this recipe by accident one evening when I had a can of biscuits, some leftover mozzarella, and a very demanding craving. The result was Pillsbury Biscuit Garlic Butter Cheese Bombs — gooey cheese sealed inside a golden biscuit shell, brushed with herby garlic butter. Absolutely unreal for the effort involved.
The best part? This recipe uses store-bought Pillsbury biscuits, which means no dough-making, no yeast, no waiting around. You get the kind of result that looks bakery-level impressive with a method that any beginner can pull off in under half an hour.
Why Pillsbury Biscuit Garlic Butter Cheese Bombs Work So Well
Pillsbury Biscuit Garlic Butter Cheese Bombs-Have you ever wondered why some recipes just feel like they were designed to succeed? Pillsbury biscuit dough is the foundation here, and it does all the structural heavy lifting. It bakes up fluffy and golden without any effort on your part beyond opening the can.
The real magic happens when the cheese melts inside that sealed biscuit pocket. The steam from the melting cheese creates a pull-apart, stretchy, gooey center that contrasts perfectly with the buttery, crisp exterior. That textural contrast is genuinely hard to beat.
Then you add the garlic butter glaze on top — a simple mix of melted butter, garlic, and herbs — and suddenly you have something that smells and looks like it took real skill to produce. IMO, this is one of the best effort-to-reward ratios in snack cooking.
Ingredients You Will Need
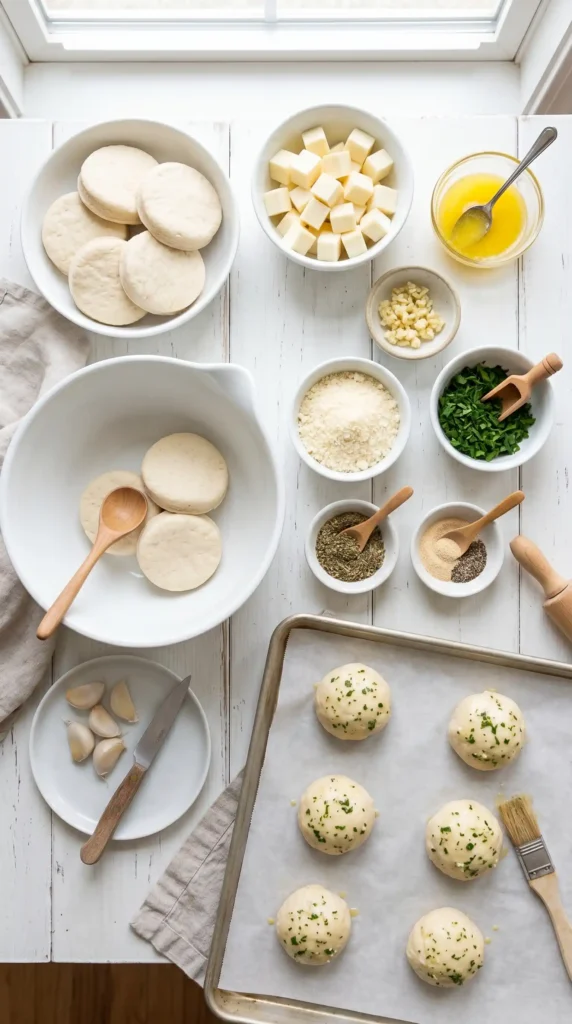
Short list, big payoff. Here is everything you need to make these cheese bombs from start to finish:
For the Cheese Bombs
- 1 can (16.3 oz) Pillsbury Grands Flaky Layers biscuits (8 biscuits)
- 8 cubes of mozzarella cheese (about 1 inch each, cut from a block)
- 1/2 cup (56g) shredded mozzarella or cheddar cheese (optional, for extra filling)
For the Garlic Butter Glaze
- 3 tablespoons (42g) unsalted butter, melted
- 2 cloves garlic, minced finely (or 1/2 teaspoon garlic powder)
- 1 tablespoon fresh parsley, finely chopped (or 1 teaspoon dried parsley)
- 1/4 teaspoon salt
- 1/4 teaspoon Italian seasoning
- 1 tablespoon grated Parmesan cheese (optional, for topping)
On the cheese choice: fresh mozzarella block gives you that classic stretchy cheese pull when you bite in. Pre-shredded mozzarella also works but melts slightly faster and can leak if the seal is not tight. Cheddar is a bolder, more savory option if you want something punchy.
Equipment You Will Need
You can make these with almost nothing. Here is your list:
- Baking sheet
- Parchment paper or cooking spray
- Small bowl for the garlic butter
- Pastry brush or spoon for glazing
- Sharp knife for cutting cheese cubes
That is honestly it. No mixer, no special pans, no thermometers. Just a baking sheet and the will to make something delicious in under 30 minutes.
How to Make Pillsbury Biscuit Garlic Butter Cheese Bombs

Here is the full step-by-step process. Making Pillsbury Biscuit Garlic Butter Cheese Bombs is straightforward, but a few technique details make the difference between a perfect result and a cheese-leaking disaster. Read through once before you start.
Step 1: Preheat the Oven and Prepare Your Baking Sheet
Set your oven to 375 degrees Fahrenheit (190 degrees Celsius). While it heats up, line a baking sheet with parchment paper or give it a light coat of cooking spray. Parchment is the better choice here because garlic butter drips can caramelize and stick aggressively to an unlined pan.
Space matters on the baking sheet. These bombs puff up during baking, so leave at least 2 inches between each one. Crowding them on the sheet leads to uneven baking and bombs that merge together at the sides — which actually is not the worst problem to have, but presentation suffers.
Step 2: Cut the Cheese Into Cubes
Take your block of mozzarella and cut it into 8 roughly equal cubes, about 1 inch on each side. You want each cube to be large enough to create a satisfying gooey center but small enough to fit inside the biscuit dough without tearing through it.
If you prefer extra cheesy bombs, add a small pinch of shredded cheddar or mozzarella alongside each cube when you stuff the biscuit. This gives you double the cheese density in the center and makes the pull-apart moment even more dramatic. This step is optional but very, very recommended.
Step 3: Open and Separate the Biscuits
Pop open the can of Pillsbury Grands biscuits and separate all 8 biscuits. Place them on a clean flat surface. These biscuits are thick enough to wrap around a cube of cheese without tearing, which is one of the reasons Grands work better than the thinner, smaller biscuit varieties.
Gently flatten each biscuit with the palm of your hand or your fingers. You are aiming for a circle about 4 inches in diameter. You do not need a rolling pin — just press gently and evenly from the center outward. Do not go too thin at the edges or the dough will tear when you fold it.
Step 4: Stuff and Seal Each Bomb
Place one cheese cube in the center of each flattened biscuit. If you are adding extra shredded cheese, pile a small amount on top of the cube now. Take a moment to position everything in the dead center — off-center fillings make it harder to seal and easier for cheese to escape.
Now bring the edges of the biscuit dough up and around the cheese, pinching firmly to seal. Work your way around the entire perimeter, pressing the dough together tightly at the top. This seal is critical — any gap you leave becomes an escape route for melted cheese. Pinch it like you mean it.
Once sealed, roll the bomb gently between your palms into a smooth ball shape. This step helps even out the dough thickness around the filling and reinforces the seal. Place each finished bomb seam-side down on the prepared baking sheet so the seal stays closed during baking.
Step 5: Make the Garlic Butter Glaze
Melt 3 tablespoons of unsalted butter in a small bowl in the microwave — about 30 seconds should do it. Add 2 cloves of minced garlic (or 1/2 teaspoon garlic powder for a milder, more evenly distributed garlic flavor), 1 tablespoon of chopped parsley, 1/4 teaspoon of salt, and 1/4 teaspoon of Italian seasoning.
Stir everything together until combined. The garlic butter glaze should smell incredible at this point. If you want an extra layer of savory flavor, stir in 1 tablespoon of grated Parmesan cheese. It melts into the butter and creates a slightly thicker, more coating glaze that sticks better to the biscuit surface.
Step 6: Brush the Bombs Before Baking
Using a pastry brush or a spoon, generously coat the top and sides of every cheese bomb with the garlic butter mixture. Do not be shy with the glaze — this is what gives the bombs their deeply golden, herby, aromatic exterior. A thin coat gives you a pale, underwhelming result.
Reserve a little bit of the garlic butter in the bowl. You will use it for a second brush immediately after the bombs come out of the oven, which adds a fresh hit of garlic and herb flavor that the heat of the oven would have otherwise cooked off. FYI — that second coat is a game-changer.
Step 7: Bake Until Golden
Slide the baking sheet into the preheated oven and bake for 12 to 15 minutes. Watch for a deep golden brown color on the tops and sides. The bottoms should look set and lightly golden when you lift one with a spatula to check.
If your cheese bombs start to look very dark on top before 12 minutes, tent a piece of foil loosely over the pan to prevent over-browning while the centers finish cooking through. Every oven is different, so use color as your guide rather than relying strictly on the clock.
Step 8: Apply the Second Glaze and Serve
Pull the baking sheet from the oven and immediately brush the reserved garlic butter over every hot bomb. The heat of the just-baked biscuit absorbs the fresh glaze instantly, and the garlic fragrance it releases in that moment is absolutely something else.
Sprinkle extra chopped parsley or grated Parmesan on top if you want to dress them up for serving. Let the bombs rest for just 2 to 3 minutes before serving — the cheese inside is molten right out of the oven, and nobody wants a burned mouth. Patience. Just 2 minutes. 🙂
Fun Variations to Try

The base recipe is fantastic, but these bombs handle customization very well. Here are some ideas:
- Pepperoni bombs: Add a slice of pepperoni inside with the cheese for a pizza-pocket effect.
- Jalapeno popper bombs: Use cream cheese mixed with diced jalapeno and shredded cheddar as the filling.
- Everything bagel bombs: Swap the Italian seasoning for everything bagel seasoning in the glaze.
- Spinach and feta bombs: Fill with a small spoonful of sauteed spinach and crumbled feta.
What to Serve With Cheese Bombs
- Marinara sauce for dipping — the classic pairing.
- Ranch dressing if you want something cool and creamy alongside the garlic heat.
- Alongside a bowl of tomato soup for a next-level comfort food combo.
- As a side with pasta dishes instead of garlic bread.
FAQs About Pillsbury Biscuit Garlic Butter Cheese Bombs
Can I use a different brand of biscuits?
Yes, any refrigerated biscuit dough works. The key is using a thick biscuit variety — thin biscuits tear more easily when you stretch them around the cheese. Pillsbury Grands Flaky Layers are ideal because of their thickness and the way they bake up fluffy and golden.
What cheese works best for cheese bombs?
Fresh mozzarella block is the top choice for a classic stretchy pull. Cheddar gives a sharper, bolder flavor. Pepper Jack adds heat. Cream cheese creates a rich, smooth filling. Avoid pre-shredded cheese as the only filling — the anti-caking agents make it melt less smoothly than block cheese.
Can I make these ahead of time?
You can assemble the stuffed, unsealed bombs up to 2 hours ahead and refrigerate them on the baking sheet. Brush with garlic butter right before baking. Fully baked cheese bombs do not reheat especially well — the dough toughens slightly — so baking them fresh for 15 minutes is always the better choice.
Why is cheese leaking out of my bombs?
The seal was not tight enough. Make sure you pinch the dough firmly all the way around the top with no gaps, then roll the bomb seam-side down on the baking sheet. Any loose seam becomes an exit point for melted cheese. A firm pinch and placing them seam-side down solves almost every leak.
Can I make these in an air fryer?
Yes. Place the assembled bombs in a single layer in the air fryer basket and cook at 330 degrees Fahrenheit for 8 to 10 minutes, checking at the 8-minute mark. The air fryer gives them an even crispier exterior than the oven. Brush with garlic butter immediately after they come out.
Final Thoughts
There is a reason Pillsbury Biscuit Garlic Butter Cheese Bombs show up at every party, game night, and potluck once someone discovers this recipe. They deliver maximum flavor and visual impact for minimum time and skill. That combination is genuinely rare.
The garlic butter glaze, the gooey cheese center, the fluffy golden biscuit shell — every element earns its place. And the fact that you can make the whole thing in 25 minutes on a weeknight makes it unreasonably useful.
So grab a can of Pillsbury biscuits, block up some mozzarella, and make a batch tonight. Your snack game is about to level up significantly, and the compliments you get will be completely out of proportion to the effort you put in. That is always a good deal.

Pillsbury Biscuit Garlic Butter Cheese Bombs
Ingredients
Method
- Preheat the oven to 375°F (190°C) and line a baking sheet with parchment paper or coat it with cooking spray.
- Cut the mozzarella into 8 equal cubes.
- Open and separate the biscuits. Flatten each biscuit to about 4 inches in diameter.
- Place a cheese cube in the center of each flattened biscuit and seal tightly by pinching the edges together.
- Roll each bomb gently to reinforce the seal and place seam-side down on the baking sheet.
- Melt the butter and mix in garlic, parsley, salt, Italian seasoning, and Parmesan if using.
- Brush each cheese bomb with the garlic butter mixture.
- Bake for 12 to 15 minutes until golden brown.
- Brush with reserved garlic butter immediately after baking and let sit for 2-3 minutes before serving.