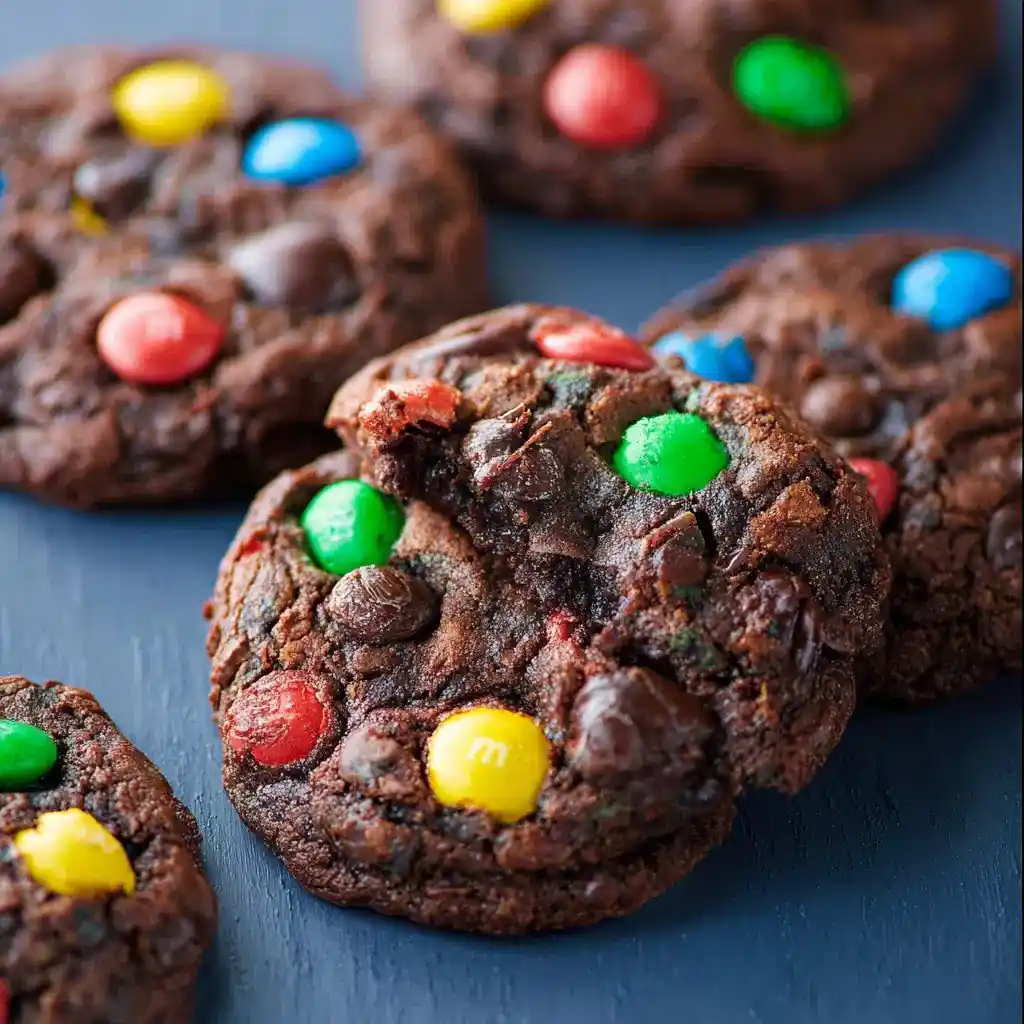
Craving a cookie so soft it practically melts in your hand? This Soft Batch Chocolate M&M Cookies recipe delivers exactly that. I’ve made these more times than I can count, and they never last more than a day in my house.
Why These Cookies Deserve a Spot in Your Rotation
Have you ever bitten into a cookie that’s crispy all the way through and wondered why you bothered? These cookies solve that problem completely. They’re soft in the center, slightly crisp on the edges, and loaded with double chocolate flavor.
I love that this recipe skips the chilling step entirely. IMO, that’s the biggest win here, since most soft-batch recipes make you wait around for hours before baking anything.
The combination of melted chocolate, cocoa powder, and colorful M&Ms creates a cookie that looks as good as it tastes. These aren’t your average chocolate chip cookies. They’re richer, chewier, and honestly a little addictive once you start eating them.
Recipe Quick Facts
Here’s what you need to know before you start mixing. This recipe moves fast, with no chilling required at any point.
- Prep time: 20 minutes
- Cook time: 16 to 18 minutes per batch
- Total time: Roughly 40 minutes
- Servings: Makes about 16 to 18 cookies
What You’ll Need for These Cookies
Gather these ingredients before you start mixing. Most of this is standard baking pantry stuff, aside from the M&Ms adding that fun pop of color.
- 1 cup plus 2 tablespoons all-purpose flour
- 1/4 cup unsweetened natural cocoa powder
- 1 teaspoon baking powder
- 1/2 teaspoon salt
- 1 cup semi-sweet chocolate chips
- 2 tablespoons unsalted butter, chopped
- 2 teaspoons vanilla extract
- 1/2 cup granulated sugar
- 1/3 cup light brown sugar, packed
- 2 large eggs, room temperature
- 2 tablespoons whole milk
- 1 1/2 cups milk chocolate M&Ms
- 1 cup milk chocolate chips
- 1/4 cup M&Ms, for garnish
- 1/4 cup semi-sweet chocolate chips, for garnish
How to Make Soft Batch Chocolate M&M Cookies, Step by Step
Ready to get baking? Here’s the full process broken into simple steps so nothing feels confusing along the way.
Step 1: Prep Your Oven and Baking Sheets
Preheat your oven to 300°F, which is lower than most cookie recipes call for. This lower temperature is exactly what keeps these cookies soft instead of crisp. Line your baking sheets with parchment paper and lightly grease it before setting them aside.
Step 2: Whisk Together the Dry Ingredients
In a medium bowl, whisk together the flour, cocoa powder, baking powder, and salt. Whisking these together first prevents little pockets of unmixed cocoa from showing up in your finished cookies. Set this bowl aside while you work on the wet ingredients.
Step 3: Melt the Chocolate and Butter Together
In a microwave-safe bowl, melt your chocolate chips and chopped butter together in short 20-second bursts, stirring between each one. Have you ever wondered why some cookies taste extra fudgy? This melted chocolate base is the secret. Stop microwaving once the mixture looks smooth and glossy.
Step 4: Whisk in the Vanilla Extract
Once your chocolate and butter mixture has cooled slightly, whisk in the vanilla extract. This step only takes a few seconds, but it builds flavor depth right from the start. Make sure the chocolate isn’t too hot, or it might scramble your next ingredients.
Step 5: Add Both Sugars
Add the granulated sugar and packed brown sugar into the melted chocolate mixture. Mix until everything looks fully combined and slightly glossy. The brown sugar here is what keeps these cookies extra moist and chewy long after they cool.
Step 6: Beat in the Eggs One at a Time
Crack in your eggs one at a time, mixing thoroughly after each addition before adding the next. This slow approach helps the eggs incorporate smoothly instead of curdling the chocolate mixture. Scrape down the bowl’s sides so nothing gets left unmixed at the bottom.
Step 7: Stir in the Milk
Add the whole milk into your chocolate mixture and stir until fully incorporated. This small addition of liquid helps keep the finished cookies soft instead of dense. Don’t skip it, even though it seems like a minor step.
Step 8: Combine Wet and Dry Ingredients
Add your whisked dry ingredients into the wet chocolate mixture. Mix gently, stopping as soon as everything just comes together. Overmixing at this stage creates tough, dense cookies, so less stirring genuinely means better results here.
Step 9: Fold in the M&Ms and Chocolate Chips
Gently fold in your milk chocolate M&Ms and chocolate chips using a spatula. Folding rather than stirring keeps the candy pieces intact instead of crushing them into the dough. This is also the moment your kitchen starts smelling absolutely incredible.
Step 10: Scoop the Dough onto Baking Sheets
Using a 1/4 cup measuring cup or scoop, portion the dough onto your prepared baking sheets. Leave a few inches between each portion, since these cookies do spread while baking. Bigger scoops mean thicker, bakery-style cookies, so don’t be shy here.
Step 11: Bake Until Edges Are Set
Bake your cookies for 16 to 18 minutes, watching for edges that look set but centers that still appear slightly soft. Pulling them a touch early guarantees that gooey, soft-batch texture everyone loves. They’ll continue cooking slightly from residual heat once out of the oven.
Step 12: Press Extra Candy on Top While Warm
While the cookies are still warm, press a few extra M&Ms and chocolate chips onto the tops. This little touch makes the cookies look bakery-perfect and adds extra pockets of chocolate in every bite. It’s a small step, but it makes a big visual difference.
Step 13: Cool Completely Before Serving
Let the cookies cool completely on the baking sheet before moving them anywhere. They’re fragile straight out of the oven and need this time to firm up properly. Patience here pays off with a perfectly soft, sturdy final texture.
Serving and Storage Tips
Wondering how to keep these fresh for as long as possible? Here’s what actually works based on my own repeated batches.
- Serve slightly warm for that extra gooey texture
- Pair with milk, coffee, or hot chocolate for the full experience
- Store in an airtight container at room temperature for up to 5 days
- Refrigerate for up to 10 days for longer-lasting freshness
- Freeze baked cookies for up to 2 months
- Freeze cookie dough balls and bake fresh whenever a craving hits
- Warm leftover cookies in the microwave for about 10 seconds before eating
Fun Variations Worth Trying
Once you’ve made the classic version, why not switch things up a little? These variations keep the recipe exciting without much extra effort.
- Double Chocolate Version: add an extra 1/4 cup cocoa powder for deeper flavor
- White Chocolate Swap: replace milk chocolate chips with white chocolate chips
- Peanut Butter Twist: mix in 1/3 cup peanut butter for a nutty richness
- Sea Salt Finish: sprinkle flaky sea salt on warm cookies right out of the oven
- Stuffed Cookies: tuck a caramel candy into the center of each cookie before baking
Frequently Asked Questions
Why aren’t my cookies turning out soft? Overbaking or using too much flour usually causes this. Pull them out once the edges look set, even if centers seem slightly underdone.
Do I need to chill this cookie dough? No, this recipe is specifically designed to skip chilling entirely, so you can bake right after mixing.
Can I use dark chocolate instead of milk chocolate chips? Yes, dark chocolate creates a richer, slightly less sweet flavor throughout the cookies.
Why melt the chocolate and butter together? This step creates that fudgy, dense texture that makes these cookies stand out from regular chocolate chip cookies.
Can I freeze the cookie dough for later? Absolutely. Freeze portioned dough balls for up to 2 months and bake them fresh whenever you want.
How do I know when these cookies are actually done baking? Look for edges that appear set while the centers still look slightly soft and underbaked.
Can I use mini M&Ms instead of regular ones? Yes, mini M&Ms actually distribute more evenly throughout each bite of dough.
Final Thoughts
Soft Batch Chocolate M&M Cookies bring bakery-level texture and double chocolate flavor into your own kitchen without much fuss. Between the fudgy center and colorful candy crunch, they’re the kind of cookie people remember. FYI, these disappear fast, so maybe bake a double batch just in case.
Give this recipe a try the next time a chocolate craving hits, and don’t hesitate to experiment with the variations. Once you taste that soft, chewy center loaded with M&Ms, regular chocolate chip cookies just won’t cut it anymore.