Servings: 4 | Prep Time: 15 minutes | Cook Time: 35 minutes | Total Time: 50 minutes
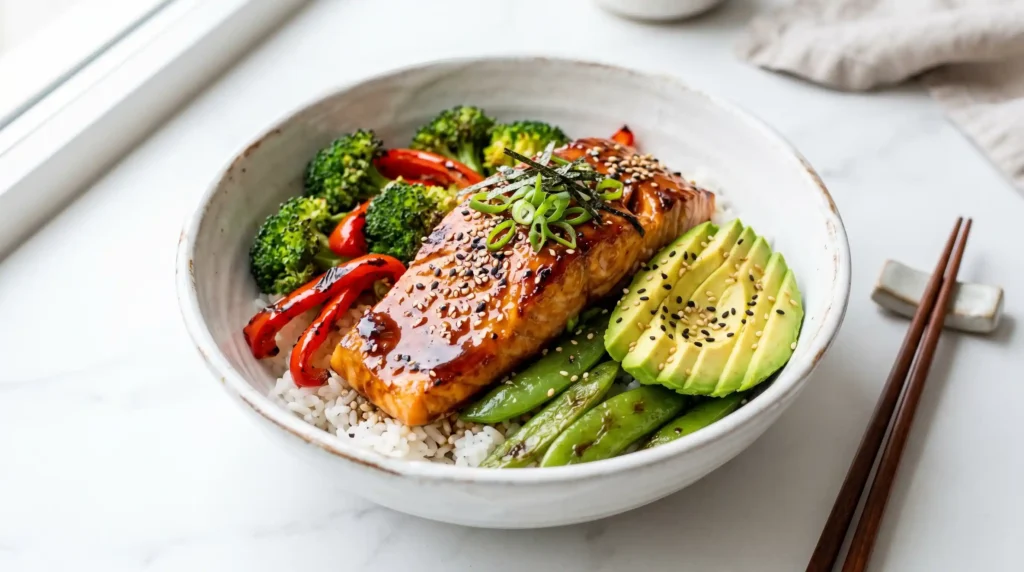
Okay, let me be real with you — the first time I made a Teriyaki Salmon Bowl, I was just trying to empty my fridge before the week ended. What happened next? Pure magic. Silky glazed salmon, fluffy sushi rice, and roasted veggies all in one bowl. I have not looked back since.
This recipe has become my go-to when I want something that feels impressive but takes less than an hour. It hits every note — sweet, savory, umami — and it looks like you spent all day in the kitchen. (Spoiler: you did not.)
Whether you are meal prepping, cooking for the family, or just treating yourself on a Tuesday night, this Teriyaki Salmon Bowl delivers every single time. Let me walk you through it, step by step.
Ingredients
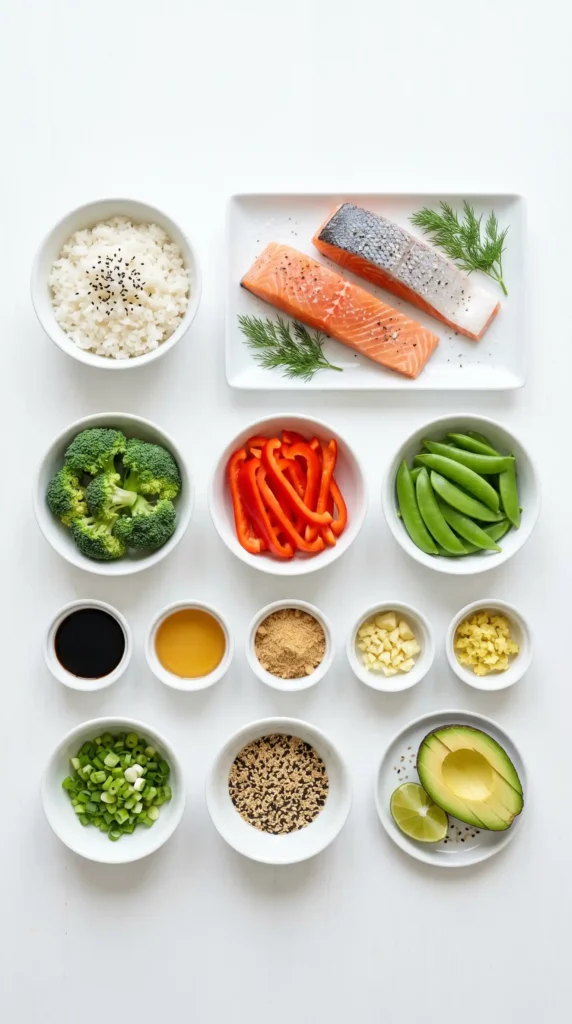
For the Teriyaki Sauce
- 1/2 cup low-sodium soy sauce
- 1/2 cup non-alcoholic mirin alternative
- 1/4 cup non-alcoholic sake alternative
- 2 tablespoons packed light brown sugar
- 1 tablespoon grated ginger
- 2 cloves minced garlic
- 1 tablespoon cornstarch (to thicken the sauce)
- 2 tablespoons cold water (to make a slurry)
For the Sushi Rice
- 1 1/2 cups short-grain sushi rice, rinsed and soaked
- 2 1/4 cups cold water for cooking
- 2 tablespoons rice vinegar for seasoning
- 1 tablespoon granulated sugar for seasoning
- 1 teaspoon salt for seasoning
Roasted Vegetables
- 1 head broccoli, cut into bite-sized pieces
- 1 whole red bell pepper, sliced
- 1 cup snap peas, trimmed
- 1 tablespoon olive oil for roasting
- 1/4 teaspoon salt
- 1/8 teaspoon black pepper
Now For the Salmon
- 4 salmon fillets (6 ounces each), patted dry and seasoned
- 2 tablespoons olive oil for pan-searing
Now For Garnish
- Toasted sesame seeds, to taste
- Sliced green onions, to taste
- Sriracha or chili flakes, optional, for added spice
- Thinly sliced avocado, optional
Why This Teriyaki Salmon Bowl Just Works
Have you ever wondered why some recipes just feel complete? This bowl does that. You get protein, carbs, and vegetables all in one shot. The homemade teriyaki sauce ties it all together with this gorgeous sticky glaze that coats every bite.
IMO, the secret weapon here is the sauce. Most store-bought teriyaki sauces are either too sweet or full of weird additives. Making your own takes about 10 minutes and the difference is genuinely night and day.
The sushi rice adds a slightly vinegary, chewy base that balances the rich salmon perfectly. And those roasted vegetables? They add color, crunch, and just enough caramelized sweetness to round everything out.
How to Make a Teriyaki Salmon Bowl
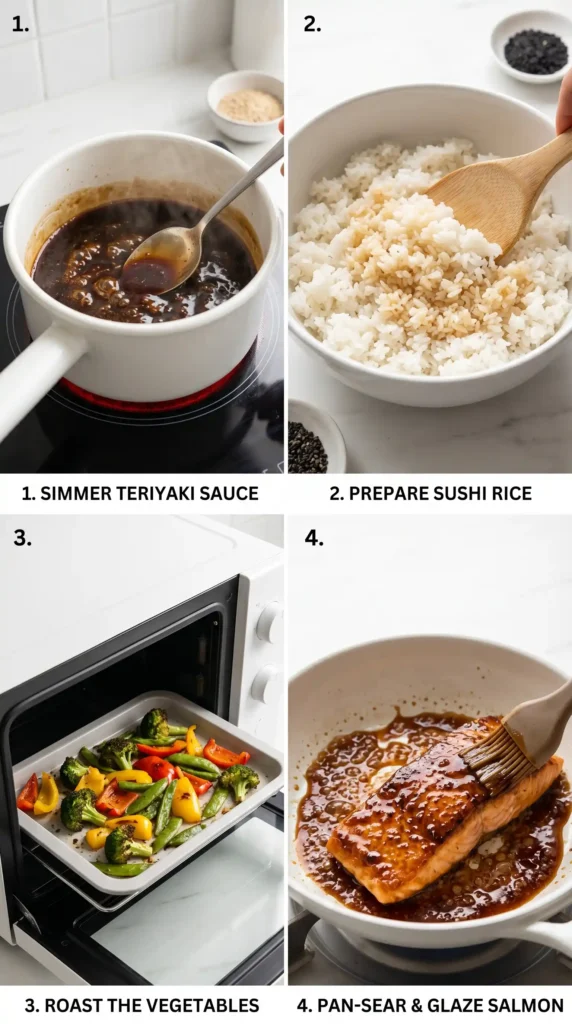
Step 1: Prepare the Teriyaki Sauce
The sauce is the heart of this entire recipe, so let’s give it the attention it deserves. Start by gathering your ingredients — soy sauce, mirin alternative, sake alternative, brown sugar, ginger, and garlic.
Pour the soy sauce, mirin alternative, and sake alternative into a medium saucepan. Add the brown sugar, freshly grated ginger, and minced garlic. Give everything a good whisk to help the sugar start dissolving before the heat even kicks in.
Place the saucepan over medium heat and continue whisking as it warms up. You will start to smell that incredible combination of sweet and savory almost immediately — try not to get too distracted by it. 🙂
Once the mixture reaches a gentle simmer, drop the heat to low. Let it bubble softly for about 5 to 7 minutes. This simmering time is crucial — it lets the garlic and ginger infuse deeply into the sauce and mellows out any sharp edges.
While the sauce simmers, make your cornstarch slurry. Whisk 1 tablespoon of cornstarch with 2 tablespoons of cold water in a small bowl until completely smooth. No lumps allowed here.
Pour the slurry slowly into the simmering sauce while whisking constantly. You will see the sauce thicken up beautifully within 1 to 2 minutes. It should coat the back of a spoon — glossy and rich. If you prefer a perfectly silky sauce, strain it through a fine mesh sieve. Set it aside.
Step 2: Cook the Sushi Rice
Good rice makes or breaks a rice bowl. Do not skip the rinsing step — it removes excess starch and keeps the grains from clumping into one giant sticky mass. Rinse the 1 1/2 cups of short-grain sushi rice under cold running water, swirling with your hand, until the water runs mostly clear.
If you have the time, soak the rinsed rice in cold water for 15 to 30 minutes before cooking. This optional step helps the rice cook more evenly and gives it a fluffier texture. Drain it fully before cooking.
Combine the drained rice with 2 1/4 cups of cold water in a saucepan. Bring it to a full boil over medium-high heat, then immediately reduce the heat to the lowest setting. Cover the pan tightly — and I mean tightly — and let it steam for 15 minutes.
Resist the urge to lift the lid. I know it is tempting. But lifting the lid lets steam escape, and that steam is what cooks the top layer of rice properly. Just trust the process.
After 15 minutes, turn the heat completely off and let the rice rest, still covered, for another 10 to 15 minutes. This resting period is where the magic happens — the steam redistributes evenly and finishes cooking every grain.
While the rice rests, whisk together the rice vinegar, sugar, and salt in a small bowl until the sugar dissolves. Once the rice has finished resting, fluff it gently with a rice paddle or spatula and fold in the seasoning mixture. Toss gently — you want every grain coated, not mushed.
Step 3: Roast the Vegetables
Preheat your oven to 400 degrees Fahrenheit (200 degrees Celsius) and line a baking sheet with parchment paper. This setup ensures even roasting and easy cleanup — the kind of life hack that makes cooking feel less like a chore.
Add the broccoli florets, sliced red bell pepper, and trimmed snap peas to a large bowl. Drizzle with 1 tablespoon of olive oil, then sprinkle on the salt and black pepper. Toss everything together until each piece has a light, even coating of oil.
Spread the vegetables out in a single layer on the prepared baking sheet. Do not crowd them — crowded vegetables steam instead of roast, and you want those beautiful caramelized edges, not soggy florets.
Slide the tray into the oven and roast for 15 to 20 minutes, tossing the vegetables halfway through. That halfway toss ensures even color on all sides. You are looking for broccoli with lightly charred tips and bell pepper that has softened with golden edges.
Step 4: Pan-Sear the Salmon
Pat your four salmon fillets completely dry with paper towels. This step is non-negotiable. Moisture is the enemy of a good sear — dry salmon gets a gorgeous golden crust, wet salmon just steams in the pan. Season both sides generously with salt and black pepper.
Heat 2 tablespoons of olive oil in a skillet over medium-high heat. You want the oil shimmering hot before the salmon goes in — if it is not hot enough, the fish will stick. Place the fillets skin-side down and press them gently against the pan for the first 10 seconds to prevent curling.
Cook the salmon skin-side down for 4 to 6 minutes without touching or moving it. You will see the flesh change color from the bottom up — when it is about two-thirds of the way cooked through, flip each fillet carefully using a thin spatula.
Cook the other side for another 2 to 4 minutes, depending on the thickness of your fillets and how you like your salmon cooked. In the last 30 seconds to 1 minute of cooking, spoon your prepared teriyaki sauce generously over the fillets. Let it bubble and caramelize around the fish. That glaze is everything.
Step 5: Assemble the Bowl
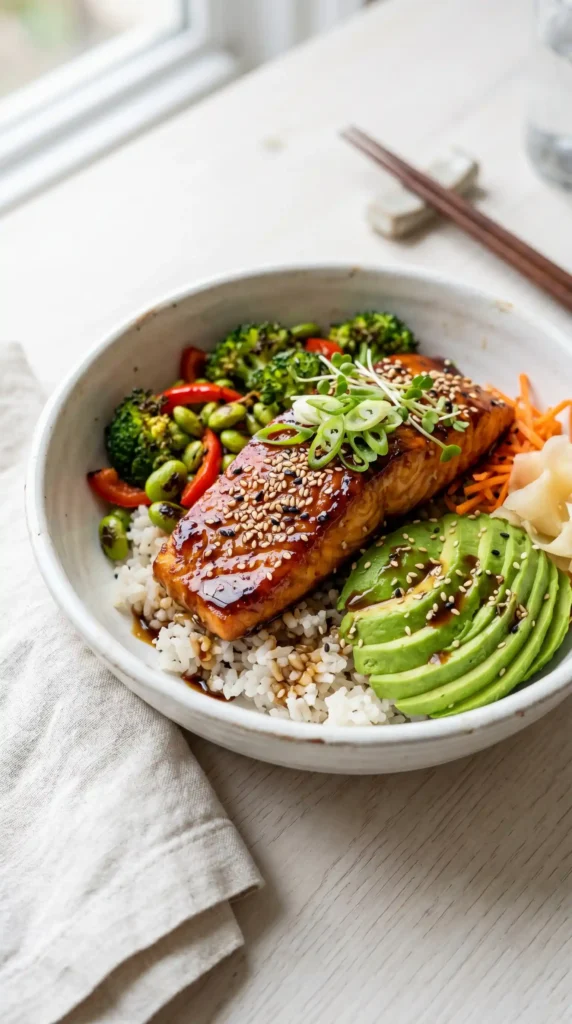
This is the fun part. Grab four serving bowls and spoon a generous portion of seasoned sushi rice into the base of each one. Use the back of the spoon to create a slight well in the center — it helps hold the salmon in place.
Arrange the roasted vegetables around the rice, distributing them evenly between bowls. Place one glazed teriyaki salmon fillet right in the center of each bowl, skin-side down. Drizzle any remaining teriyaki sauce over everything.
Finish with your garnishes: a sprinkle of toasted sesame seeds, a scattering of sliced green onions, and if you like heat, a drizzle of Sriracha or a pinch of chili flakes. Fan out some avocado slices on the side for extra creaminess. Done.
Tips for the Best Teriyaki Salmon Bowl
FYI — these small tweaks make a noticeable difference:
- Choose skin-on salmon fillets. The skin protects the fish from drying out and crisps up beautifully in the pan.
- Do not skip soaking the rice. Even 15 minutes makes the texture noticeably fluffier.
- Make extra sauce. It keeps in the fridge for up to a week and works on chicken, tofu, or noodles.
- Roast vegetables at high heat. 400 degrees gives you caramelized edges, not steamed mush.
- Rest the salmon after cooking. Two minutes off heat lets the juices redistribute and keeps the fish moist.
Easy Variations to Try
Once you nail the base recipe, the variations are endless. Have you ever thought about how many ways you can remix one bowl? Here are a few favorites:
- Spicy Teriyaki Bowl: Add 1 teaspoon of chili garlic sauce to the teriyaki sauce for a kick that lingers.
- Cauliflower Rice Version: Swap sushi rice for cauliflower rice to cut carbs without losing any flavor.
- Tofu Option: Pressed extra-firm tofu cubes work beautifully with the same sauce and technique.
- Add Edamame: Toss in some shelled edamame for extra protein and a pop of bright green.
- Mango Salsa Topping: Diced mango, red onion, and cilantro add a tropical twist that pairs surprisingly well with teriyaki.
How to Store and Meal Prep This Bowl
This recipe is a meal prep champion. You can store each component separately in airtight containers in the fridge for up to 3 days. Keep the teriyaki sauce in a separate small jar so it does not make the rice soggy.
When reheating, warm the rice with a small splash of water to bring back the moisture. Reheat the salmon gently in a skillet over low heat — microwaving it works in a pinch, but it can dry out the fish faster than you’d like. The vegetables reheat well in the oven at 350 degrees for a few minutes.
You can also freeze the cooked salmon and sauce (separately) for up to 1 month. Just defrost overnight in the fridge and reheat as above. Fresh rice always tastes better, so cook that fresh when you are ready to eat.
FAQs About Teriyaki Salmon Bowl
1. Can I use frozen salmon for this recipe?
Yes, absolutely. Just make sure to thaw the salmon completely in the fridge overnight before cooking. Pat it very dry before seasoning — frozen fish releases more water as it thaws, and that extra moisture will prevent a proper sear.
2. What can I use instead of mirin in the teriyaki sauce?
A mix of equal parts rice vinegar and a little extra sugar works as a solid substitute. The flavor will be slightly less complex, but the sauce will still taste great. You can also use pineapple juice for a fruity twist on the sweetness.
3. How do I know when the salmon is fully cooked?
The most reliable test is using a fork to gently press the thickest part of the fillet. Fully cooked salmon flakes easily and has changed from translucent to opaque all the way through. An internal temperature of 145 degrees Fahrenheit (63 degrees Celsius) means it is safe to eat.
4. Can I make the teriyaki sauce ahead of time?
Definitely. The sauce actually gets better as it sits, since the flavors have time to meld. Make it up to 5 days ahead and store it in an airtight jar in the fridge. Just give it a quick stir or shake before using, as the cornstarch may settle slightly.
5. What vegetables work best in a teriyaki salmon bowl?
Broccoli, snap peas, and bell pepper are classics, but you can swap in zucchini, bok choy, mushrooms, asparagus, or baby corn. The key is cutting everything roughly the same size so they roast evenly. Heartier vegetables like broccoli benefit from a slightly longer roast time than delicate greens.
Final Thoughts
At the end of the day, a great Teriyaki Salmon Bowl comes down to three things: a well-made sauce, properly cooked rice, and salmon that actually has some color on it. Nail those three elements and everything else falls into place.
This recipe genuinely earns a spot in your weekly rotation. It is fast enough for weeknights, impressive enough for guests, and flexible enough to adapt to whatever is in your fridge. Plus, once you try homemade teriyaki sauce, you will never reach for the bottled stuff again.
So what are you waiting for? Go grab some salmon and get cooking. You can thank me later.

Teriyaki Salmon Bowl
Ingredients
Method
- Gather your ingredients for the teriyaki sauce.
- Pour the soy sauce, mirin alternative, and sake alternative into a medium saucepan. Add brown sugar, grated ginger, and minced garlic. Whisk to dissolve the sugar.
- Place over medium heat until it simmers. Reduce to low and let it bubble for 5-7 minutes.
- Make a cornstarch slurry by whisking cornstarch with cold water until smooth.
- Pour the slurry into the simmering sauce while whisking constantly until thickened (1-2 minutes).
- Rinse the sushi rice under cold running water until water runs clear.
- Soak the rinsed rice in cold water for 15-30 minutes, then drain.
- Combine rice with cold water in a saucepan. Bring to a boil, then reduce to low heat and cover for 15 minutes.
- Once cooked, let it rest covered for 10-15 minutes.
- Whisk together rice vinegar, sugar, and salt until sugar dissolves. Fluff rice and fold in the seasoning mixture.
- Preheat oven to 400°F (200°C) and line a baking sheet with parchment paper.
- Toss broccoli, bell pepper, and snap peas with olive oil, salt, and pepper.
- Spread on the baking sheet and roast for 15-20 minutes, tossing halfway.
- Pat salmon dry with paper towels and season both sides with salt and pepper.
- Heat olive oil in a skillet over medium-high heat. Add salmon fillets skin-side down.
- Cook for 4-6 minutes without moving, then flip and cook for another 2-4 minutes. Spoon teriyaki sauce over salmon in the last minute.
- In serving bowls, place a portion of sushi rice in the center.
- Arrange roasted vegetables around the rice and top with glazed salmon.
- Drizzle with remaining teriyaki sauce and garnish as desired.