Some desserts are just desserts. This one is a full-on experience. The first time I made this Dreamy Lemon Cheesecake, I stood at the counter and ate three slices before it even made it to the table. Zero regrets. If you love lemon and you love cheesecake, this recipe was made for you.
Servings: 12 slices Prep Time: 35 minutes Bake Time: 60–70 minutes Total Time: About 2 hours (plus chilling overnight)
Why This Dreamy Lemon Cheesecake Is Different From the Rest
Most lemon cheesecakes play it safe. A little lemon zest, maybe some lemon extract, and call it a day. This recipe goes all in. You get homemade lemon curd, a buttery graham cracker crust, and a cream cheese filling that’s dense, silky, and perfectly balanced.
The combination of fresh lemon juice, lemon zest, and a rich cheesecake filling creates something that’s bright without being sharp and creamy without being heavy. Have you ever had a cheesecake that actually tasted like real lemons and not just lemon candy? That’s exactly what this delivers.
Ingredients You’ll Need
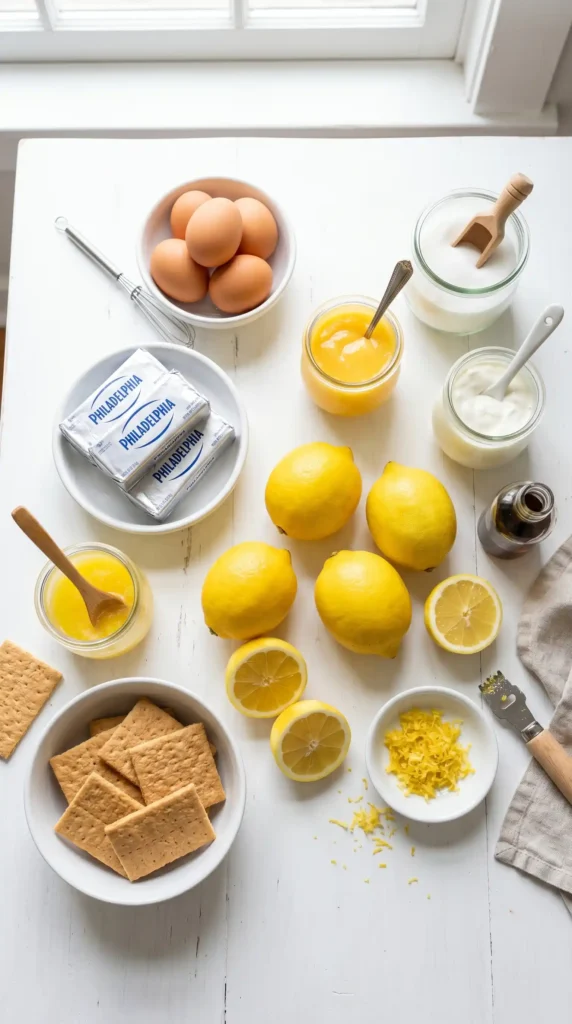
Lemon Curd
- 5 large eggs
- 1 1/2 cups granulated sugar
- 1 1/4 cup fresh lemon juice (about 5–6 lemons)
- 1/4 cup lemon zest
- 1/4 teaspoon salt
- 10 tablespoons unsalted butter
Graham Cracker Crust
- 1 1/2 cups graham cracker crumbs (about 12 graham crackers)
- 1/4 cup granulated sugar
- 1/4 cup unsalted butter, melted
- 1 pinch salt
Cheesecake Filling
- 2 pounds cream cheese, room temperature (4 packages)
- 8 ounces sour cream, room temperature
Equipment You’ll Need
Getting your tools ready before you start saves real time and stress. Here’s what you need:
- 9-inch springform pan
- Stand mixer or hand mixer
- Medium saucepan (for lemon curd)
- Fine mesh strainer
- Two mixing bowls
- Rubber spatula
- Roasting pan (for water bath)
- Aluminum foil
- Cooling rack
How to Make Dreamy Lemon Cheesecake

Step 1: Make the Lemon Curd First
Start with the lemon curd because it needs time to cool before going into the cheesecake. In a medium saucepan over medium-low heat, whisk together the 5 large eggs, 1 1/2 cups of granulated sugar, 1 1/4 cup of fresh lemon juice, 1/4 cup of lemon zest, and 1/4 teaspoon of salt.
Whisk constantly as the mixture heats up. This is not a step where you walk away. The eggs are raw and the heat is what cooks and thickens the curd — but too much heat too fast will scramble everything. Keep the heat low and steady, and keep that whisk moving.
Step 2: Finish and Strain the Lemon Curd
After about 8–10 minutes of constant stirring over medium-low heat, the curd will thicken noticeably. It should coat the back of a spoon and hold a line when you drag your finger through it. That’s your sign it’s ready.
Remove the pan from the heat immediately. Add the 10 tablespoons of unsalted butter a few pieces at a time, stirring after each addition until fully melted and incorporated. Then pour the finished curd through a fine mesh strainer into a clean bowl. This removes any cooked egg bits and gives you the smoothest, silkiest curd possible. Press plastic wrap directly onto the surface and refrigerate until cool.
Step 3: Preheat the Oven and Prep the Pan
Preheat your oven to 325°F (163°C). Wrap the outside of your 9-inch springform pan tightly in two layers of heavy-duty aluminum foil. Wrap it up past the halfway point on the sides. This protects the crust from the water bath you’ll use later.
The foil wrapping takes about 2 minutes but saves you from a soggy, waterlogged crust. IMO, skipping this step is one of the most common reasons home cheesecakes fail. Take the 2 minutes — it’s worth every second.
Step 4: Make the Graham Cracker Crust
In a mixing bowl, combine the 1 1/2 cups of graham cracker crumbs, 1/4 cup of granulated sugar, 1/4 cup of melted unsalted butter, and a pinch of salt. Stir everything together until the mixture looks like wet sand and holds together when you press it between your fingers.
Pour the crumb mixture into the foil-wrapped springform pan. Use the flat bottom of a measuring cup to press the crumbs firmly and evenly across the bottom. Bring the crust slightly up the sides if you can — about half an inch. This creates a clean edge when you slice the finished cheesecake.
Step 5: Pre-Bake the Crust
Slide the pan into the preheated oven and bake the crust alone for 10 minutes. The crust will look slightly golden and will smell wonderfully buttery. Pull it out and set it aside to cool while you prepare the filling.
Pre-baking the crust keeps it from turning soggy once the filling goes in. A properly pre-baked crust stays crisp and snappy even after the cheesecake chills overnight. It’s a small step that makes a big difference in the final texture of every slice.
Step 6: Make the Cheesecake Filling
In your stand mixer fitted with the paddle attachment, beat the 2 pounds of room temperature cream cheese on medium speed for about 3 full minutes. You want it completely smooth, creamy, and free of any lumps before adding anything else.
Scrape down the bowl and the paddle thoroughly at least twice during this process. Cold cream cheese doesn’t fully blend at this stage — it just pretends to. Room temperature cream cheese is non-negotiable here if you want a silky, crack-free result. Don’t rush it.
Step 7: Add the Sour Cream and Lemon Curd
Add the 8 ounces of room temperature sour cream to the cream cheese and beat on medium-low speed until fully combined. Then add the cooled lemon curd — all of it — and beat again on medium-low until the filling looks uniform, creamy, and beautifully pale yellow.
Scrape the bowl down again before and after adding the lemon curd. You want every bit of that tangy curd fully incorporated into the filling. The filling should taste bright, tangy, and rich at this point. Have you ever tasted raw cheesecake filling and had to physically stop yourself? Yeah. This is that moment.
Step 8: Fill the Pan and Set Up the Water Bath
Pour the cream cheese filling into the pre-baked crust. Use your rubber spatula to smooth the top completely flat. Tap the pan gently on the counter a few times to release any air bubbles sitting just below the surface.
Place the foil-wrapped springform pan inside a large roasting pan. Carefully pour hot water into the roasting pan until it reaches about halfway up the sides of the springform pan. This water bath creates a gentle, humid baking environment that prevents the cheesecake from cracking and drying out on top.
Step 9: Bake Low and Slow
Carefully transfer the roasting pan with the cheesecake inside to the oven. Bake at 325°F for 60 to 70 minutes. At the 60-minute mark, gently nudge the roasting pan. The outer edges of the cheesecake should look firm and set, while the center 2–3 inches should still have a slight, wobbling jiggle.
That jiggle is correct. The center firms up completely as the cheesecake cools, so pulling it out with a fully-set center means you overbaked it. FYI, overbaked cheesecake has a grainy texture that no amount of topping can hide. Watch that jiggle and trust it.
Step 10: Cool Gradually — This Step Really Matters
Turn the oven off but leave the cheesecake inside with the door cracked open about an inch. Let it sit in the cooling oven for 1 full hour. This gradual temperature drop dramatically reduces the chance of cracks forming across the top.
After the hour in the oven, remove the cheesecake and let it continue cooling at room temperature for another hour. Then remove the foil, cover the pan loosely with plastic wrap, and refrigerate overnight — or for a minimum of 6 hours. A fully chilled cheesecake slices cleanly and has the proper dense, creamy texture.
Step 11: Slice and Serve
Run a thin knife around the inside edge of the springform pan before releasing the sides. This prevents the cheesecake from sticking and tearing when the pan opens. Release the springform latch slowly and lift the sides away.
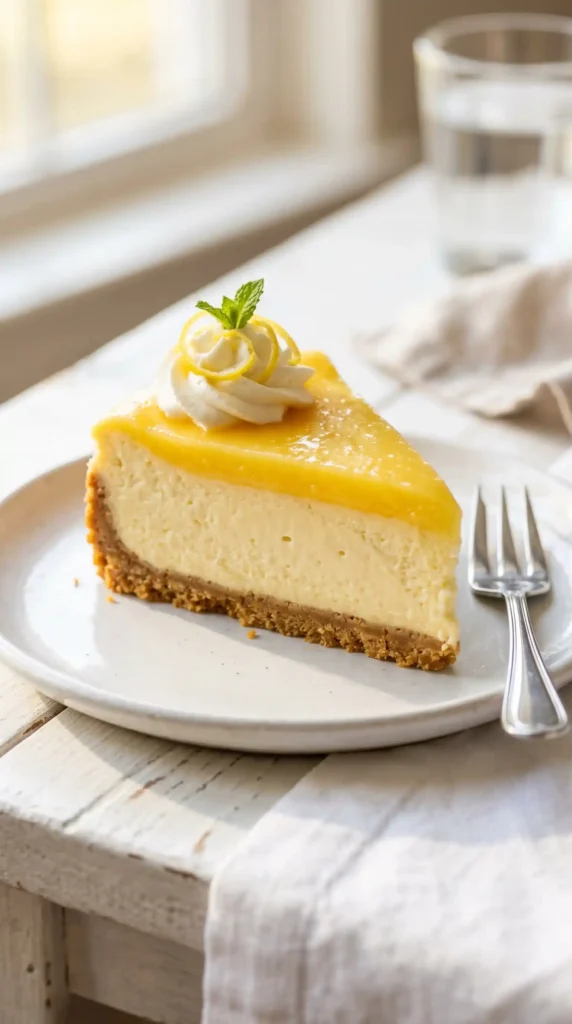
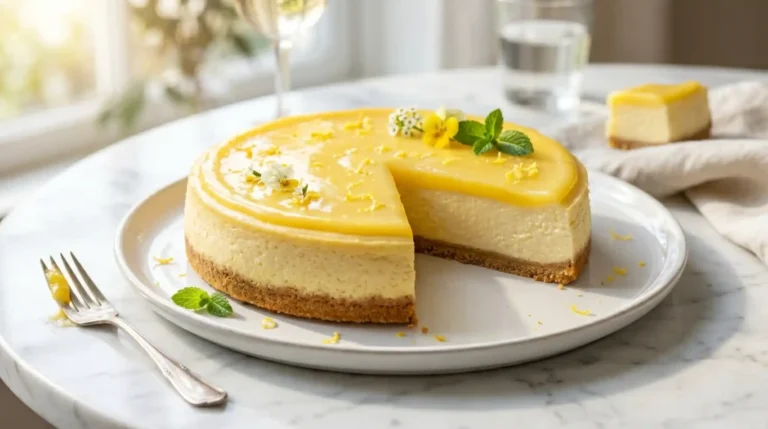
Slice with a sharp knife, wiping it clean between each cut. If you want to top the cheesecake, a thin layer of extra lemon curd spread across the surface looks stunning and adds an extra hit of bright lemon flavor. Whipped cream on individual slices works beautifully too.
Tips for the Perfect Dreamy Lemon Cheesecake
- Always use room temperature ingredients. Cold cream cheese and sour cream create lumps that never fully blend out.
- Fresh lemon juice only. Bottled juice tastes flat and processed. Fresh juice makes a genuinely noticeable difference in this recipe.
- Don’t skip the water bath. It’s the single biggest factor in a crack-free, creamy cheesecake.
- Chill overnight. A 2-hour chill produces a soft, underset cheesecake. Overnight produces perfection.
- Strain the lemon curd. Those few extra seconds of straining give you a silky curd without any cooked egg texture.
How to Store Lemon Cheesecake
Store the Dreamy Lemon Cheesecake covered in the refrigerator for up to 5 days. Keep it in the springform pan or transfer slices to an airtight container. The flavor actually deepens by day two, so leftovers are a genuine treat.
For longer storage, freeze individual slices. Wrap each slice tightly in plastic wrap, then in foil. Freeze for up to 2 months. Thaw overnight in the fridge — never at room temperature, which can make the texture watery.
Frequently Asked Questions
Q1: Do I have to use a water bath for this cheesecake? Technically no, but you’ll likely get cracks and a drier texture without one. The water bath keeps the oven environment humid, which prevents the top from setting and pulling apart too quickly. For this Dreamy Lemon Cheesecake, the water bath is strongly recommended.
Q2: Can I use store-bought lemon curd instead of homemade? Yes, and it saves real time. Use about 3/4 to 1 cup of good-quality store-bought lemon curd. The flavor won’t be quite as bright and fresh as homemade, but the cheesecake will still taste fantastic and the method stays exactly the same.
Q3: Why did my cheesecake crack on top? Cracks usually come from one of three things: overmixing the batter (adds air), overbaking (dries the top), or cooling too fast. Make sure you follow the gradual cooling steps and use the water bath. A little crack is purely cosmetic — cover it with lemon curd and nobody will ever know.
Q4: Can I make this cheesecake without a springform pan? A springform pan really is the right tool for this job. Without it, removing the cheesecake cleanly becomes very difficult. If you don’t have one, a deep 9-inch cake pan lined with parchment that overhangs the sides works as a backup. Lift with the parchment handles.
Q5: How far ahead can I make this cheesecake? You can make it up to 3 days ahead and keep it refrigerated. The texture and flavor hold up beautifully over that time. If anything, a cheesecake made two days ahead tastes more settled and flavorful than one made the same morning it’s served.
Final Thoughts
This Dreamy Lemon Cheesecake is exactly what it sounds like — dreamy. Dense, creamy filling, a crisp buttery crust, and enough bright lemon flavor to make every bite feel alive. It’s the kind of dessert people ask you for the recipe before they’ve even finished their slice.
Put in the time, follow the steps, and this cheesecake will reward you completely. Make it for a special occasion or make it on a random Tuesday because you deserve something genuinely great. Either reason is a perfectly good one.
Dreamy Lemon Cheesecake
Ingredients
Method
- In a medium saucepan over medium-low heat, whisk together eggs, sugar, lemon juice, lemon zest, and salt.
- Continue whisking constantly until the mixture thickens, about 8–10 minutes. It should coat the back of a spoon.
- Remove from heat and stir in the butter until melted, then pour through a fine mesh strainer into a clean bowl.
- Press plastic wrap onto the surface and refrigerate until cool.
- Preheat the oven to 325°F (163°C). Wrap the springform pan with aluminum foil.
- In a mixing bowl, combine graham cracker crumbs, sugar, melted butter, and a pinch of salt. Mix until combined.
- Press into the bottom of the foil-wrapped springform pan and slightly up the sides.
- Bake the crust in the oven for 10 minutes. Set aside to cool.
- In a stand mixer, beat cream cheese on medium speed until smooth, about 3 minutes.
- Add sour cream and mix until combined.
- Gently fold in cooled lemon curd until the mixture is uniform.
- Pour the cheesecake filling into the cooled crust. Tap to remove air bubbles.
- Place the springform pan in a larger roasting pan, and add hot water halfway up the sides of the springform pan.
- Bake at 325°F for 60 to 70 minutes, until the outer edges are set but the center has a slight jiggle.
- Turn off the oven and let the cheesecake cool inside with the door cracked for 1 hour, then cool at room temperature for another hour before refrigerating overnight.
- Run a knife around the edge, release the sides of the springform pan, slice, and serve. Top with lemon curd or whipped cream if desired.