Servings: 4 | Prep Time: 10 minutes | Cook Time: 20 minutes | Total Time: 30 minutes
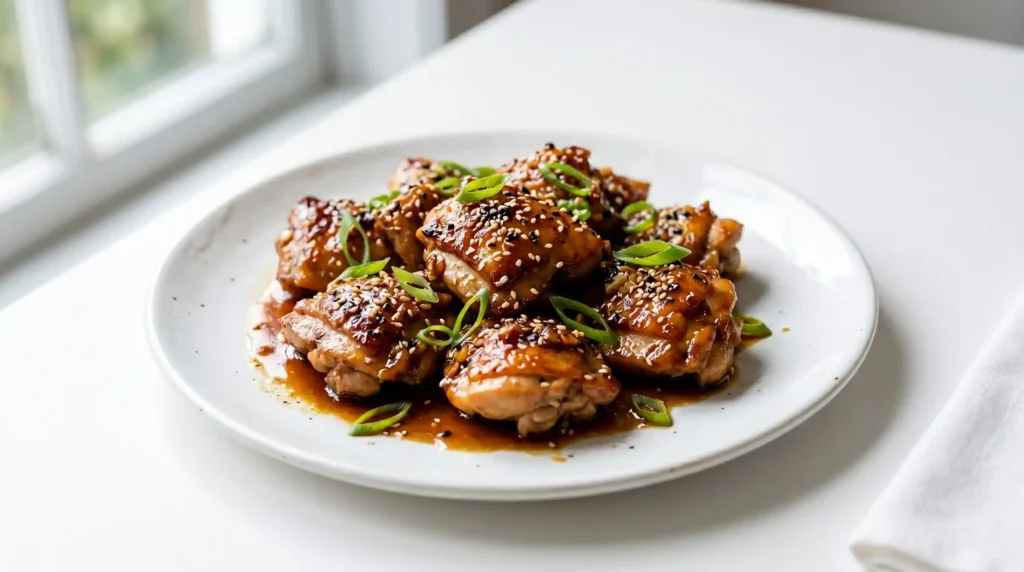
Let me tell you about the dish that single-handedly saved my weeknight dinner routine. Mongolian Chicken Thighs — sticky, savory, and just the right amount of sweet — took over my kitchen and never left. One pan, thirty minutes, and everyone at the table goes quiet.
The first time I made this, I fully expected it to be fine. Just fine. Instead, I scraped the pan clean and immediately started planning the next batch. That sauce does something to chicken thighs that honestly feels a little unfair.
If you have ever stared at a pack of chicken thighs wondering what to do with them, this is your answer. This recipe is fast, deeply flavorful, and requires zero fancy techniques. Just good ingredients and a hot pan.
Ingredients
For the Chicken
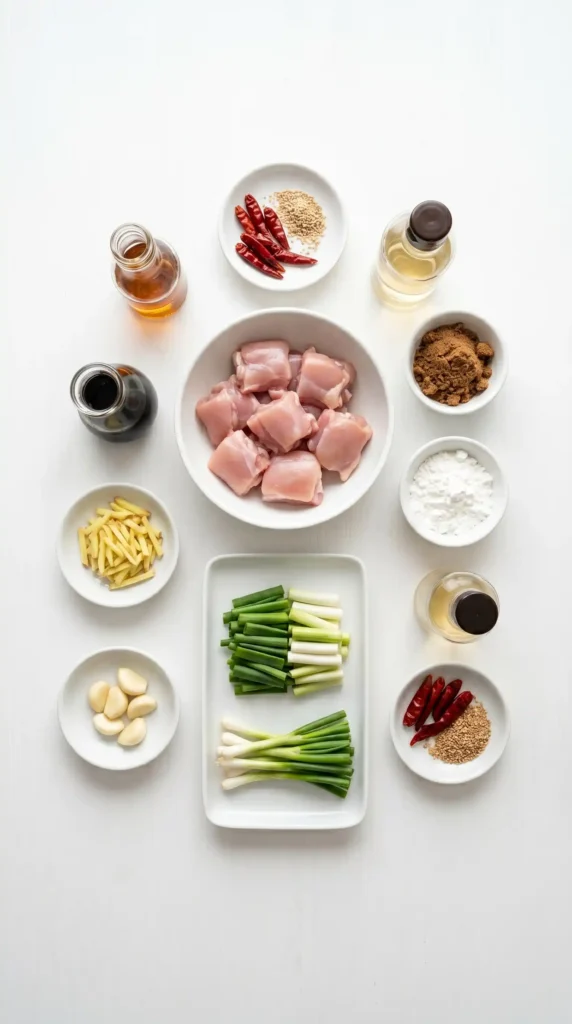
- 600 grams boneless, skinless chicken thighs
- 3 tablespoons cornstarch
- 2 tablespoons vegetable oil
For the Sauce
- 4 cloves garlic, minced
- 1 tablespoon fresh ginger, grated
- 100 ml low-sodium soy sauce
- 75 grams dark brown sugar
- 2 teaspoons rice vinegar
- 1 teaspoon sesame oil
- 1 dried red chili (optional, for heat)
- 3 spring onions, sliced (for garnish)
Why Chicken Thighs Are the Right Call
Can we talk about how underrated chicken thighs are? They stay juicy even when you push the heat, they absorb marinades and sauces beautifully, and they have actual flavor. Chicken breasts are fine, but thighs? They commit.
The fat content in chicken thighs means they stay tender through the whole cooking process. They do not dry out the second you look away, which is exactly what you want when cooking in a sticky, high-sugar sauce over medium-high heat.
IMO, swapping thighs for breasts in this recipe would technically work — but you would lose that silky, pull-apart texture that makes Mongolian Chicken Thighs so satisfying. Stick with thighs. Trust the process.
How to Make Mongolian Chicken Thighs
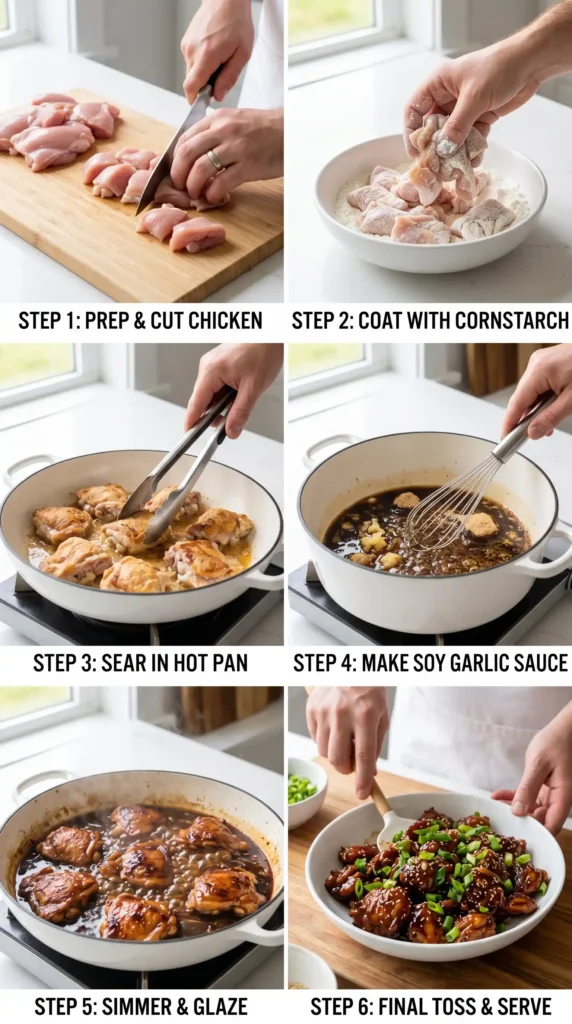
Step 1: Prepare the Chicken
Start by patting your 600 grams of boneless, skinless chicken thighs completely dry with paper towels. Do both sides. Dry chicken is the foundation of a good sear — moisture creates steam, and steam is the enemy of that golden crust you are going for.
Once the chicken is dry, cut each thigh into roughly equal pieces — about two to three chunks per thigh works well. Consistent sizing means everything cooks at the same rate, so you avoid the situation where half the pieces are perfect and the other half are overdone.
Add the cut chicken to a medium bowl and sprinkle over 3 tablespoons of cornstarch. Toss everything together until each piece has a light, even coating. The cornstarch does two things here: it helps create a golden crust during frying and later helps the sauce cling to every surface of the chicken.
Do not skip this step or reduce the cornstarch. It looks like a lot at first, but the coating is thin and disappears into the sauce by the time you serve. What it leaves behind is texture and that beautiful sauce-gripping surface.
Step 2: Cook the Chicken
Heat 2 tablespoons of vegetable oil in a large skillet or wok over medium-high heat. You want the oil properly hot before the chicken goes in — a drop of water should sizzle immediately on contact. Cold oil means the chicken absorbs fat instead of searing.
Add the coated chicken pieces in a single layer. Do not crowd the pan. If your skillet is not large enough, cook in two batches rather than stacking pieces. Overcrowding drops the pan temperature and turns your sear into a steam — which defeats the whole point of the cornstarch coating.
Leave the chicken completely undisturbed for 2 to 3 minutes. Resist the urge to move it around. The golden crust forms when the chicken has full, uninterrupted contact with the hot surface. You will know it is ready to flip when it releases from the pan without sticking.
Flip each piece and cook the other side for about 1 minute. The chicken does not need to be fully cooked through at this stage — it will finish cooking in the sauce. Remove the chicken to a clean plate and set it aside while you build the sauce.
Step 3: Make the Sauce
Lower the heat to medium and keep all those golden bits in the pan. Do not wipe it out. Those caramelized bits stuck to the bottom of the skillet carry a huge amount of flavor, and the sauce is about to pick all of it up.
Add the 4 cloves of minced garlic and 1 tablespoon of grated fresh ginger directly into the pan. Stir them around and cook for 30 to 60 seconds, just until fragrant. Be careful here — garlic burns fast at this stage and bitter burnt garlic will wreck the entire sauce.
Pour in the 100 ml of low-sodium soy sauce and 75 grams of dark brown sugar. Add a splash of water — about 60 ml — to help loosen the sauce and prevent it from caramelizing too quickly. Whisk everything together to combine.
Bring the mixture to a gentle simmer, stirring regularly. Watch the sugar dissolve and the sauce start to thicken. This takes about 2 to 3 minutes. The sauce should look glossy and just thick enough to coat the back of a spoon. If it is too thin, give it another minute.
Stir in the 2 teaspoons of rice vinegar and 1 teaspoon of sesame oil. The vinegar adds a subtle brightness that cuts through the sweetness, and the sesame oil rounds out the whole flavor profile with a nutty depth. If you want heat, drop in that dried red chili now.
Step 4: Combine and Finish
Return the seared chicken thighs and any juices that collected on the plate back into the skillet. Toss everything together so each piece gets coated in the glossy sauce. This step matters — the juices from the resting chicken add extra savory depth to the sauce.
Cook the chicken in the sauce for a further 2 to 3 minutes, stirring occasionally. By this point the chicken should be cooked completely through and the sauce should have thickened further and clung to every piece. If the sauce looks too thick, add a splash of water to loosen it.
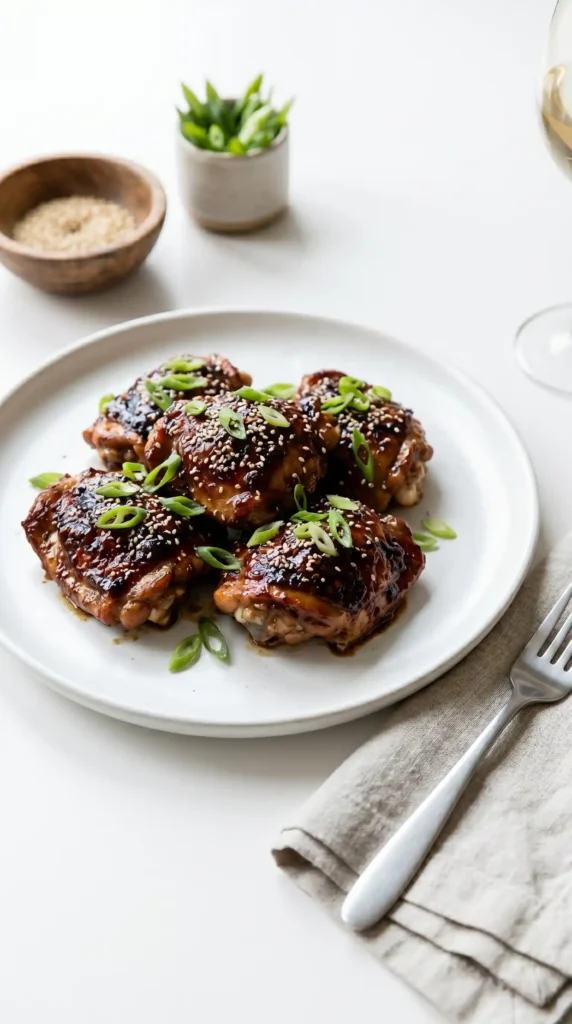
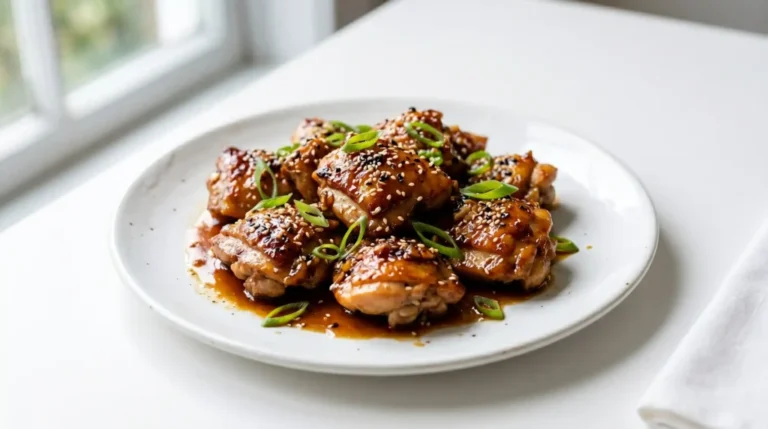
Stir in most of the sliced spring onions during the final 30 seconds. The heat wilts them slightly while keeping their fresh bite and bright green color. Save a small handful for garnishing at the end — they add visual contrast and a fresh note against the dark sauce.
Step 5: Serve
Transfer the Mongolian Chicken Thighs to a serving platter or directly onto bowls of steamed rice. Scatter the remaining spring onions over the top. Serve immediately while the sauce is still glossy and the chicken is piping hot.
This dish works best over plain steamed white rice — the neutral base soaks up the sauce without competing with the bold flavors. Noodles work too. Honestly, a fork and the pan also works, but maybe save that for when nobody is watching. 🙂
What Makes This Recipe Stand Out
Have you ever wondered why restaurant-style Asian dishes taste so much richer than home versions? It comes down to high heat and layered sauces. This recipe uses both. The wok-style sear on the chicken, followed by a sauce built directly in the same pan, creates layers of flavor most home cooks miss.
The cornstarch coating on the chicken also does something clever — it thickens the sauce slightly as the chicken cooks in it. You get this naturally glossy, sticky coating without needing extra thickener. The sauce essentially bonds to the chicken.
FYI — dark brown sugar is important here. Light brown sugar or white sugar will not deliver the same molasses depth. Dark brown sugar creates a richer, more complex sweetness that gives the sauce its characteristic Mongolian flavor profile.
Tips for Perfect Mongolian Chicken Thighs Every Time
- Use a hot pan. Medium-high heat is non-negotiable for the sear. A lukewarm pan gives you grey, steamed chicken instead of golden, crispy pieces.
- Cook in batches if needed. Crowding the pan is the most common mistake. Two smaller batches beat one overcrowded batch every time.
- Do not skip the dry step. Patting the chicken dry takes ten seconds and makes a measurable difference in the final texture.
- Taste the sauce before combining. Adjust sweetness or saltiness before the chicken goes back in — it is much easier to fix at that stage.
- Rest the chicken briefly. Even a minute on the plate while you build the sauce lets juices settle and adds flavor back to the pan.
Ways to Customize This Recipe
Once you know the base, the variations are easy. What would you add if you could change just one thing?
- Add vegetables: Sliced bell peppers, broccoli florets, or snap peas all work well. Add them after the garlic and ginger and stir-fry for 2 minutes before adding the sauce.
- Make it spicier: Double the dried red chili or add a teaspoon of chili garlic paste to the sauce for a more pronounced heat.
- Use honey instead of brown sugar: Honey creates a slightly lighter, floral sweetness. Use about 3 tablespoons to replace the 75 grams of sugar.
- Add toasted sesame seeds: A sprinkle of toasted white sesame seeds at serving adds texture and a nutty visual finish.
- Try it with rice noodles: Toss the finished chicken and sauce through cooked rice noodles for a quick one-pan noodle dish.
Storing and Reheating Leftovers
Leftovers store well in an airtight container in the fridge for up to 3 days. The sauce actually deepens in flavor overnight, so day-two leftovers taste even better. Reheat gently in a skillet over low heat with a small splash of water to loosen the sauce.
You can also freeze the cooked chicken in its sauce for up to 1 month. Defrost overnight in the fridge and reheat the same way. The texture of the chicken stays good — chicken thighs hold up far better through freezing than chicken breasts do.
FAQs About Mongolian Chicken Thighs
1. Can I use chicken breasts instead of thighs?
Yes, you can. Cut them into even pieces and reduce the cooking time slightly — chicken breasts cook faster and dry out more easily. Watch the internal temperature and pull them when they hit 74 degrees Celsius (165 degrees Fahrenheit). The texture will be different but the sauce still works.
2. Is Mongolian chicken the same as Mongolian beef?
The sauce profile is very similar — both use soy sauce, brown sugar, garlic, and ginger as a base. The main difference is the protein and the texture. This Mongolian Chicken Thighs version uses cornstarch-coated chicken for a slightly crispier result. The flavor is comparable but the chicken version cooks faster.
3. How do I make the sauce thicker?
If the sauce looks too thin after simmering, mix 1 teaspoon of cornstarch with 2 teaspoons of cold water and stir it into the simmering sauce. It will thicken within a minute. Alternatively, just simmer longer — the sauce reduces naturally with time.
4. Can I make this recipe gluten-free?
Yes. Swap the regular soy sauce for tamari or coconut aminos. Both give you a similar salty, savory base without the gluten. Cornstarch is naturally gluten-free, so the rest of the recipe does not need any changes.
5. What should I serve with Mongolian chicken thighs?
Steamed jasmine or short-grain rice is the classic pairing. Egg fried rice works really well too. For something lighter, try it over steamed broccoli or cauliflower rice. If you want a full spread, add a simple cucumber salad with rice vinegar dressing on the side.
Final Thoughts
That is the full picture on Mongolian Chicken Thighs — a recipe that punches well above its effort level. Thirty minutes, one pan, and a sauce that makes even the pickiest dinner guest ask for seconds.
The key takeaways are simple: dry the chicken, do not crowd the pan, build the sauce in the same skillet, and use dark brown sugar. Those four things make all the difference between a good version and a great one.
Now stop reading and go make it. The pan is waiting.
Mongolian Chicken Thighs
Ingredients
Method
- Pat the chicken thighs completely dry with paper towels. Cut each thigh into two to three equal pieces.
- Add the cut chicken to a bowl, sprinkle with cornstarch, and toss until evenly coated.
- Heat the vegetable oil in a large skillet over medium-high heat until hot.
- Add the chicken in a single layer and cook undisturbed for 2-3 minutes to form a golden crust.
- Flip the chicken and cook for an additional minute. Remove from skillet and set aside.
- In the same skillet, add minced garlic and grated ginger, and cook for 30-60 seconds until fragrant.
- Pour in soy sauce and dark brown sugar, along with a splash of water. Whisk to combine and bring to a gentle simmer.
- Add rice vinegar and sesame oil, and stir in the dried red chili if using.
- Return the cooked chicken to the skillet and toss to coat in the sauce. Cook for 2-3 minutes until thoroughly heated.
- Add most of the sliced spring onions in the last 30 seconds of cooking.
- Serve the Mongolian Chicken Thighs over steamed rice and garnish with the remaining spring onions.