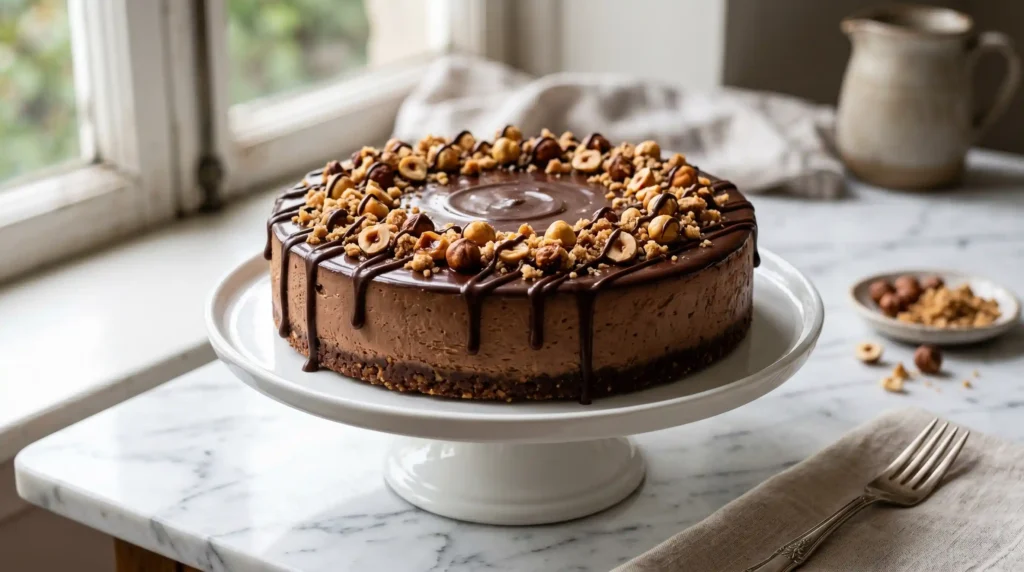
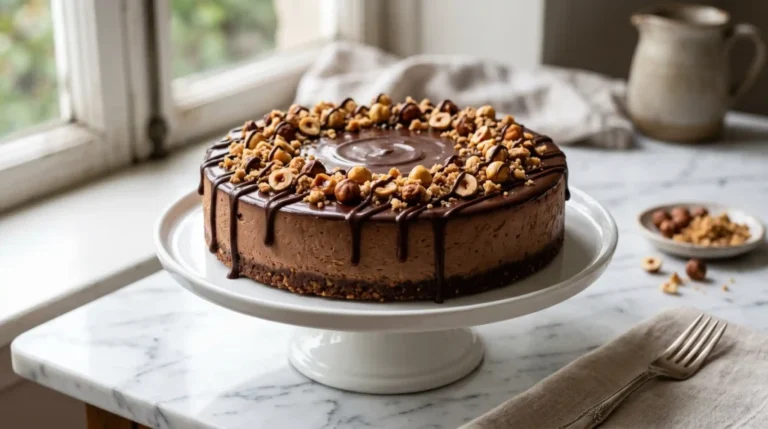
Hazelnut and chocolate together produce one of the most widely loved flavour combinations in the dessert world — and for genuinely good reason. The earthy, slightly sweet nuttiness of hazelnut and the rich depth of dark chocolate create a pairing that tastes simultaneously indulgent and elegant. No-Bake Hazelnut Cheesecake With Hazelnut Crumble takes that combination and runs it through every layer of a cheesecake — the crust, the filling, and the topping — producing something that tastes extraordinary without requiring an oven, a water bath, or any technique more complex than whipping cream.
I made this for the first time when I wanted something that felt genuinely special but needed to come together the evening before a dinner party with minimal stress. Thirty-five minutes of active prep, an overnight chill, and I pulled a dessert from the fridge the next day that received more compliments than anything I had baked in recent memory. The fact that I had not baked anything felt like a personal victory on multiple levels.
Have you ever made a no-bake dessert that genuinely surprised people with its quality? This is that dessert. Let us build it layer by layer.
Why Hazelnut Through Every Layer Makes This Cheesecake Exceptional
Most hazelnut cheesecakes put hazelnut spread in the filling and call it done. This recipe runs hazelnut through every single component — the crust, the filling, and the crumble — which means every bite delivers a complete, cohesive hazelnut experience rather than a cheesecake with a hazelnut note in one layer. The flavour builds from the base upward and finishes with the crumble adding a textural and aromatic dimension that the filling alone cannot provide.
The crumble is the element that most distinguishes this from a standard hazelnut cheesecake. Toasted hazelnuts combined with butter, flour, and brown sugar produce a golden, sandy, deeply nutty topping that shatters when the fork cuts through it — providing a textural contrast to the silky filling and the buttery crust that makes every slice genuinely interesting from the first bite to the last.
The no-bake method specifically suits this flavour profile. Baking a hazelnut cheesecake at high temperature can mute the delicate hazelnut aromatics in the filling — they are heat-sensitive compounds that taste more vivid cold than hot. A chilled, no-bake filling preserves every hazelnut note at full intensity. IMO, this recipe is demonstrably better as a no-bake than it would be baked and that is not a compromise — it is an advantage.
What You Need-No-Bake Hazelnut Cheesecake With Hazelnut Crumble
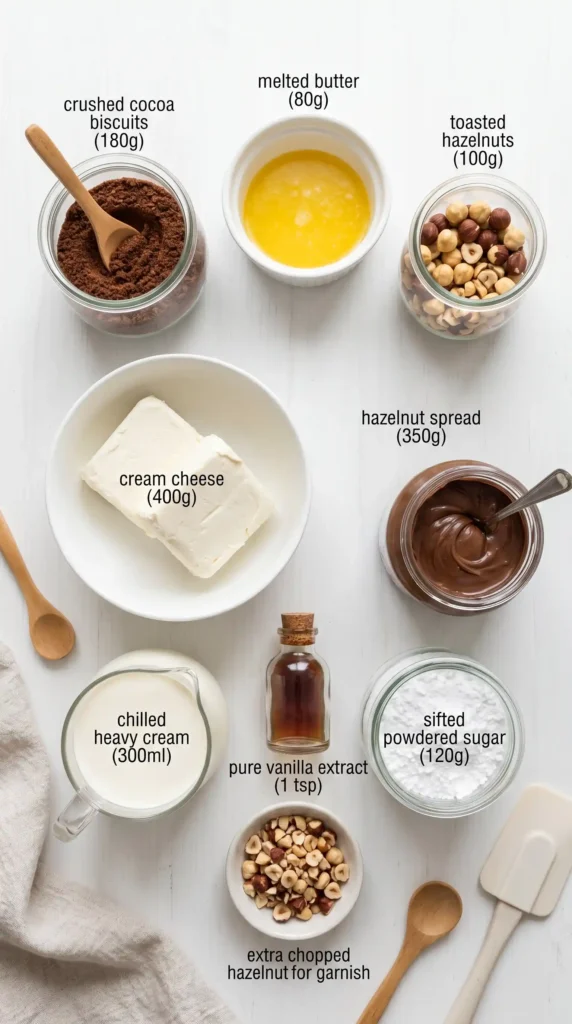
Four components: the hazelnut chocolate crust, the cream cheese filling, the hazelnut crumble topping, and the finishing elements. The hazelnut spread (Nutella or equivalent) appears in both the filling and the finishing drizzle. The toasted hazelnuts appear in the crust and the crumble. This flavour repetition across components is deliberate — it is what makes every layer taste like part of a unified whole rather than separate elements stacked together.
For the Hazelnut Chocolate Crust
- 200g (about 2 cups) chocolate digestive biscuits or Oreo biscuits, processed to fine crumbs
- 1/2 cup (60g) toasted hazelnuts, roughly chopped
- 4 tablespoons (57g) unsalted butter, melted
- 2 tablespoons hazelnut spread (Nutella or equivalent)
- Pinch of salt
For the Hazelnut Cream Cheese Filling
- 450g (16oz / 2 packages) full-fat cream cheese, softened to room temperature
- 1/2 cup (120g) hazelnut spread (Nutella or equivalent)
- 3/4 cup (90g) powdered sugar, sifted
- 1 teaspoon pure vanilla extract
- 1 tablespoon fresh lemon juice
- Pinch of salt
- 1 and 1/2 cups (360ml) heavy whipping cream, cold
Now For the Hazelnut Crumble Topping
- 1/2 cup (60g) all-purpose flour
- 1/4 cup (50g) packed light brown sugar
- 3 tablespoons (42g) cold unsalted butter, cut into small cubes
- 1/2 cup (60g) toasted hazelnuts, roughly chopped
- Pinch of salt
Now For Finishing
- 3 tablespoons hazelnut spread, warmed until pourable (for drizzling)
- 10–12 whole toasted hazelnuts for decoration
- Flaky sea salt (optional — a pinch across the finished cheesecake is genuinely excellent)
Toast the Hazelnuts Before Anything Else — Here Is WhyRaw hazelnuts taste mild and slightly bitter. Toasted hazelnuts taste rich, deeply nutty, and aromatic — the toasting process develops the volatile flavour compounds that give hazelnuts their characteristic character. Spread them on a dry baking sheet and toast at 175°C for 10–12 minutes, watching carefully after 8 minutes, until the skins are dark and the nuts smell deeply fragrant. Cool, then rub in a clean kitchen towel to remove most of the skins. FYI — this step transforms the recipe from good to genuinely excellent and takes twelve minutes you will not regret.
How to Make No-Bake Hazelnut Cheesecake With Hazelnut Crumble Step by Step
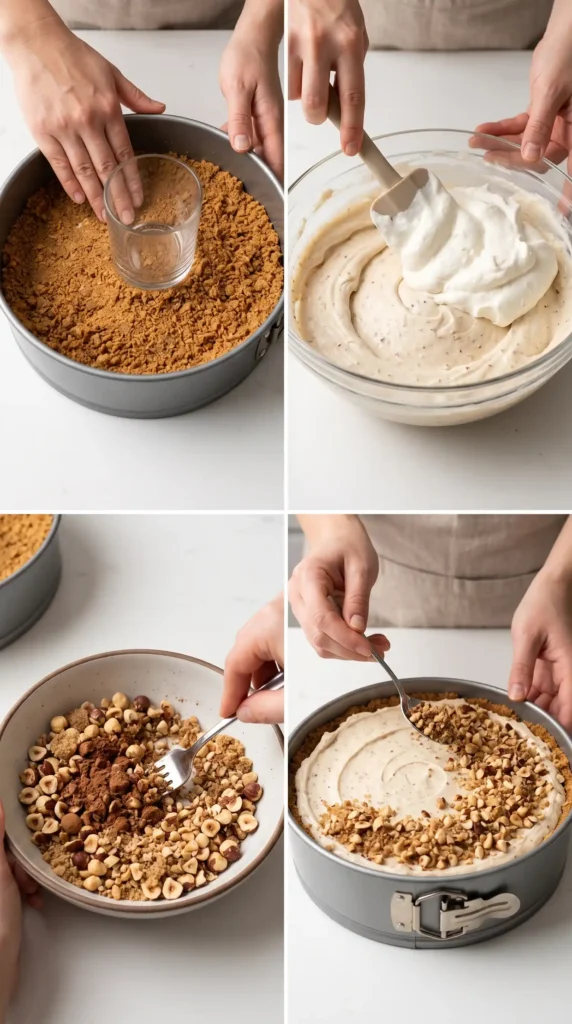
Four stages: make the crumble topping (it needs to chill), make the crust, make the filling, then assemble and chill. The crumble comes first so it has time to rest in the fridge while the other components come together. The active work totals about 35 minutes. Everything else is chilling time — let the refrigerator do its job while you prepare to be genuinely impressed by what comes out tomorrow.
Step 1: Make the Hazelnut Crumble Topping First
Place the flour, light brown sugar, and pinch of salt in a medium bowl. Add the cold butter cubes and use your fingertips to rub the butter into the dry ingredients — press the butter between your fingers and smear it through the flour, working quickly so the heat of your hands does not soften the butter before it incorporates. Work until the mixture resembles rough, sandy crumbs with some pea-sized pieces of butter still visible throughout.
Add the roughly chopped toasted hazelnuts and mix briefly to incorporate. The crumble should look uneven and clumped — some larger clusters, some fine crumbs, a generally rough texture. This uneven texture is correct and desirable: it produces a topping that, once chilled and pressed onto the cheesecake, has an interesting irregular texture rather than a uniform paste.
Press the crumble mixture loosely onto a parchment-lined tray and refrigerate for at least 20 minutes. The cold butter in the crumble is what creates the sandy, breakable texture when you press it onto the finished cheesecake — if the butter is warm and soft when applied, the crumble compresses into a dense layer rather than the loose, sandy topping you are aiming for. Cold crumble applied to a cold cheesecake surface produces the best textural result.
Step 2: Make the Chocolate Hazelnut Crust
Process the chocolate digestive biscuits or Oreos in a food processor until they form fine, uniform crumbs. Add the roughly chopped toasted hazelnuts and pulse briefly — three or four pulses — until the hazelnuts are incorporated but still slightly chunky rather than ground to a fine powder. The hazelnut pieces in the crust add textural interest and flavour depth that a pure biscuit crust cannot provide.
In a bowl, combine the biscuit-hazelnut crumbs, melted butter, hazelnut spread, and pinch of salt. Stir vigorously until every crumb is coated in the butter and hazelnut spread and the mixture holds its shape when pressed between your fingers. The hazelnut spread in the crust adds both flavour and a slight binding quality beyond what the butter alone provides — it makes the crust firmer and more cohesive after chilling.
Press the crust mixture into the base of a 23cm (9-inch) springform pan. Use the flat bottom of a measuring cup or drinking glass to press it firmly and evenly — working from the centre outward and pressing up the sides about 3–4cm to create a shallow crust wall that holds the filling in place. Refrigerate the lined pan for 20 minutes while you make the filling.
Step 3: Make the Hazelnut Cream Cheese Filling
In a large bowl, beat the room-temperature cream cheese with a hand mixer on medium speed for about 90 seconds until completely smooth and lump-free. Any lumps at this stage will not smooth out after the other ingredients are added. If the cream cheese looks at all lumpy after 90 seconds, it was still too cold — microwave in 10-second intervals, stirring between each, until fully softened.
Add the hazelnut spread, sifted powdered sugar, vanilla extract, lemon juice, and pinch of salt to the smooth cream cheese. Beat on medium speed for 60 seconds until fully incorporated and the filling looks uniformly brown-cream in colour with no streaks of plain cream cheese or unmixed hazelnut spread. Taste it — the filling should taste richly hazelnut-forward, slightly tangy from the cream cheese, and balanced sweet rather than cloying. The lemon juice is doing important work here — it adds a brightness that prevents the rich hazelnut and cream cheese from tasting too heavy.
In a separate cold bowl, whip the cold heavy cream with clean beaters on medium-high speed until it reaches stiff peaks — about 2–3 minutes. Cold cream, cold bowl, and clean beaters (free of any oil or residue) are the three conditions that produce stiff, stable whipped cream efficiently. Fold the whipped cream into the hazelnut cream cheese mixture in three additions using a rubber spatula, using large, gentle strokes from the bottom of the bowl upward. Stop folding when the cream streaks are no longer visible — do not over-fold, which deflates the cream and produces a denser, less airy filling.
Step 4: Assemble and Chill
Pour the hazelnut cream cheese filling over the chilled crust in the springform pan. Use an offset spatula or the back of a spoon to smooth the surface into a completely even, flat layer that reaches the edges of the pan with no gaps. Cover the surface with cling film pressed directly against the filling — this prevents a skin forming on the surface during the long chilling period. Refrigerate the assembled cheesecake for a minimum of 6 hours, ideally overnight.
The cheesecake needs this time to firm from a pourable, mousse-like consistency to a firm, cleanly sliceable filling that holds its shape when the springform ring is released. At 6 hours it is mostly set but slightly soft in the centre. At overnight it is fully firm throughout and slices perfectly cleanly. Do not rush this step and do not move the cheesecake during the chilling period — any vibration or movement can disrupt the setting process.
Step 5: Top and Serve the Cheesecake
Remove the fully chilled No-Bake Hazelnut Cheesecake With Hazelnut Crumble from the refrigerator. Release the springform ring carefully — run a thin knife around the inner edge of the ring first to ensure the filling has not adhered to the metal. Scatter the chilled hazelnut crumble generously across the entire top surface of the cheesecake, pressing it very gently into the cream cheese surface so it adheres without sinking.
Warm the hazelnut spread in a small bowl in the microwave for 10–15 seconds until it becomes fluid and pourable. Drizzle it over the crumble topping in slow, thin overlapping lines from one edge to the other. Arrange the whole toasted hazelnuts across the top of the crumble in a decorative pattern. Finish with a pinch of flaky sea salt if using. Slice with a warm, clean knife and serve immediately.
Cutting Clean Slices From a No-Bake CheesecakeA warm knife cuts through cold cream cheese filling without dragging or tearing the layers. Run a long, sharp knife under hot water and wipe completely dry between each cut. Score the entire cheesecake lightly before making full cuts — a shallow score mark gives you a cutting guide that helps you portion evenly without having to measure as you go. This technique produces clean, restaurant-quality slices from a home-made cheesecake every single time.
Variations Worth Making
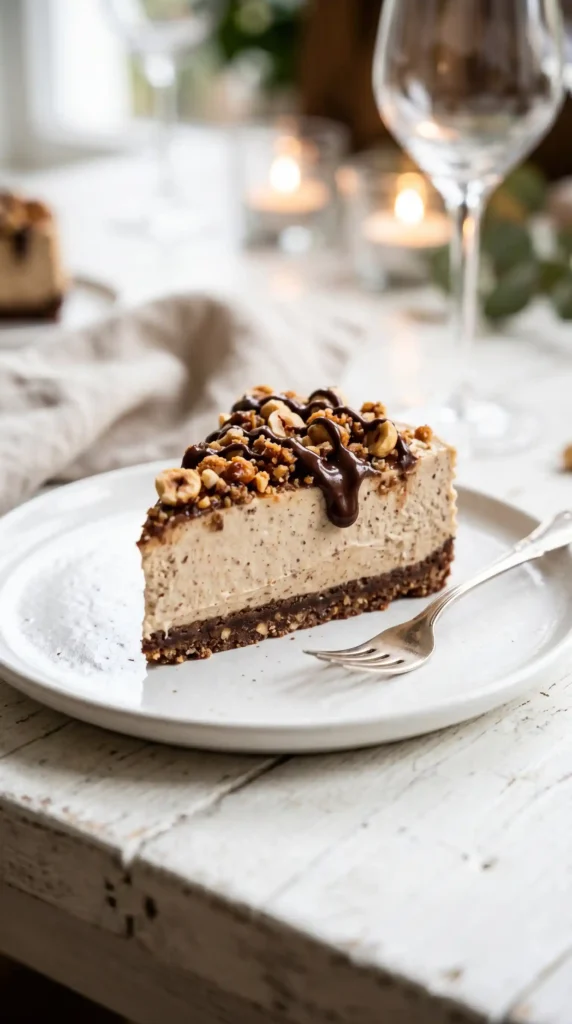
White Chocolate Hazelnut Version
Replace the hazelnut spread in the filling with a white chocolate hazelnut spread — several brands make a white version with an equally strong hazelnut flavour but a paler, creamier colour that produces a stunning visual contrast against the dark crust and brown crumble. Add 2 tablespoons of melted white chocolate to the filling alongside the hazelnut spread for extra richness. The result looks sophisticated and elegant on any dessert table. 🙂
Coffee and Hazelnut Cheesecake
Add 2 teaspoons of instant espresso powder dissolved in a tablespoon of warm water to the cream cheese mixture along with the hazelnut spread. The coffee deepens the hazelnut flavour dramatically — espresso and hazelnut have a natural affinity that makes each flavour taste more intense than it does alone. This version is especially popular at dinner parties where the coffee note makes the dessert feel more sophisticated and adult-oriented.
Vegan Hazelnut Cheesecake
Use vegan cream cheese in place of regular and full-fat coconut cream whipped to stiff peaks in place of heavy cream. Replace the butter in the crust and crumble with coconut oil. Use a dairy-free hazelnut spread rather than standard Nutella, which contains skimmed milk powder. The technique is identical throughout. The vegan version produces a slightly less rich filling than the dairy version but the hazelnut flavour comes through just as strongly.
Storage and Make-Ahead Tips
Store the No-Bake Hazelnut Cheesecake With Hazelnut Crumble covered in the refrigerator for up to 5 days. The crumble softens very slightly over time as it absorbs moisture from the filling and the air — it loses some of its initial sandy texture by day three but retains full flavour. Apply the crumble on the day of serving if you want to preserve maximum crunch. The cheesecake base and filling keep perfectly for 5 days without any quality loss.
This cheesecake freezes well without the crumble topping. Wrap the fully set, untopped cheesecake tightly in cling film and then foil and freeze for up to 2 months. Thaw overnight in the fridge. Make and apply fresh crumble and the hazelnut drizzle on the day of serving for the freshest presentation and best texture contrast. The filling texture after thawing is essentially identical to freshly made.
Frequently Asked Questions
Can I use a different nut spread instead of hazelnut spread?
Yes. Almond butter produces a milder, less sweet filling with a more delicate nuttiness — increase the powdered sugar by a tablespoon to compensate for the reduced sweetness. Cashew butter produces an even more neutral, creamy base that lets the cream cheese flavour dominate more than the nut. Peanut butter works but significantly changes the flavour profile toward a peanut butter cheesecake rather than a hazelnut one. For the most authentic result, use a quality hazelnut chocolate spread where hazelnut is the primary flavour.
Why is my filling not setting firm enough to slice cleanly?
Insufficient chilling time is the most common cause — the filling needs a full 6 hours minimum and overnight produces the best result. Cold cream that was not whipped to true stiff peaks is the second most likely cause — soft-peak whipped cream does not provide enough structural support to the filling during chilling and it sets to a softer, less stable consistency. The third possibility is too much hazelnut spread — it contains oil that can prevent the filling from setting as firmly as plain cream cheese. Measure it exactly.
How do I make the hazelnut crumble baked vs. unbaked?
The crumble in this recipe is raw rather than baked — the cold butter binds it into a sandy, crumbly texture that adheres to the cold cheesecake surface without baking. For a crunchier, more golden crumble, spread the mixture on a parchment-lined tray and bake at 175°C for 12–15 minutes until golden and fragrant, then cool completely before applying to the cheesecake. The baked crumble produces a crunchier, more caramelised result that stays crispier for longer against the filling moisture.
Can I make the crumble and crust with different biscuits?
Yes. For the crust, graham crackers produce a lighter-coloured, slightly less intensely flavoured base than chocolate digestives. Lotus Biscoff biscuits produce a spiced, caramel-forward crust that pairs unexpectedly well with the hazelnut filling. For the crumble, ground almonds or pecans can substitute for hazelnuts — use the same quantity and toast the nuts before adding. The hazelnut flavour will be less prominent in the crumble but the textural element and the toasted nut aroma remain equally effective.
Can I add gelatin to make the filling firmer?
Yes, and this is especially recommended if you are serving in a warm environment where the cheesecake might soften. Dissolve 1 and 1/2 teaspoons of unflavoured gelatin powder in 3 tablespoons of cold water — let it bloom for 5 minutes, then warm briefly until fully liquid and clear. Fold the cooled liquid gelatin into the cream cheese mixture before adding the whipped cream. The gelatin-stabilised version holds its shape perfectly even at warmer room temperatures and produces the cleanest possible slices.
Final Thoughts
This No-Bake Hazelnut Cheesecake With Hazelnut Crumble earns its place as one of the most genuinely impressive desserts you can make without an oven. The hazelnut flavour running through every component — the crust, the silky filling, the crumble, the drizzle — creates a dessert that tastes more deliberate and more sophisticated than its preparation time suggests. Thirty-five minutes of work plus the patience of overnight chilling produces something that looks and tastes like significant effort was expended somewhere.
It works for dinner parties, for celebrations, for special occasions that deserve something beautiful, and for any occasion where you want to make a genuinely memorable dessert without the anxiety of a water bath, a precise oven temperature, or the possibility of a cracked top. The no-bake method removes every baking risk and replaces them with waiting, which is a significantly more comfortable position to be in.
Toast those hazelnuts first. Use room-temperature cream cheese without compromise. Whip that cream to genuine stiff peaks. Chill overnight. And then drizzle that Nutella over the crumble and accept the entirely justified applause that follows. IMO, it is the most satisfying 35 minutes of dessert work in this collection.
No-Bake Hazelnut Cheesecake With Hazelnut Crumble
Ingredients
Method
- Combine flour, light brown sugar, and pinch of salt in a bowl. Rub cold butter cubes into the dry ingredients until sandy.
- Mix in roughly chopped toasted hazelnuts, and refrigerate for at least 20 minutes.
- Process biscuits to fine crumbs, then add toasted hazelnuts and pulse briefly.
- Mix crumbs with melted butter, hazelnut spread, and salt. Press into the base of a springform pan and refrigerate for 20 minutes.
- Beat cream cheese until smooth, then mix in hazelnut spread, powdered sugar, vanilla, lemon juice, and salt until fully incorporated.
- Whip the cold heavy cream to stiff peaks and fold into cream cheese mixture gently.
- Pour the filling into the chilled crust, smooth the surface, and cover tightly with cling film.
- Refrigerate for a minimum of 6 hours or overnight.
- Remove cheesecake from the fridge and scatter the chilled crumble on top.
- Drizzle warmed hazelnut spread over and decorate with whole toasted hazelnuts and salt if desired.
- Slice with a warm knife and serve immediately.



