Servings: 6–8 | Prep Time: 15 minutes | Cook Time: 30 minutes | Total Time: 45 minutes
You know that moment when you open the fridge and just stare into it, hoping dinner magically appears? Yeah, same. That’s exactly how I discovered the walking taco casserole — and honestly, it changed my weeknight game forever.
This dish takes everything you love about a walking taco (that legendary bag-of-Fritos handheld situation) and turns it into a hearty, crowd-pleasing casserole. It’s cheesy, crunchy, and ridiculously easy to pull off.
What Even Is a Walking Taco Casserole?
If you’ve never had a walking taco, let me paint you a picture. Imagine taco toppings stuffed right into a bag of corn chips — no plate needed. Now imagine that concept baked into a bubbling, cheesy casserole dish. That’s the walking taco casserole.
It’s the kind of recipe that disappears at potlucks before you even set down the serving spoon. IMO, it’s the ultimate comfort food mashup. Crunchy meets creamy meets cheesy — all in one pan.
Ingredients You’ll Need
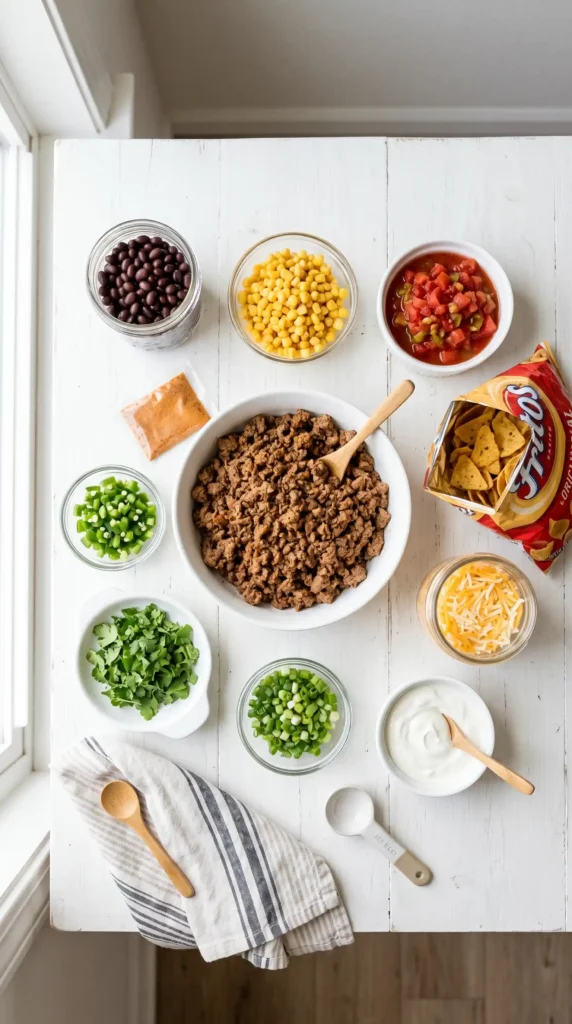
Here’s everything to grab before you start. No fancy stuff, just simple pantry staples.
For the meat layer:
- 1.5 lbs ground beef (80/20 blend works great)
- 1 packet (1 oz) taco seasoning
- 1/2 cup water
- 1 can (15 oz) diced tomatoes with green chilies (like Rotel)
- 1 can (15 oz) black beans, drained and rinsed
- 1 can (15.25 oz) whole kernel corn, drained
For the topping:
- 2 cups shredded Mexican blend cheese (divided)
- 1 bag (9.25 oz) Fritos corn chips, lightly crushed
- 1/2 cup sour cream (for serving)
- 1/4 cup sliced green onions
- 1/4 cup pickled jalapeños (optional but highly recommended)
- 1/4 cup fresh cilantro, chopped
How to Make Walking Taco Casserole
Ready to cook? Let’s walk through this step by step. Don’t worry — it’s genuinely hard to mess this one up.
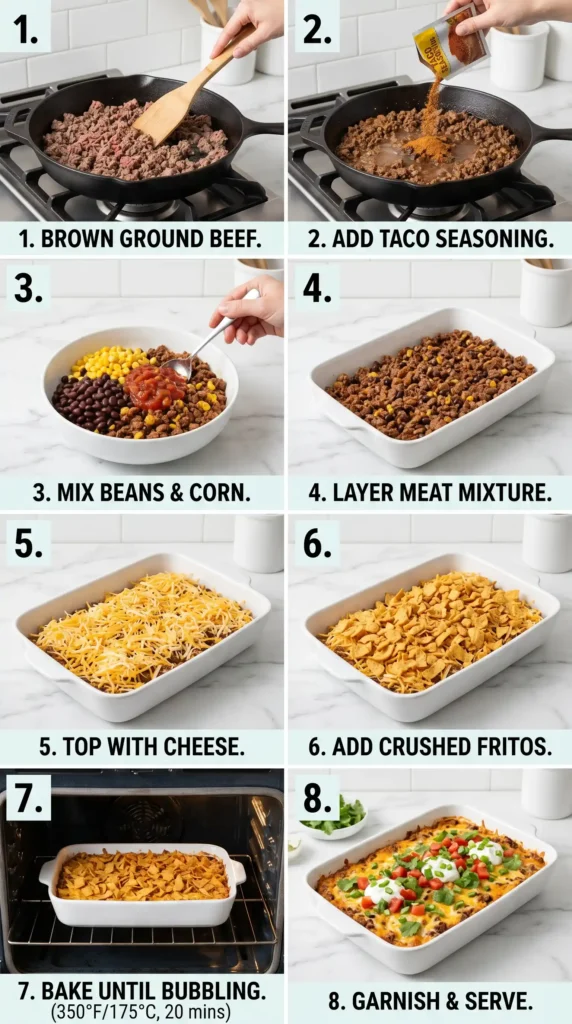
Step 1: Preheat and Prep
Start by preheating your oven to 350°F (175°C). Grab a 9×13 inch baking dish and lightly grease it with cooking spray or a thin swipe of butter. Set it aside — you’ll need it soon.
While the oven heats up, go ahead and drain your canned corn and rinse your black beans under cold water. This keeps your casserole from getting watery. Little prep steps like this make a big difference in the final texture.
Step 2: Brown the Ground Beef
Place a large skillet over medium-high heat. Once it’s hot, add the ground beef and break it up with a wooden spoon or spatula. Cook it for about 7–9 minutes, stirring occasionally, until no pink remains.
If there’s a lot of excess grease sitting in the pan, drain it off carefully. Too much grease makes the casserole heavy and greasy at the bottom — nobody wants that. A little fat is fine and adds flavor, but too much is just overkill.
Step 3: Season the Meat
Reduce the heat to medium. Sprinkle the full packet of taco seasoning over the browned beef. Stir it in thoroughly so every bit of meat gets coated in those spices.
Next, pour in 1/2 cup of water. Stir again and let the mixture simmer for about 3–4 minutes. The water helps the seasoning bloom and coat the beef evenly, creating that classic taco flavor you’re going for. The mixture should look glossy and well-seasoned, not dry or crumbly.
Step 4: Add the Veggies and Beans
Now pour in the can of diced tomatoes with green chilies — do not drain this one. The liquid carries a ton of flavor and moisture that the casserole needs. Stir everything together well.
Add the drained black beans and drained corn into the skillet. Stir the whole mixture gently until it’s all combined and heated through, about 2 more minutes. At this point, your kitchen should smell absolutely amazing. If it doesn’t, you might want to check if the seasoning packet actually made it into the pan.
Step 5: Layer the Casserole
Pour the meat and veggie mixture evenly into your prepared baking dish. Use a spoon or spatula to spread it out into a flat, even layer. This ensures every bite has the same ratio of meat, beans, and corn.
Sprinkle 1 cup of the shredded Mexican cheese directly over the meat layer. Make sure it covers the whole surface evenly. This cheese layer acts as a melty, gooey bridge between the meat and the chip topping.
Step 6: Add the Chip Topping
Here’s where the walking taco casserole really becomes its own thing. Take your bag of Fritos and gently crush them inside the bag — not into powder, just into rough, chunky pieces. You want texture, not dust.
Spread the crushed Fritos in an even layer on top of the cheese. Then sprinkle the remaining 1 cup of shredded cheese over the chips. The cheese goes on top of the chips so it melts slightly and helps hold everything together. It’s a genius little move.
Step 7: Bake It
Slide the baking dish into your preheated oven, uncovered. Bake for 20–25 minutes. You’re looking for the cheese to be fully melted and bubbling at the edges. The chips on top will turn a slightly deeper golden color — that’s exactly what you want.
Resist the urge to cover the dish with foil. Leaving it uncovered keeps the Fritos crispy instead of steaming them into a soggy mess. And nobody is here for a soggy Frito.
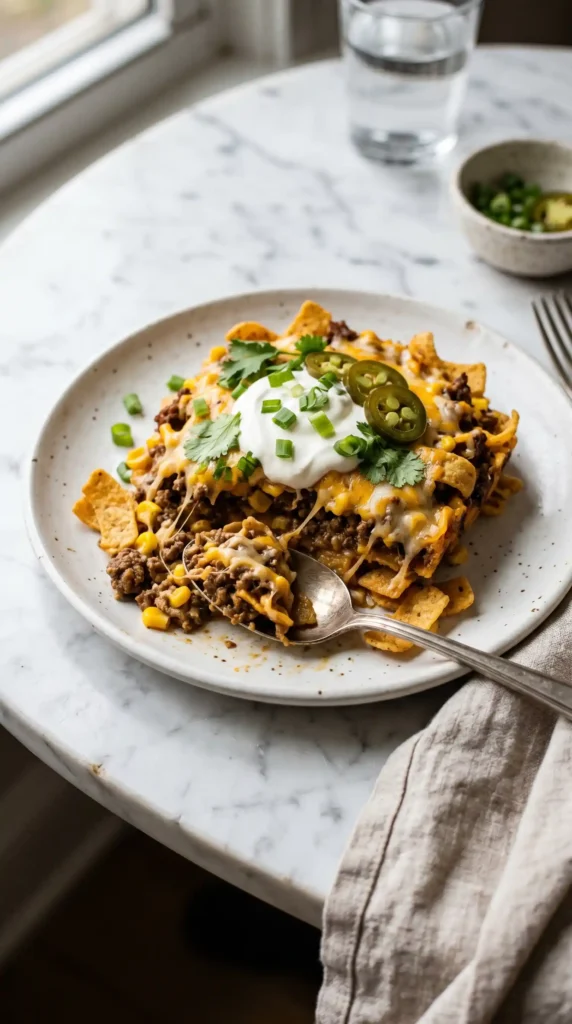
Step 8: Add the Fresh Toppings and Serve
Pull the casserole out of the oven and let it rest for about 5 minutes before serving. This gives the layers a moment to settle so your scoop holds together nicely on the plate.
Top individual servings with dollops of sour cream, sliced green onions, fresh cilantro, and pickled jalapeños if you’re feeling spicy. FYI, a squeeze of fresh lime juice right before serving takes this whole thing to the next level. Try it — you’ll thank yourself later.
Tips for the Best Walking Taco Casserole
Want to nail this recipe every single time? Here are a few tips I’ve picked up:
- Don’t overbake. Chips can go from perfectly crunchy to overdone pretty fast. Start checking at the 20-minute mark.
- Add chips right before baking. If you layer them too early, they soak up moisture and lose their crunch.
- Use freshly shredded cheese if you can. Pre-shredded bags have starch coatings that affect how they melt.
- Make it spicier by using hot Rotel or adding a pinch of cayenne to the meat mixture.
- For a milder version, swap the diced tomatoes with green chilies for plain diced tomatoes.
Can You Make It Ahead?
Absolutely, and this is where the walking taco casserole really earns its place in your weekly rotation. You can prepare the meat mixture up to 2 days in advance and keep it refrigerated in an airtight container.
When you’re ready to bake, just reheat the meat layer briefly on the stovetop, transfer to your baking dish, and layer the cheese and chips fresh. Bake as directed. The key is always adding the chips right before the oven — do not pre-layer them and refrigerate overnight unless you enjoy sad, soft chips.
How to Store Leftovers
Got leftovers? Lucky you. Store the casserole in an airtight container in the refrigerator for up to 3 days. When reheating, use the oven at 325°F for about 10 minutes rather than the microwave. The microwave works in a pinch, but it won’t preserve that chip crunch.
You can also freeze the meat layer (without chips) for up to 3 months. Thaw it overnight in the fridge and add fresh chips when you’re ready to bake again.
Variations Worth Trying
The walking taco casserole is incredibly flexible. Here are some fun ways to mix it up:
- Chicken version: Swap ground beef for shredded rotisserie chicken. Season it the same way.
- Turkey version: Ground turkey works great and cuts down on fat.
- Vegetarian version: Skip the meat entirely and double up on beans. Add a can of pinto beans for extra heartiness.
- Nacho twist: Use crushed tortilla chips or Doritos instead of Fritos for a slightly different flavor profile. Nacho cheese Doritos? :/ Sounds weird, tastes amazing.
FAQs About Walking Taco Casserole
Q: Can I use a different type of chip instead of Fritos? Yes! Tortilla chips, Doritos, or even crushed tostada shells work well. Each gives a slightly different texture and flavor. Fritos are the classic choice because they hold up well in the oven and add a distinctive corn flavor that pairs perfectly with the taco seasoning.
Q: Can I make this recipe gluten-free? Absolutely. Most taco seasoning packets contain no gluten, but always double-check the label. Fritos original corn chips are also gluten-free. The rest of the ingredients — beans, corn, cheese, tomatoes — are naturally gluten-free. Just verify any packaged items you buy.
Q: What can I serve alongside walking taco casserole? This dish is hearty enough to stand alone, but it pairs beautifully with a simple green salad, Mexican rice, or refried beans on the side. A fresh pico de gallo or guacamole on the table never hurts either.
Q: How do I keep the chips from getting soggy? The golden rule: add chips right before baking, never before. Also, make sure your meat mixture isn’t overly wet when it goes into the dish. Drain your corn and beans thoroughly, and let the meat simmer long enough for excess liquid to cook off.
Q: Can I double the recipe for a large crowd? Yes — simply double all the ingredients and use two 9×13 dishes, or one large roasting pan. The bake time stays roughly the same. This recipe is a potluck legend, so doubling it is almost always a good idea.
Final Thoughts
The walking taco casserole is one of those recipes that feels like a little more effort than it is. It looks impressive, tastes incredible, and feeds a crowd without making you stand in the kitchen for hours. What more could you want on a Tuesday night?
Whether you’re feeding picky kids, hungry adults, or a group of friends watching the game — this casserole delivers every single time. Give it a try this week and watch it disappear in about ten minutes flat.

Walking Taco Casserole
Ingredients
Method
- Preheat your oven to 350°F (175°C). Lightly grease a 9x13 inch baking dish and set aside.
- Drain the canned corn and rinse the black beans under cold water.
- In a large skillet over medium-high heat, add the ground beef and cook for about 7–9 minutes until browned, stirring occasionally.
- If there's excess grease, drain it off.
- Sprinkle taco seasoning over the beef, stir in water, and simmer for 3–4 minutes.
- Add the can of diced tomatoes (do not drain) to the meat mixture and stir well.
- Fold in the drained black beans and corn. Heat for about 2 minutes.
- Pour the meat mixture into the prepared baking dish and spread it evenly.
- Sprinkle 1 cup of shredded cheese over the meat layer.
- Crush the Fritos and spread them over the cheese, then top with another cup of cheese.
- Bake uncovered for 20–25 minutes until the cheese is melted and bubbling, and Fritos are golden.
- Let the casserole rest for 5 minutes before serving.
- Top servings with sour cream, green onions, cilantro, and jalapeños if desired.