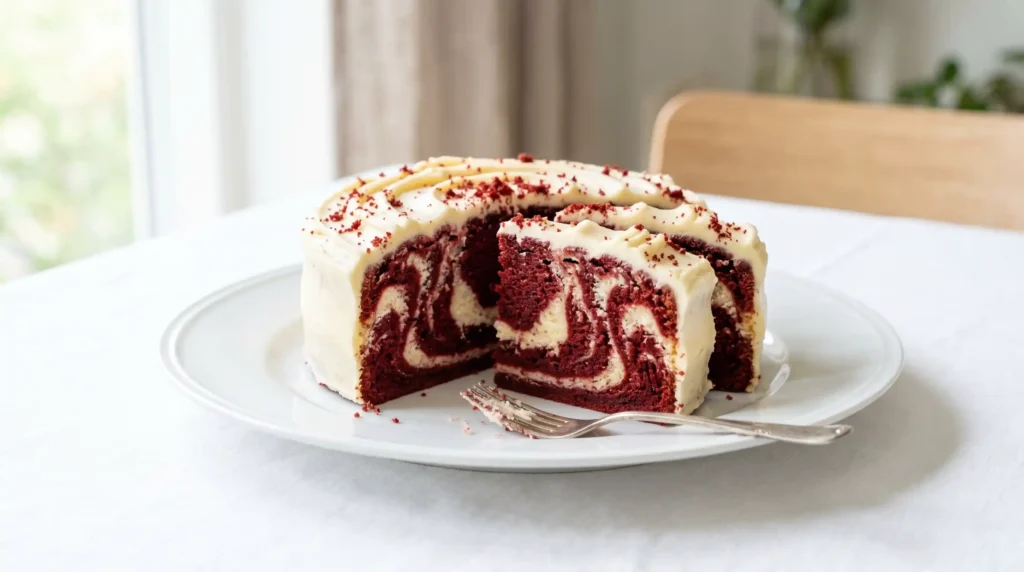
Servings: 10-12 slices | Prep Time: 25 minutes | Bake Time: 45-50 minutes | Total Time: ~1 hour 20 minutes
Okay, let me just say it — this Red Velvet & Vanilla Marble Cake is the kind of showstopper that makes people think you went to culinary school. You didn’t. And that’s the beauty of it.
This cake brings two crowd-favorites together in one gorgeous swirled loaf. The deep crimson of red velvet swirled with creamy vanilla batter? It is basically edible art. And yes, it tastes as good as it looks.
I first made this Red Velvet & Vanilla Marble Cake for a birthday party, expecting a polite response. Instead, I got three people asking for the recipe before dessert was even over. So here we are.
What Makes This Marble Cake So Special?
Most marble cakes just combine chocolate and vanilla. Fun, sure. But this version uses red velvet as the dramatic partner to vanilla, and the contrast is next-level — visually and flavor-wise.
Red velvet brings a subtle cocoa depth, a gentle tang from buttermilk, and of course that iconic color. Vanilla batter keeps things light, sweet, and smooth. Together, they create a layered, complex bite every single time.
The marbling effect also means no two slices look the same. IMO, that makes every piece feel like a little surprise. Who doesn’t love that?
Ingredients You Will Need
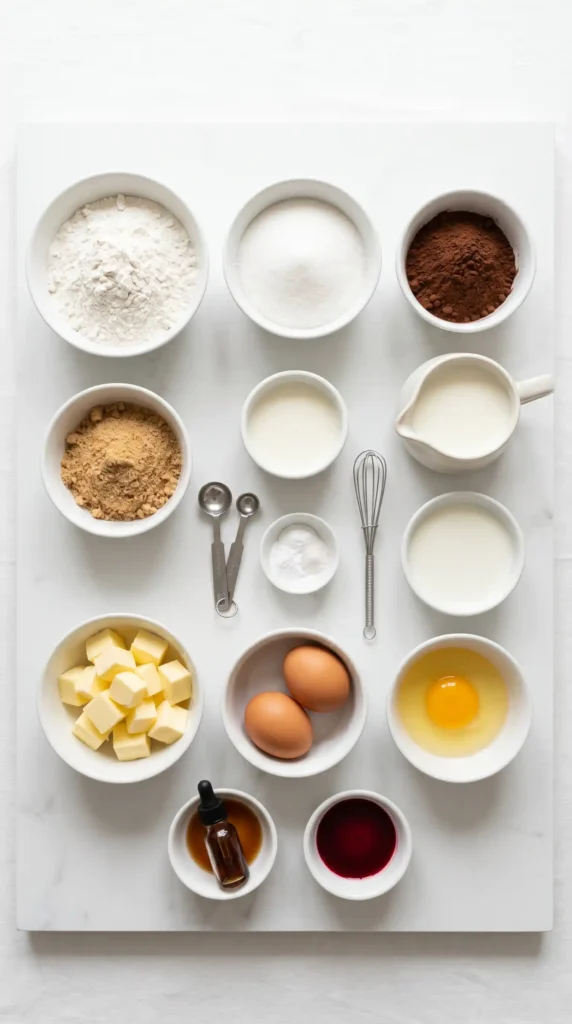
Here is what you need to pull off this beauty. Nothing here is exotic or hard to find – just pantry staples working overtime.
For the Vanilla Batter
- 1 and 1/2 cups (190g) all-purpose flour
- 1/2 cup (115g) unsalted butter, softened
- 3/4 cup (150g) granulated white sugar
- 2 large eggs, at room temperature
- 1/2 cup (120ml) whole milk
- 1 and 1/2 teaspoons pure vanilla extract
- 1 and 1/2 teaspoons baking powder
- 1/4 teaspoon salt
For the Red Velvet Batter
- 1 cup (125g) all-purpose flour
- 1/4 cup (25g) unsweetened cocoa powder
- 1/2 cup (115g) unsalted butter, softened
- 3/4 cup (150g) granulated white sugar
- 2 large eggs, at room temperature
- 1/2 cup (120ml) buttermilk
- 1 tablespoon red food coloring (gel or liquid)
- 1 teaspoon white vinegar
- 1 teaspoon baking soda
- 1/4 teaspoon salt
- 1 teaspoon pure vanilla extract
Optional Glaze (Highly Recommended)
- 1 cup (120g) powdered sugar
- 2 to 3 tablespoons whole milk
- 1/2 teaspoon vanilla extract
Equipment You Will Need
Before you start mixing, make sure you have the right tools. Nothing worse than realizing halfway through that you don’t have a loaf pan.
- 9×5 inch loaf pan (or two 8×4 inch pans for smaller loaves)
- Two large mixing bowls
- Electric hand mixer or stand mixer
- Rubber spatula for folding and scraping
- Wooden skewer or butter knife for swirling
- Wire cooling rack
How to Make Red Velvet & Vanilla Marble Cake: Step-by-Step
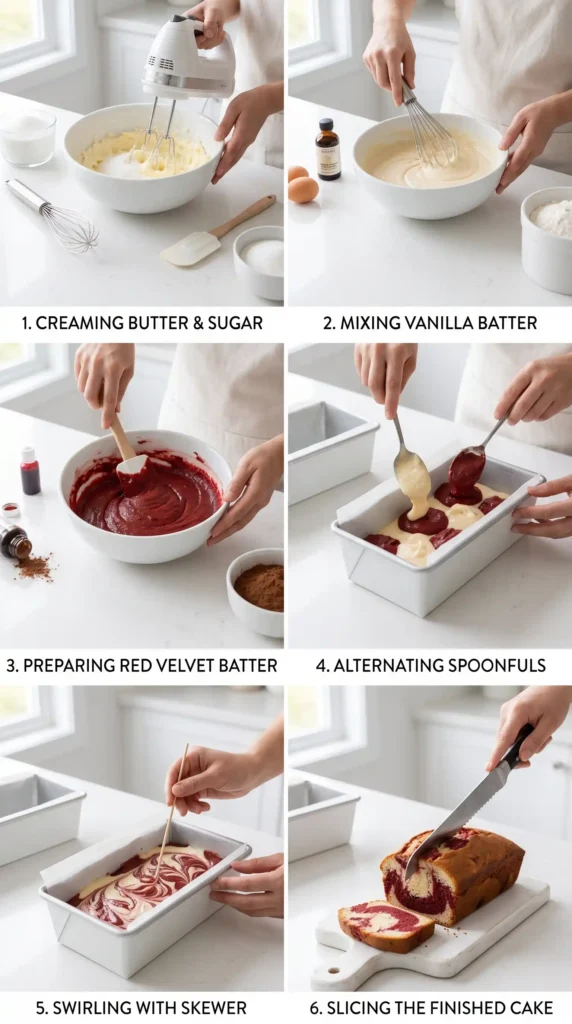
Alright, let’s actually make this thing. Follow these steps closely and you will end up with a cake that looks like it belongs on a dessert blog.
Step 1: Preheat and Prepare Your Pan
Start by preheating your oven to 350 degrees Fahrenheit (175 degrees Celsius). This is non-negotiable — a properly preheated oven ensures even baking from the very first minute.
While the oven heats up, grease your 9×5 inch loaf pan generously with butter or non-stick spray. Then dust it lightly with flour and tap out any excess. This prevents the cake from sticking and makes unmolding a clean, satisfying process.
If you want extra insurance, line the bottom of the pan with a strip of parchment paper, leaving an overhang on both sides. That way you can just lift the whole cake right out. Easy.
Step 2: Make the Vanilla Batter
Grab a large mixing bowl and beat the softened butter and sugar together using your electric mixer on medium-high speed. Do this for about 3 to 4 minutes until the mixture looks pale, fluffy, and noticeably increased in volume. Don’t rush this step — it builds the structure of your cake.
Next, add the eggs one at a time, beating well after each addition. Make sure each egg is fully incorporated before adding the next. Then pour in the vanilla extract and mix for another 30 seconds.
Now, alternate adding the flour mixture and the milk: add one-third of the flour, mix until just combined, add half the milk, mix, another third of flour, remaining milk, and finally the last of the flour. Always start and end with flour. Mix only until the batter just comes together — overmixing makes a dense cake, and nobody wants that.
Set this vanilla batter aside and rinse your mixer attachments. Time for the red velvet magic.
Step 3: Make the Red Velvet Batter
In your second large bowl, whisk together the flour, cocoa powder, baking soda, and salt. This is your dry mix — set it aside for a moment.
Using your electric mixer, beat the butter and sugar until light and fluffy, just like you did with the vanilla batter. Again, take the full 3 to 4 minutes here. The texture difference between properly creamed butter and rushed butter is significant.
Add the eggs one at a time, mixing well after each. Then add the vanilla extract, red food coloring, and white vinegar. Mix until everything is evenly combined and the batter looks a deep, vibrant red.
Now alternate adding your flour mixture and the buttermilk, just like you did with the vanilla batter. Start with flour, end with flour. Mix until just combined. The batter should be smooth, glossy, and that gorgeous deep crimson color.
Step 4: Layer and Swirl the Batters
Here comes the fun part. This is where the magic happens and where the Red Velvet & Vanilla Marble Cake earns its name.
Begin by dropping large spoonfuls of vanilla batter into the bottom of your prepared pan. Spread it loosely — it doesn’t need to be perfectly even. Then add large spoonfuls of red velvet batter on top and in between the vanilla dollops.
Continue alternating spoonfuls of both batters until both bowls are empty and the pan is filled roughly three-quarters of the way. You should already see a beautiful contrast of red and white.
Now take your wooden skewer or butter knife and draw figure-eight or S-shaped patterns through the batter. Go through the batter two or three times — not more. Over-swirling blends the batters together and you lose the marble effect. Trust the process and resist the urge to keep going.
Step 5: Bake the Cake
Slide the pan into your preheated oven and bake for 45 to 50 minutes. The cake is done when the top is set, a skewer inserted into the center comes out clean or with just a few moist crumbs, and the edges have pulled away slightly from the pan.
Around the 40-minute mark, check on the cake. If the top is browning too quickly, loosely tent it with foil for the remaining bake time. This prevents the crust from getting too dark while the center finishes baking.
Once done, let the cake cool in the pan for 15 minutes before turning it out onto a wire rack. Then allow it to cool completely before slicing or adding any glaze — cutting too early causes the cake to crumble.
Step 6: Make the Vanilla Glaze (Optional but Honestly, Do It)
Whisk together 1 cup powdered sugar, 2-3 tablespoons milk, and 1/2 teaspoon vanilla extract in a small bowl until smooth and pourable. If it looks too thick, add milk one teaspoon at a time. If it’s too thin, add more powdered sugar.
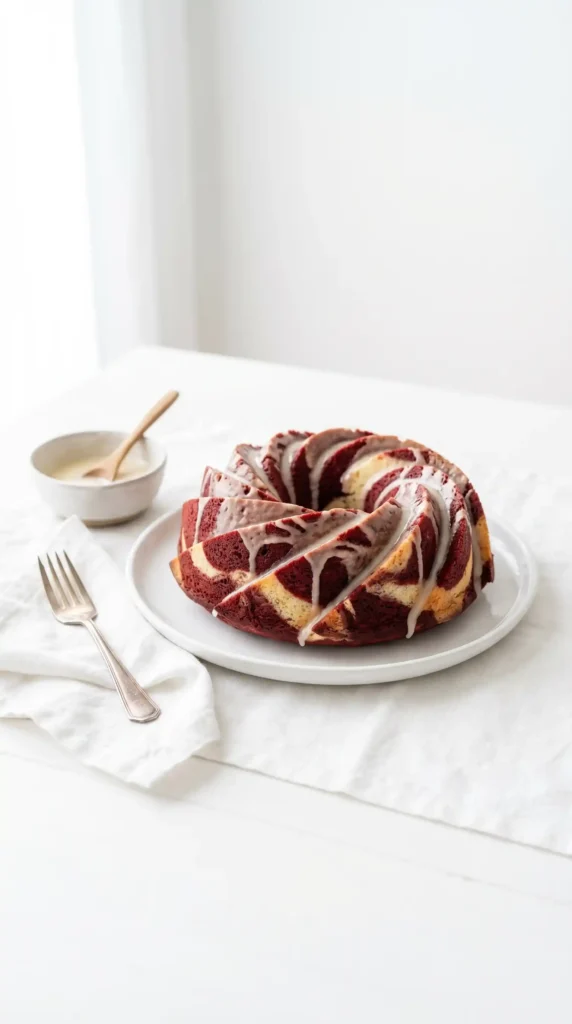
Once the cake has cooled completely, drizzle the glaze over the top in a slow, even stream. Let it drip naturally down the sides for a gorgeous, bakery-style finish. Allow the glaze to set for 10 to 15 minutes before slicing.
Pro Tips for the Perfect Marble Cake
Want to go from good to wow? Here are a few things I learned the hard way so you don’t have to.
- Always use room-temperature butter and eggs. Cold ingredients don’t emulsify properly and result in a lumpy batter.
- Gel food coloring gives a more vibrant red than liquid. A little goes a long way.
- Do not skip the white vinegar in the red velvet batter. It reacts with the baking soda to give the cake its signature tender crumb.
- Use full-fat buttermilk for the red velvet batter. It adds moisture and a subtle tang that makes a real difference.
- Measure your flour correctly — spoon it into the measuring cup and level off the top. Packing it in adds too much flour and dries out the cake.
How to Store Your Red Velvet & Vanilla Marble Cake
FYI, this cake stores really well, which makes it perfect for prepping ahead of time.
At room temperature: Cover the cake tightly with plastic wrap or store in an airtight container. It stays fresh for up to 3 days.
In the refrigerator: Wrap well and refrigerate for up to 6 days. Let it come to room temperature for 30 minutes before serving for the best texture.
Frozen: Wrap individual slices in plastic wrap, then place in a zip-lock bag. Freeze for up to 2 months. Thaw overnight in the fridge or at room temperature for an hour.
Frequently Asked Questions
Can I make this Red Velvet & Vanilla Marble Cake without buttermilk?
Yes, you can make a quick substitute. Add 1 tablespoon of white vinegar or lemon juice to 1/2 cup of regular milk and let it sit for 5 minutes. It curdles slightly and mimics buttermilk really well in this recipe.
Can I use a bundt pan instead of a loaf pan?
Absolutely. A 10-cup bundt pan works great. Just adjust the baking time to 50 to 60 minutes and check with a skewer. The marbling effect looks even more dramatic in a bundt shape.
Why did my marble cake turn pink instead of red?
This usually happens when the batters mix too much during the swirling step, or if you used liquid food coloring instead of gel. Gel coloring is much more concentrated and keeps the red vibrant even after baking.
Can I add cream cheese frosting instead of a glaze?
Yes, and honestly that is an upgrade. A simple cream cheese frosting pairs beautifully with the cocoa notes in the red velvet batter. Just make sure the cake is completely cool before frosting so it doesn’t slide off.
How do I know when the marble cake is done baking?
Insert a wooden skewer into the thickest part of the center. If it comes out clean or with just a couple of moist crumbs, the cake is done. If wet batter clings to it, give the cake another 5 minutes and test again.
Can I make this cake ahead of time?
Yes, this cake actually tastes better the next day once the flavors have had time to settle. Bake it the night before, wrap it well, and store at room temperature. Add the glaze just before serving.
Final Thoughts
This Red Velvet & Vanilla Marble Cake is one of those recipes that looks impressive but doesn’t demand expert-level skills. The steps are straightforward, the ingredients are easy to find, and the result is genuinely stunning.
Whether you’re making it for a birthday, a dinner party, or just because it’s Tuesday and you deserve something beautiful — this cake delivers every single time. So go ahead, preheat that oven and make something you are actually proud of. And when your friends ask where you learned to bake like this, feel free to take all the credit. You did the work
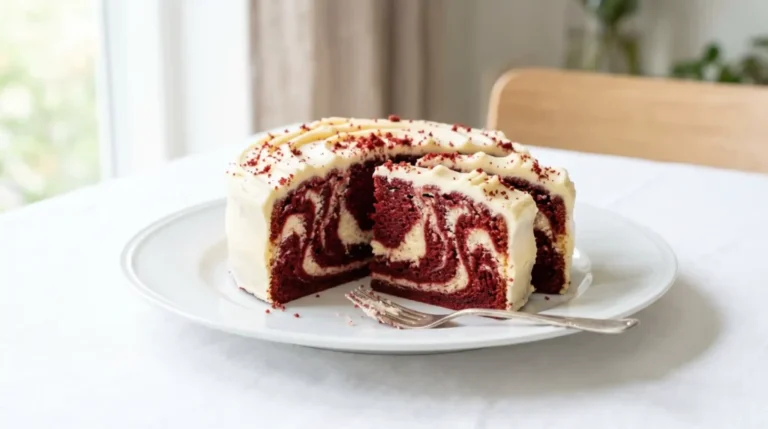
Red Velvet & Vanilla Marble Cake
Ingredients
Method
- Preheat your oven to 350 degrees Fahrenheit (175 degrees Celsius) and grease your 9x5 inch loaf pan with butter or non-stick spray.
- Dust the greased pan lightly with flour and tap out any excess.
- In a large bowl, beat the softened butter and sugar together with an electric mixer on medium-high speed for about 3 to 4 minutes until pale and fluffy.
- Add the eggs one at a time, beating well after each addition.
- Mix in the vanilla extract.
- Alternate adding flour and milk: add one-third of the flour, mix until combined, add half the milk, mix, then repeat with the flour and remaining milk.
- Mix until just combined and set the batter aside.
- In a second bowl, whisk together the flour, cocoa powder, baking soda, and salt.
- Beat the butter and sugar until light and fluffy for 3 to 4 minutes.
- Add the eggs one at a time, mixing well after each addition.
- Mix in the vanilla extract, red food coloring, and white vinegar until evenly combined.
- Alternate adding the dry mixture and buttermilk, starting and ending with dry mixture, mixing until just combined.
- Drop large spoonfuls of vanilla batter into the bottom of the prepared pan, followed by red velvet batter, alternating until both batters are used.
- Using a skewer or butter knife, swirl through the batters to create a marbled effect.
- Bake for 45 to 50 minutes until the top is set and a skewer inserted comes out clean.
- Let the cake cool in the pan for 15 minutes before turning it out onto a wire rack.
- In a small bowl, whisk together powdered sugar, milk, and vanilla extract until smooth and pourable.
- Drizzle the glaze over the cooled cake before serving.



